Build webapp with ExpressJS - VueJS (Vuex) - MongoDB (CRUD)
Mở đầu Như tiêu đề bài viết, nhân tiện mình đang tim hiểu về nodejs và dự án đang làm sử dụng vuejs thì bài viết lần này mình xin chia sẻ cách kết hợp giữa ExpressJS - VueJS - MongoDB để build webapp. A. Build server với Express Sử dụng đoạn code server như sau. const express = ...
Mở đầu
Như tiêu đề bài viết, nhân tiện mình đang tim hiểu về nodejs và dự án đang làm sử dụng vuejs thì bài viết lần này mình xin chia sẻ cách kết hợp giữa ExpressJS - VueJS - MongoDB để build webapp.
A. Build server với Express
- Sử dụng đoạn code server như sau.
const express = require('express')
const bodyParser = require('body-parser')
const cors = require('cors')
const morgan = require('morgan')
const mongoose = require('mongoose')
const app = express()
app.use(morgan('combined'))
app.use(bodyParser.json())
app.use(cors())
var Post = require("./post");

app.get('/posts', (req, res) => {
  Post.find({}, function (error, posts) {
	  if (error) { console.error(error); }
	  res.send({
			posts: posts
		})
	}).sort({_id:-1})
})

app.post('/create', (req, res) => {
	var title = req.body.title;
	var description = req.body.description;
	var newPost = new Post({
		title: title,
		description: description
	})

	newPost.save(function (error) {
		if (error) {
			console.log(error)
		}
		res.send({
			success: true
		})
	})
})

app.post('/posts/:id', (req, res) => {
	Post.findById(req.params.id, function (error, post) {
	  if (error) { console.error(error); }

	  post.title = req.body.title
	  post.description = req.body.description
	  post.save(function (error) {
			if (error) {
				console.log(error)
			}
			res.send({
				success: true
			})
		})
	})
})

app.get('/posts/:id', (req, res) => {
	Post.remove({
		_id: req.params.id
	}, function(err, post){
		if (err)
			res.send(err)
		res.send({
			success: true
		})
	})
})

mongoose.connect('mongodb://localhost:27017/mevn', { useNewUrlParser: true });
mongoose.connection.once("open", function(callback){
  console.log("Connection Succeeded");
});

app.listen(process.env.PORT || 3000)
Đoạn code trên cũng tương đối dễ hiểu, mình chỉ tóm tắt lại một vài cái mình dùng:
- body-parser: Đây là lớp trung gian, xỷ lý JSON, text và mã hóa URL.
- mongoose: kết nối server với database của mongodb
mongoose.connect('mongodb://localhost:27017/mevn', { useNewUrlParser: true });
mongoose.connection.once("open", function(callback){
  console.log("Connection Succeeded");
});

app.listen(process.env.PORT || 3000)
Thiết lập model Post
var mongoose = require("mongoose");
var Schema = mongoose.Schema;

var PostSchema = new Schema({
    title: String,
    description: String
});

var Post = mongoose.model("Post", PostSchema);
module.exports = Post;
Đây là file package.json để bạn có thể cấu trúc lại thư mục của mình cũng như là các package cần cài đặt.
{
  "name": "server",
  "version": "1.0.0",
  "description": "",
  "main": "index.js",
  "scripts": {
    "start": "./node_modules/nodemon/bin/nodemon.js src/app.js",
    "test": "echo "Error: no test specified" && exit 1"
  },
  "keywords": [],
  "author": "",
  "license": "ISC",
  "dependencies": {
    "body-parser": "^1.18.1",
    "cors": "^2.8.4",
    "express": "^4.15.4",
    "mongoose": "^5.2.8",
    "morgan": "^1.8.2",
    "nodemon": "^1.12.1"
  }
}
Vậy là build server vậy đã xong, bước tiếp theo ta sẽ build client sử dụng VueJS (Vuex)
B. Build client với VueJS
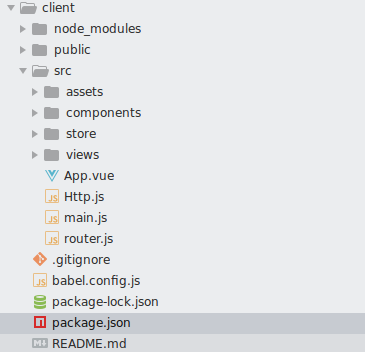
Trước tiên hãy xem qua cấu trúc thư mục của folder client (mình dụng vue@cli và cài đặt ở chế độ cơ bản nhất)
 Và điểm qua cách package ta sẽ sử dụng nhé
{
  "name": "client",
  "version": "0.1.0",
  "private": true,
  "scripts": {
    "serve": "vue-cli-service serve",
    "build": "vue-cli-service build"
  },
  "dependencies": {
    "axios": "^0.18.0",
    "vue": "^2.5.17",
    "vue-axios": "^2.1.3",
    "vue-router": "^3.0.1",
    "vue-sweetalert2": "^1.5.2",
    "vuex": "^3.0.1"
  },
  "devDependencies": {
    "@vue/cli-plugin-babel": "^3.0.1",
    "@vue/cli-service": "^3.0.1",
    "vue-template-compiler": "^2.5.17"
  },
  "postcss": {
    "plugins": {
      "autoprefixer": {}
    }
  },
  "browserslist": [
    "> 1%",
    "last 2 versions",
    "not ie <= 8"
  ]
}
Mình sẽ sử dung vuex theo dạng chia modules vì theo mình biết thực tế nếu những dự án lớn một chút thì chia theo modules sẽ dễ quản lý và nhìn các dòng code trông cũng sexy hơn.
import Vue from 'vue'
import Vuex from 'vuex'
import post from './modules/post'

Vue.use(Vuex)

const store = new Vuex.Store({
    modules: {
        post
    },
    strict: true
})

export default store
Module post sẽ được import vào store
import Http from '@/Http'

const state = {
    posts: [],
    post: {}
}

const getters = {
    getAllPosts: (state) => state.posts,
    getPost: (state) => state.post
}

const actions = {
    getPosts(context) {
        Http.get('/posts')
        .then(response => {
            context.commit('setPosts', response.data.posts);
        });
    },
    createPost(context, obj) {
        return new Promise((res, rej) => {
            Http.post('/create', obj)
            .then(response => {
                res(response);
            })
        })
    },
    updatePost(context, obj) {
        return new Promise((res, rej) => {
            Http.post('/posts/' + obj._id, obj)
            .then(response => {
                res(response);
            })
        })
    },
    getPost(context, id) {
        return new Promise((res, rej) => {
            Http.get('/post/' + id)
            .then(response => {
                res(response.data)
            })
        })
    },
    deletePost(context, id) {
        return new Promise((res, rej) => {
            Http.get('/posts/' + id)
            .then(response => {
                res(response)
            })
        })
    }
}

const mutations = {
    setPosts(state, posts) {
        state.posts = posts;
    },
    setPost(state, post) {
        state.post = post
    }
}

export default {
    state,
    getters,
    actions,
    mutations,
    namespaced: true
}
Vậy để chia theo được đúng nghĩa module thì trong module đó ta phải thêm gía trị namespaced: true, điều này mang ý nghĩa như thế nào? Gỉa sử các actions trong các modules có tên giống nhau thì mình sẽ không thể gọi được hay thậm chí nói chính xác hơn là vuex sẽ không hiểu rằng bạn muốn gọi action nào. Bởi vậy thay vì ta gọi this.$store.dispatch('methodName') thì ta sẽ ghi thành this.$store.dispatch('moduleName/methodName')
File router.js
import Vue from 'vue'
import Router from 'vue-router'
import ActionPost from './components/post/ActionPost'
import Posts from './components/post/Posts'
import Home from './components/home/Home'

Vue.use(Router)

export default new Router({
  mode: 'history',
  routes: [
    {
      path: '/',
      name: 'home',
      component: Home
    },
    {
      path: '/posts',
      name: 'posts',
      component: Posts
    },
    {
      path: '/posts/create',
      component: ActionPost,
      name: 'create'
    },
    {
      path: '/posts/:id/edit',
      component: ActionPost,
      name: 'edit'
    }
  ]
})
Ở đây mình sẽ set cho Create, Update sẽ sử dụng chung 1 component nên trong router mình chỉ cần set 2 path khác nhau là được
Điểm qua file Http.js
import Vue from 'vue'
import axios from 'axios'
import VueAxios from 'vue-axios'

const Http = {
    init() {
        Vue.use(VueAxios, axios)
        Vue.axios.defaults.baseURL = process.env.URL | 'http://localhost:3000'
    },

    get(url) {
        return Vue.axios
            .get(`${url}`)
            .catch((error) => {
                throw new Error(`[Error] Http ${error}`)
            })
    },

    post(resource, params) {
        return Vue.axios.post(`${resource}`, params)
    }
}

export default Http;
Nhìn sơ các bạn cũng biết để làm gì rồi đúng không? Cách làm việc của nó là nó sẽ kết nối đến server, mình override lại axios để sử dụng một cách thuận tiện nhất.
Giờ hãy xem file main.js và App.vue
import Vue from 'vue'
import App from './App.vue'
import router from './router'
import store from '@/store'
import Http from './Http';
import VueSweetalert2 from 'vue-sweetalert2'

Vue.use(VueSweetalert2)
Vue.config.productionTip = false
Http.init();

new Vue({
  router,
  store,
  render: h => h(App)
}).$mount('#app')
Dùng gì thì cho vào main.js và đừng quên gọi Http.init() nhé.
<template>
  <div id="app">
    <router-view/>
  </div>
</template>
Khi Vue@cli được khởi tạo thì cũng tạo ra trong folder một file index.html bạn thêm 3 dòng này vào thẻ head để sử dụng được bootstrap nhanh nhất nhé (nhớ rằng import lúc làm practice thôi nhé, project thật thì đừng làm không là ăn X đấy nhé
