Cách dùng ConstraintLayout
Nếu bạn đã quen với RelativeLayout, thì ConstrainLayout cũng sẽ cho bạn cảm giác như vậy. Tuy nhiên, ConstraintLayout linh hoạt hơn và có performs tốt hơn RelativeLayout. Để thêm ConstraintLayout vào dự án của bạn, hãy đặt các tệp sau vào tệp tin build.gradle của bạn // Add the Google maven ...

Nếu bạn đã quen với RelativeLayout, thì ConstrainLayout cũng sẽ cho bạn cảm giác như vậy. Tuy nhiên, ConstraintLayout linh hoạt hơn và có performs tốt hơn RelativeLayout. Để thêm ConstraintLayout vào dự án của bạn, hãy đặt các tệp sau vào tệp tin build.gradle của bạn
// Add the Google maven repository
repositories {
    maven {
        url 'https://maven.google.com'
    }
}

// Add to your app's dependencies
dependencies {
  compile 'com.android.support.constraint:constraint-layout:1.0.2'
}
Trước khi tìm hiểu một ví dụ sử dụng ContrainLayout thì hãy cùng xem một ví dụ sử dụng RelaytiveLayout nhé :
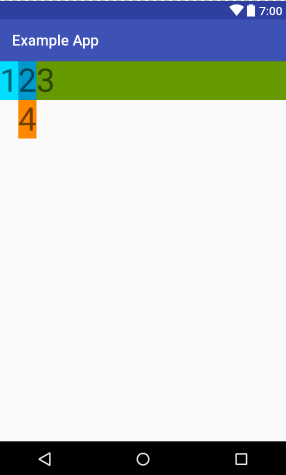 Đây là code cho layout :
<RelativeLayout
        android:layout_awidth="match_parent"
        android:layout_height="wrap_content">

        <TextView
            android:id="@+id/textView1"
            android:layout_awidth="wrap_content"
            android:layout_height="wrap_content"
            android:layout_alignParentLeft="true"
            android:background="@android:color/holo_blue_bright"
            android:text="1"
            android:textSize="44sp"/>

        <TextView
            android:id="@+id/textView2"
            android:layout_awidth="wrap_content"
            android:layout_height="wrap_content"
            android:layout_toRightOf="@+id/textView1"
            android:background="@android:color/holo_blue_dark"
            android:text="2"
            android:textSize="44sp"/>

        <TextView
            android:id="@+id/textView3"
            android:layout_awidth="wrap_content"
            android:layout_height="wrap_content"
            android:layout_alignParentRight="true"
            android:layout_toRightOf="@+id/textView2"
            android:background="@android:color/holo_green_dark"
            android:text="3"
            android:textSize="44sp"/>

        <TextView
            android:id="@+id/textView4"
            android:layout_awidth="wrap_content"
            android:layout_height="wrap_content"
            android:layout_below="@+id/textView1"
            android:layout_toRightOf="@+id/textView1"
            android:background="@android:color/holo_orange_dark"
            android:text="4"
            android:textSize="44sp"/>
</RelativeLayout>
Tương tự với ContrainLayout. Ta phải thêm các loại ràng buộc tương tự RelaytiveLayout :
<android.support.constraint.ConstraintLayout
    android:layout_awidth="match_parent"
    android:layout_height="wrap_content">

    <TextView
        android:id="@+id/textView1"
        android:layout_awidth="wrap_content"
        android:layout_height="wrap_content"
        app:layout_constraintLeft_toLeftOf="parent"
        android:background="@android:color/holo_blue_bright"
        android:text="1"
        android:textSize="44sp"/>

    <TextView
        android:id="@+id/textView2"
        android:layout_awidth="wrap_content"
        android:layout_height="wrap_content"
        app:layout_constraintLeft_toRightOf="@+id/textView1"
        android:background="@android:color/holo_blue_dark"
        android:text="2"
        android:textSize="44sp"/>

    <TextView
        android:id="@+id/textView3"
        android:layout_awidth="wrap_content"
        android:layout_height="wrap_content"
        app:layout_constraintRight_toRightOf="parent"
        app:layout_constraintLeft_toRightOf="@+id/textView2"
        android:background="@android:color/holo_green_dark"
        android:text="3"
        android:textSize="44sp"/>

    <TextView
        android:id="@+id/textView4"
        android:layout_awidth="wrap_content"
        android:layout_height="wrap_content"
        app:layout_constraintTop_toBottomOf="@+id/textView1"
        app:layout_constraintLeft_toRightOf="@+id/textView1"
        android:background="@android:color/holo_orange_dark"
        android:text="4"
        android:textSize="44sp"/>
</android.support.constraint.ConstraintLayout>
Tuy nhiên kết quả lại có chút khác biệt :
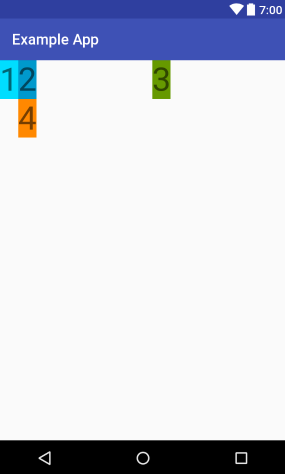 Điều đó bởi vì awidth của Textview được set là wrap-content, do đó nó chỉ cần chỉ cần không gian cần thiết để hiển thị. Ngược lại với RelativeLayout, phần không gian này sẽ được kéo dài để được xếp đúng vị trí .
Nếu muốn View được hiển thị giống như trên kia, bạn chỉ cần set awidth cho Textview là 0dp.
Điều đó bởi vì awidth của Textview được set là wrap-content, do đó nó chỉ cần chỉ cần không gian cần thiết để hiển thị. Ngược lại với RelativeLayout, phần không gian này sẽ được kéo dài để được xếp đúng vị trí .
Nếu muốn View được hiển thị giống như trên kia, bạn chỉ cần set awidth cho Textview là 0dp.
Như bạn thấy đó. ConstrainLayout có thể làm những điều tương tự như RelaytiveLayout, thậm chị còn nhiều hơn. Có một thứ khá tốt mà ConstrainLayout có được đó là Guideline. Bạn có thể đặt vị trí và kích thước cho View của bạn. Ví dụ sau , nếu bạn muốn Textview của mình chiếm 25% chiều rộng :
<android.support.constraint.ConstraintLayout
    android:layout_awidth="match_parent"
    android:layout_height="wrap_content">

    <android.support.constraint.Guideline
        android:id="@+id/guideline1"
        android:layout_awidth="wrap_content"
        android:layout_height="wrap_content"
        android:orientation="vertical"
        app:layout_constraintGuide_percent="0.25"/>

    <TextView
        android:id="@+id/textView1"
        android:layout_awidth="0dp"
        android:layout_height="wrap_content"
        android:background="@android:color/holo_blue_bright"
        android:text="1"
        android:textSize="44sp"
        app:layout_constraintLeft_toLeftOf="parent"
        app:layout_constraintRight_toLeftOf="@id/guideline1"/>

    <TextView
        android:id="@+id/textView2"
        android:layout_awidth="wrap_content"
        android:layout_height="wrap_content"
        android:background="@android:color/holo_blue_dark"
        android:text="2"
        android:textSize="44sp"
        app:layout_constraintLeft_toRightOf="@+id/textView1"/>

    <TextView
        android:id="@+id/textView3"
        android:layout_awidth="0dp"
        android:layout_height="wrap_content"
        android:background="@android:color/holo_green_dark"
        android:text="3"
        android:textSize="44sp"
        app:layout_constraintLeft_toRightOf="@+id/textView2"
        app:layout_constraintRight_toRightOf="parent"/>

    <TextView
        android:id="@+id/textView4"
        android:layout_awidth="wrap_content"
        android:layout_height="wrap_content"
        android:background="@android:color/holo_orange_dark"
        android:text="4"
        android:textSize="44sp"
        app:layout_constraintLeft_toRightOf="@+id/textView1"
        app:layout_constraintTop_toBottomOf="@+id/textView1"/>
</android.support.constraint.ConstraintLayout>
Một cải tiến lớn khác của RelativeLayout là hỗ trợ tab thiết kế . Trong khi bạn có thể tự viết xml như tôi đã làm ở trên, có một số công cụ sẽ giúp bạn dễ dàng hơn rất nhiều :
 Nội dung về ConstrainLayout còn rất nhiều , có lẽ mình sẽ viết tiếp vào thời gian tới.
Các bạn có thể tham khảo thêm tại đây https://developer.android.com/reference/android/support/constraint/ConstraintLayout.html.
Nội dung về ConstrainLayout còn rất nhiều , có lẽ mình sẽ viết tiếp vào thời gian tới.
Các bạn có thể tham khảo thêm tại đây https://developer.android.com/reference/android/support/constraint/ConstraintLayout.html.
