Cài đặt docker trên windows 10 home sử dụng Vagrant + Virtual Box
Cài đặt docker trên windows 10 home rất khó khăn, khi mà Hyper-V không hỗ trợ trên phiên bản này, chỉ hỗ trợ từ bản windows 10 pro trở lên. Nếu bạn có bản windows 10 pro thì có thể theo hướng dẫn từ trang docker: https://docs.docker.com/docker-for-windows/install/. Với bản windows 10 home thì ...

Cài đặt docker trên windows 10 home rất khó khăn, khi mà Hyper-V không hỗ trợ trên phiên bản này, chỉ hỗ trợ từ bản windows 10 pro trở lên. Nếu bạn có bản windows 10 pro thì có thể theo hướng dẫn từ trang docker: https://docs.docker.com/docker-for-windows/install/. Với bản windows 10 home thì không thể cài đặt docker theo hướng dẫn trên được. Các công cụ cần cài:
- Vagrant: https://www.vagrantup.com/downloads.html
- Virtual Box: https://www.virtualbox.org/wiki/Downloads Do windows 10 home không hỗ trợ Hyper-V, nên sẽ có cài đặt docker một cách trực tiếp. Để khắc phục vấn đề này, chúng ta sẽ cài docker trên môi trường linux ảo trên windows sử dụng vagrant + virtual box
1) Cài đặt môi trường linux ảo sử dung Vagrant + Virtual Box
Sau khi đã cài đặt xong vagrant và virtual box, tiếp theo chúng ta khởi tạo Vagrant file để cấu hình máy ảo sẽ chạy (ram, cpus, IP, share folder) theo lệch sau: (các bạn tạo một thư mục demo nào đó, sao đó dùng command line Cmd, Git Bash… để gõ lệnh tại chính thư mục này)
 Khi chạy lệnh này, sẽ sinh ra Vagrantfile chứa các thông tin máy ảo.
# -*- mode: ruby -*-
# vi: set ft=ruby :

# All Vagrant configuration is done below. The "2" in Vagrant.configure
# configures the configuration version (we support older styles for
# backwards compatibility). Please don't change it unless you know what
# you're doing.
Vagrant.configure("2") do |config|
  # The most common configuration options are documented and commented below.
  # For a complete reference, please see the online documentation at
  # https://docs.vagrantup.com.

  # Every Vagrant development environment requires a box. You can search for
  # boxes at https://vagrantcloud.com/search.
  config.vm.box = "base"

  # Disable automatic box update checking. If you disable this, then
  # boxes will only be checked for updates when the user runs
  # `vagrant box outdated`. This is not recommended.
  # config.vm.box_check_update = false

  # Create a forwarded port mapping which allows access to a specific port
  # within the machine from a port on the host machine. In the example below,
  # accessing "localhost:8080" will access port 80 on the guest machine.
  # NOTE: This will enable public access to the opened port
  # config.vm.network "forwarded_port", guest: 80, host: 8080

  # Create a forwarded port mapping which allows access to a specific port
  # within the machine from a port on the host machine and only allow access
  # via 127.0.0.1 to disable public access
  # config.vm.network "forwarded_port", guest: 80, host: 8080, host_ip: "127.0.0.1"

  # Create a private network, which allows host-only access to the machine
  # using a specific IP.
  # config.vm.network "private_network", ip: "192.168.33.10"

  # Create a public network, which generally matched to bridged network.
  # Bridged networks make the machine appear as another physical device on
  # your network.
  # config.vm.network "public_network"

  # Share an additional folder to the guest VM. The first argument is
  # the path on the host to the actual folder. The second argument is
  # the path on the guest to mount the folder. And the optional third
  # argument is a set of non-required options.
  # config.vm.synced_folder "../data", "/vagrant_data"

  # Provider-specific configuration so you can fine-tune various
  # backing providers for Vagrant. These expose provider-specific options.
  # Example for VirtualBox:
  #
  # config.vm.provider "virtualbox" do |vb|
  #   # Display the VirtualBox GUI when booting the machine
  #   vb.gui = true
  #
  #   # Customize the amount of memory on the VM:
  #   vb.memory = "1024"
  # end
  #
  # View the documentation for the provider you are using for more
  # information on available options.

  # Enable provisioning with a shell script. Additional provisioners such as
  # Puppet, Chef, Ansible, Salt, and Docker are also available. Please see the
  # documentation for more information about their specific syntax and use.
  # config.vm.provision "shell", inline: <<-SHELL
  #   apt-get update
  #   apt-get install -y apache2
  # SHELL
end
Giờ chúng ta sẽ cấu hình thử môi trường linux ảo:
- Ubuntu 18
- IP máy ảo: 192.168.33.10
- Ram: 2G
- 4 core CPUS Loại bỏ dấu # và thay đổi nội dung các dòng:
-
config.vm.box = "base" --> config.vm.box = "bento/ubuntu-18.04"
-
config.vm.network "private_network", ip: "192.168.33.10"
-
vb.gui = false
-
vb.memory = "2048"
-
Thêm vb.cpus = 4
Dưới đây là nội dung hoàn chỉnh sau khi thực hiện thay đổi
# -*- mode: ruby -*-
# vi: set ft=ruby :

# All Vagrant configuration is done below. The "2" in Vagrant.configure
# configures the configuration version (we support older styles for
# backwards compatibility). Please don't change it unless you know what
# you're doing.
Vagrant.configure("2") do |config|
  # The most common configuration options are documented and commented below.
  # For a complete reference, please see the online documentation at
  # https://docs.vagrantup.com.

  # Every Vagrant development environment requires a box. You can search for
  # boxes at https://vagrantcloud.com/search.
  config.vm.box = "bento/ubuntu-18.04"

  # Disable automatic box update checking. If you disable this, then
  # boxes will only be checked for updates when the user runs
  # `vagrant box outdated`. This is not recommended.
  # config.vm.box_check_update = false

  # Create a forwarded port mapping which allows access to a specific port
  # within the machine from a port on the host machine. In the example below,
  # accessing "localhost:8080" will access port 80 on the guest machine.
  # NOTE: This will enable public access to the opened port
  # config.vm.network "forwarded_port", guest: 80, host: 8080

  # Create a forwarded port mapping which allows access to a specific port
  # within the machine from a port on the host machine and only allow access
  # via 127.0.0.1 to disable public access
  # config.vm.network "forwarded_port", guest: 80, host: 8080, host_ip: "127.0.0.1"

  # Create a private network, which allows host-only access to the machine
  # using a specific IP.
    config.vm.network "private_network", ip: "192.168.33.10"

  # Create a public network, which generally matched to bridged network.
  # Bridged networks make the machine appear as another physical device on
  # your network.
  # config.vm.network "public_network"

  # Share an additional folder to the guest VM. The first argument is
  # the path on the host to the actual folder. The second argument is
  # the path on the guest to mount the folder. And the optional third
  # argument is a set of non-required options.
  # config.vm.synced_folder "../data", "/vagrant_data"

  # Provider-specific configuration so you can fine-tune various
  # backing providers for Vagrant. These expose provider-specific options.
  # Example for VirtualBox:
  #
   config.vm.provider "virtualbox" do |vb|
  #   # Display the VirtualBox GUI when booting the machine
     vb.gui = false
  #
  #   # Customize the amount of memory on the VM:
     vb.memory = "2048"
     vb.cpus = 4
   end
  #
  # View the documentation for the provider you are using for more
  # information on available options.

  # Enable provisioning with a shell script. Additional provisioners such as
  # Puppet, Chef, Ansible, Salt, and Docker are also available. Please see the
  # documentation for more information about their specific syntax and use.
  # config.vm.provision "shell", inline: <<-SHELL
  #   apt-get update
  #   apt-get install -y apache2
  # SHELL
end
Khi đã xong cấu hình máy ảo, tiếp tục chạy máy ảo này bằng lệnh: vagrant up
$ vagrant up
Bringing machine 'default' up with 'virtualbox' provider...
==> default: Importing base box 'bento/ubuntu-18.04'...
==> default: Matching MAC address for NAT networking...
==> default: Checking if box 'bento/ubuntu-18.04' version '201906.18.0' is up to date...
==> default: A newer version of the box 'bento/ubuntu-18.04' for provider 'virtualbox' is
==> default: available! You currently have version '201906.18.0'. The latest is version
==> default: '201910.20.0'. Run `vagrant box update` to update.
==> default: Setting the name of the VM: demo_default_1572423736667_96610
==> default: Clearing any previously set network interfaces...
==> default: Preparing network interfaces based on configuration...
    default: Adapter 1: nat
    default: Adapter 2: hostonly
==> default: Forwarding ports...
    default: 22 (guest) => 2222 (host) (adapter 1)
==> default: Running 'pre-boot' VM customizations...
==> default: Booting VM...
==> default: Waiting for machine to boot. This may take a few minutes...
    default: SSH address: 127.0.0.1:2222
    default: SSH username: vagrant
    default: SSH auth method: private key
    default:
    default: Vagrant insecure key detected. Vagrant will automatically replace
    default: this with a newly generated keypair for better security.
    default:
    default: Inserting generated public key within guest...
==> default: Machine booted and ready!
==> default: Checking for guest additions in VM...
==> default: Configuring and enabling network interfaces...
==> default: Mounting shared folders...
Sau khi khởi động xong máy ảo, tiếp đó ta phải ssh vào máy ảo này để cài đặt docker. Thực hiện lệnh sau để ssh vào máy ảo: vagrant ssh
$ vagrant ssh
Welcome to Ubuntu 18.04.2 LTS (GNU/Linux 4.15.0-51-generic x86_64)

 * Documentation:  https://help.ubuntu.com
 * Management:     https://landscape.canonical.com
 * Support:        https://ubuntu.com/advantage

  System information as of Wed Oct 30 08:26:35 UTC 2019

  System load:  0.02              Processes:           120
  Usage of /:   2.5% of 61.80GB   Users logged in:     0
  Memory usage: 6%                IP address for eth0: 10.0.2.15
  Swap usage:   0%                IP address for eth1: 192.168.33.10

0 packages can be updated.
0 updates are security updates.
Ngon lành, giờ chúng ta sẽ xem máy ảo có cấu hình đúng hay chưa bằng lệnh htop
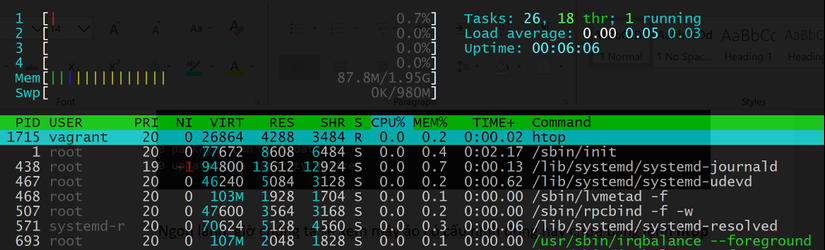
Đúng như cấu hình mong đợi, 4 cores, 2G ram
2) Cài đặt Docker
Từ máy ảo, chúng ta thực hiện các bước sau:
- Đầu tiên, cập nhật hệ thống: sudo apt update
- Tiếp đó, cài đặt một số thư viện, để apt sử dụng thư viện qua giao thức HTTPS sudo apt install apt-transport-https ca-certificates curl software-properties-common
- Thêm GPG key, để hệ thống thêm Docker vào nguồn cài đặt của hệ thống curl -fsSL https://download.docker.com/linux/ubuntu/gpg | sudo apt-key add – sudo add-apt-repository "deb [arch=amd64] https://download.docker.com/linux/ubuntu bionic stable"
- Update package database: sudo apt update
- Tiếp theo, kiểm tra phiên bản docker có thể cài đặt apt-cache policy docker-ce
[email protected]:~$ apt-cache policy docker-ce
docker-ce:
  Installed: (none)
  Candidate: 5:19.03.4~3-0~ubuntu-bionic
  Version table:
     5:19.03.4~3-0~ubuntu-bionic 500
        500 https://download.docker.com/linux/ubuntu bionic/stable amd64 Packages
     5:19.03.3~3-0~ubuntu-bionic 500
        500 https://download.docker.com/linux/ubuntu bionic/stable amd64 Packages
     5:19.03.2~3-0~ubuntu-bionic 500
        500 https://download.docker.com/linux/ubuntu bionic/stable amd64 Packages
     5:19.03.1~3-0~ubuntu-bionic 500
        500 https://download.docker.com/linux/ubuntu bionic/stable amd64 Packages
     5:19.03.0~3-0~ubuntu-bionic 500
        500 https://download.docker.com/linux/ubuntu bionic/stable amd64 Packages
     5:18.09.9~3-0~ubuntu-bionic 500
        500 https://download.docker.com/linux/ubuntu bionic/stable amd64 Packages
     5:18.09.8~3-0~ubuntu-bionic 500
        500 https://download.docker.com/linux/ubuntu bionic/stable amd64 Packages
     5:18.09.7~3-0~ubuntu-bionic 500
        500 https://download.docker.com/linux/ubuntu bionic/stable amd64 Packages
     5:18.09.6~3-0~ubuntu-bionic 500
        500 https://download.docker.com/linux/ubuntu bionic/stable amd64 Packages
     5:18.09.5~3-0~ubuntu-bionic 500
        500 https://download.docker.com/linux/ubuntu bionic/stable amd64 Packages
     5:18.09.4~3-0~ubuntu-bionic 500
        500 https://download.docker.com/linux/ubuntu bionic/stable amd64 Packages
     5:18.09.3~3-0~ubuntu-bionic 500
        500 https://download.docker.com/linux/ubuntu bionic/stable amd64 Packages
     5:18.09.2~3-0~ubuntu-bionic 500
        500 https://download.docker.com/linux/ubuntu bionic/stable amd64 Packages
     5:18.09.1~3-0~ubuntu-bionic 500
        500 https://download.docker.com/linux/ubuntu bionic/stable amd64 Packages
     5:18.09.0~3-0~ubuntu-bionic 500
        500 https://download.docker.com/linux/ubuntu bionic/stable amd64 Packages
     **18.06.3~ce~3-0~ubuntu** 500
        500 https://download.docker.com/linux/ubuntu bionic/stable amd64 Packages
     18.06.2~ce~3-0~ubuntu 500
        500 https://download.docker.com/linux/ubuntu bionic/stable amd64 Packages
     18.06.1~ce~3-0~ubuntu 500
        500 https://download.docker.com/linux/ubuntu bionic/stable amd64 Packages
     18.06.0~ce~3-0~ubuntu 500
        500 https://download.docker.com/linux/ubuntu bionic/stable amd64 Packages
     18.03.1~ce~3-0~ubuntu 500
        500 https://download.docker.com/linux/ubuntu bionic/stable amd64 Packages
Chọn bản mới nhất 18.06.3~ce~3-0~ubuntu Chạy lệnh sau để cài đặt: sudo apt install docker-ce=18.06.3~ce~3-0~ubuntu Kiểm tra docker đã cài hay chưa: sudo systemctl status docker
[email protected]:~$ sudo systemctl status docker
● docker.service - Docker Application Container Engine
   Loaded: loaded (/lib/systemd/system/docker.service; enabled; vendor preset: enabled)
   Active: active (running) since Wed 2019-10-30 09:38:04 UTC; 52s ago
     Docs: https://docs.docker.com
 Main PID: 16590 (dockerd)
    Tasks: 27
   CGroup: /system.slice/docker.service
           ├─16590 /usr/bin/dockerd -H fd://
           └─16614 docker-containerd --config /var/run/docker/containerd/containerd.toml

Oct 30 09:38:03 vagrant dockerd[16590]: time="2019-10-30T09:38:03.814713710Z" level=info msg="ClientConn switc
Oct 30 09:38:03 vagrant dockerd[16590]: time="2019-10-30T09:38:03.814781234Z" level=info msg="pickfirstBalance
Oct 30 09:38:03 vagrant dockerd[16590]: time="2019-10-30T09:38:03.815779979Z" level=info msg="pickfirstBalance
Oct 30 09:38:03 vagrant dockerd[16590]: time="2019-10-30T09:38:03.815853428Z" level=info msg="Loading containe
Oct 30 09:38:04 vagrant dockerd[16590]: time="2019-10-30T09:38:04.253278482Z" level=info msg="Default bridge (
Oct 30 09:38:04 vagrant dockerd[16590]: time="2019-10-30T09:38:04.544635809Z" level=info msg="Loading containe
Oct 30 09:38:04 vagrant dockerd[16590]: time="2019-10-30T09:38:04.612997170Z" level=info msg="Docker daemon" c
Oct 30 09:38:04 vagrant dockerd[16590]: time="2019-10-30T09:38:04.613323876Z" level=info msg="Daemon has compl
Oct 30 09:38:04 vagrant dockerd[16590]: time="2019-10-30T09:38:04.652692598Z" level=info msg="API listen on /v
Oct 30 09:38:04 vagrant systemd[1]: Started Docker Application Container Engine.
OK!!!! Đã cài thành công docker, giờ chạy thử hello-world docker nhé (chú ý lệnh chạy docker, phải chạy với lênh root sudo) sudo docker run hello-world
[email protected]:~$ sudo docker run hello-world
Unable to find image 'hello-world:latest' locally
latest: Pulling from library/hello-world
1b930d010525: Pull complete
Digest: sha256:c3b4ada4687bbaa170745b3e4dd8ac3f194ca95b2d0518b417fb47e5879d9b5f
Status: Downloaded newer image for hello-world:latest

Hello from Docker!
This message shows that your installation appears to be working correctly.

To generate this message, Docker took the following steps:
 1. The Docker client contacted the Docker daemon.
 2. The Docker daemon pulled the "hello-world" image from the Docker Hub.
    (amd64)
 3. The Docker daemon created a new container from that image which runs the
    executable that produces the output you are currently reading.
 4. The Docker daemon streamed that output to the Docker client, which sent it
    to your terminal.

To try something more ambitious, you can run an Ubuntu container with:
 $ docker run -it ubuntu bash

Share images, automate workflows, and more with a free Docker ID:
 https://hub.docker.com/

For more examples and ideas, visit:
 https://docs.docker.com/get-started/
Vậy là chúng ta đã cài đặt docker thành công trên windows 10 home. Trong quá trình dev, thì chỉ việc chạy máy ảo linux bằng lệnh: vagrant up và lệnh vagrant ssh vào máy ảo để dev tiếp nhé.
