Game đơn giản Maze cho iPhone
Mở Xcode và tạo Project, chọn chế độ Single View Application Chọn Use Authomatic Reference Counting, không chọn vào Use Storyboard. Click vào next and create Chọn Landscape Right ở trong Supported Interface Orientations để app ko rotate khi user xoay iPhone. Ẩn thanh công cụ của iPhone ...
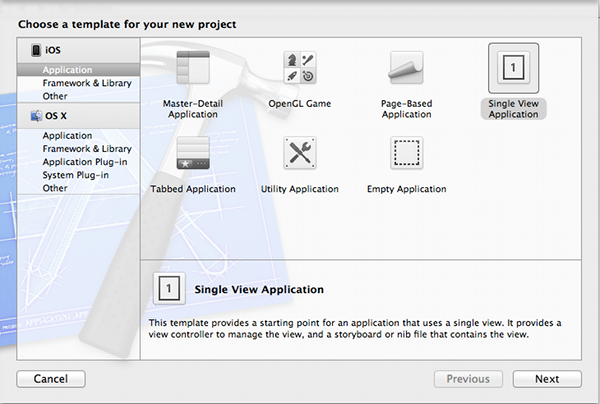
Mở Xcode và tạo Project, chọn chế độ Single View Application
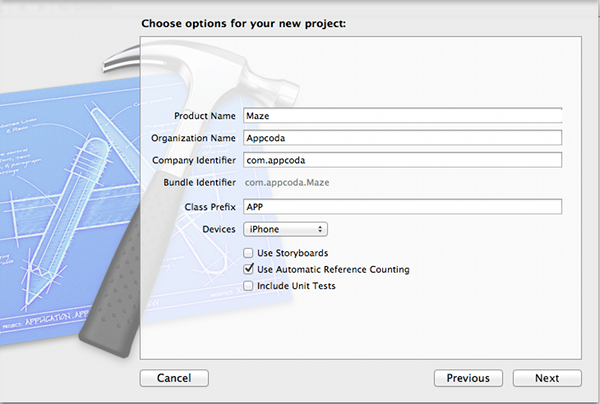
Chọn Use Authomatic Reference Counting, không chọn vào Use Storyboard. Click vào next and create
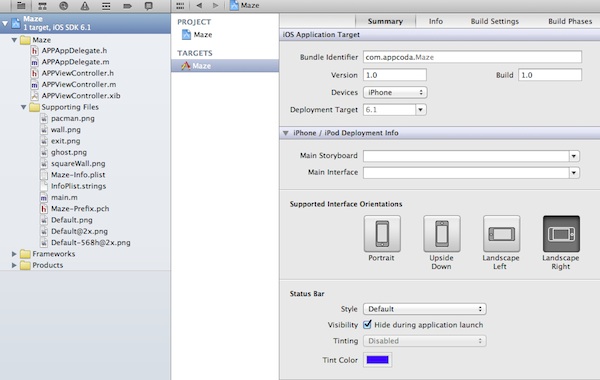
Chọn Landscape Right ở trong Supported Interface Orientations để app ko rotate khi user xoay iPhone. Ẩn thanh công cụ của iPhone bang cách chọn vạo Hide during application launch ở mục Status Bar.
Thiết kế Maze và nhân vật Game
Chọn AppViewController.xib từ Xcode Navigator để hiển thị View Controller trên Editor Pane. Từ list object thì chọn UIView để thay đổi 1 vài thuộc tính của nó. Từ Utility Pane, chọn Attributes Inspector và thay đổi như dưới
- Thiết lập orientation về Landscape
- Thiết lập status bar option về None
- Thay đổi the background về black

Chèn Images vào Project
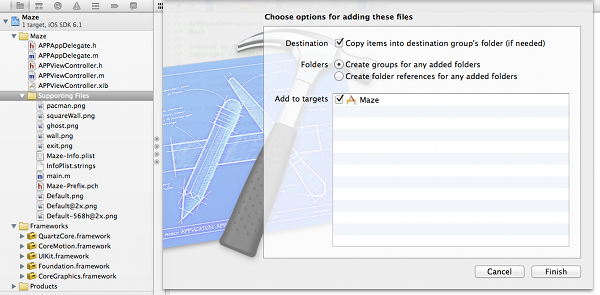
Tiếp, chúng ta phải add tất cả các graphics sử dụng trong project này.


Sau khi down về thì add vào project.
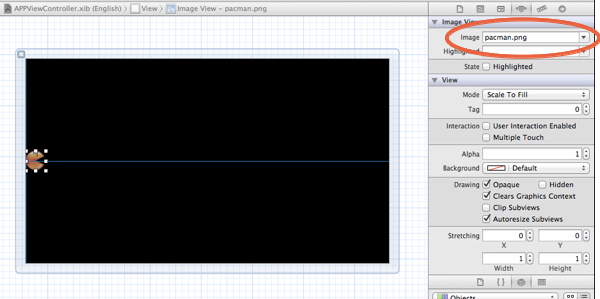
Drag 1 UIImageView từ object library và place vào bên trài của screen. Chọn UIImageView và chọn Attributes Inspector. Chọn file pacman.png. Chỉnh size cho anh. Từu màn hình Xcode, chọn Editor -> Size to Fit Content.
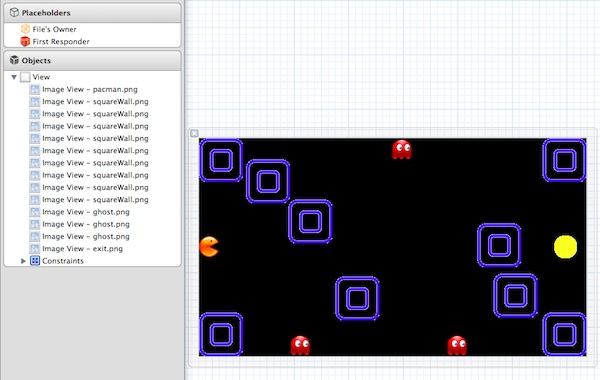
Lặp lại các bước trên cho phần ảnh còn lại. Cho tất cả element vào vị trí như dưới. Các ghost đc đặt ở gần cạnh màn hình.
Liên kết Image View với Code
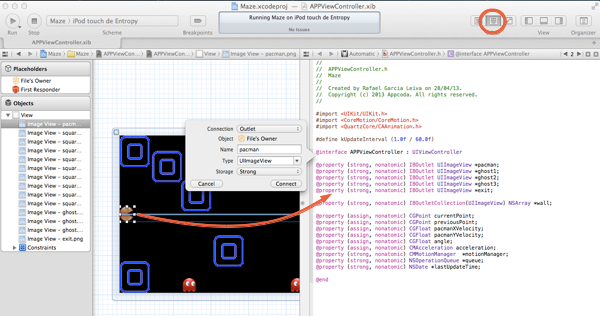
Cuối cùng, phải tạo IBOutlets cho UIIamgeViews chúng ta vừa mới create. Để làm vậy thì chọn AppVIewController.xib và thay dổi Editor về Assistant mode. AppViewController.h sẽ đc mở. Ấn Control key và kéo từ UIImageView về AppViewController.h để tạo IBOutlet. Chọn name là pacman, type là UIImageView và lưu là Strong.
Lặp lại cùng cách làm với 3 ghost. Đặt tên là ghost1, ghost2, ghost3.
Đối với wall thì phải dung kĩ thuật khác. Thay vì sử dụng IBOutlet ta phải sử dụng IBOutletCollection. Điều này cho pép chúng ta kết hợp tất cả với object NSArray. Chọn wall bất kì và drag vào AppViewController.php.
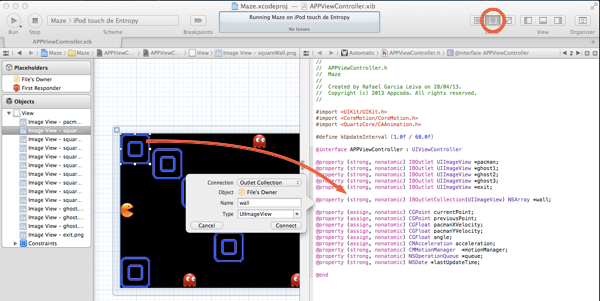
Để connections, chọn Outlet Collections. Đặt tên là Wall với type là UIIamgeView. Còn phần image wall còn lại thì sử dụng phương thức tương tự với outlet connections.
Code thì sẽ như file AppViewController.h dưới đây
@interface APPViewController : UIViewController

@property (strong, nonatomic) IBOutlet UIImageView *pacman;
@property (strong, nonatomic) IBOutlet UIImageView *ghost1;
@property (strong, nonatomic) IBOutlet UIImageView *ghost2;
@property (strong, nonatomic) IBOutlet UIImageView *ghost3;
@property (strong, nonatomic) IBOutlet UIImageView *exit;

@property (strong, nonatomic) IBOutletCollection(UIImageView) NSArray *wall;

@end
Chèn thêm Frameworks cần thiết
Chúng ta cần CoreMotion framework để sử dụng accelerometer. Đây là framework ko đc include trong default application cho nên cần phải add vào bằng tay. Chọn project từ Navigator. Trong pane editor chọn Buil Phases và mở Link Binary With Libraries.
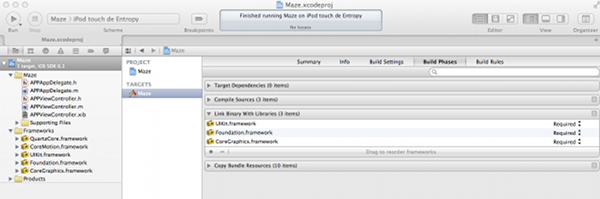
Next click on the “+” button to open the list of available frameworks, and from that list, select the CoreMotion and click add:

Chọn vào nút + để mở list của nhưng framework, chọn CoreMotion và add.
Hơn tất cả, chúng ta cần import QuartzCore framework. Đây là tập hợp các API để xử lý ảnh và video. Chúng ta sẽ sử dụng lớp CABasicAnimation để tạo những animation cơ bản.
Thiết lập chuyển động the Ghost Images bằng QuartzCore
Chúng ta phải config tất cả nhưng elements được yêu cầu bởi game. Đầu tiên chúng ta sẽ animate ảnh của ghost.
#import <QuartzCore/CAAnimation.h>;
Như đã nói ở trên, chúng ta sử dụng lớp CABasicAnimation của QuartzCore để animate ghost. Đầu tiên, ta phải include những file header. Mở AppViewController.h và chèn đoạn code sau.
CGPoint origin1 = self.ghost1.center;
CGPoint target1 = CGPointMake(self.ghost1.center.x, self.ghost1.center.y-124);

CABasicAnimation *bounce1 = [CABasicAnimation animationWithKeyPath:@“position.y”];
bounce1.fromValue = [NSNumber numberWithInt:origin1.y];
bounce1.toValue = [NSNumber numberWithInt:target1.y];
bounce1.duration = 2;
bounce1.autoreverses = YES;
bounce1.repeatCount = HUGE_VALF;

[self.ghost1.layer addAnimation:bounce1 forKey:@“position”];
Tiếp, mở AppViewController.m và chèn đoạn code như dưới trong viewDidLoad method để animate ghost đầu tiên
Ở 2 hàng đầu tiên, chúng ta định nghĩa điểm bắt đầu và kết thúc của animations. Sau khi create CABasicAnimations bằng việc chỉ định rằng chúng ta muốn di chuyển theo trục x từ origin.y đến target.y point. Chúng ta cũng thiết lập khoảng time cho animations này là 2 giây. Nói 1 cách khác, ghost image nên trở về vị trí ban đầu khi nó chạm vào target points. Cuối cùng, chúng ta muốn animation này lặp lại mãi mãi do đó, chúng ta set repeatCount thành HUGE_VALF.
CGPoint origin2 = self.ghost2.center;
CGPoint target2 = CGPointMake(self.ghost2.center.x, self.ghost2.center.y+284);
CABasicAnimation *bounce2 = [CABasicAnimation animationWithKeyPath:@“position.y”];
bounce2.fromValue = [NSNumber numberWithInt:origin2.y];
bounce2.toValue = [NSNumber numberWithInt:target2.y];
bounce2.duration = 2;
bounce2.repeatCount = HUGE_VALF;
bounce2.autoreverses = YES;
[self.ghost2.layer addAnimation:bounce2 forKey:@“position”];

CGPoint origin3 = self.ghost3.center;
CGPoint target3 = CGPointMake(self.ghost3.center.x, self.ghost3.center.y-284);
CABasicAnimation *bounce3 = [CABasicAnimation animationWithKeyPath:@“position.y”];
bounce3.fromValue = [NSNumber numberWithInt:origin3.y];
bounce3.toValue = [NSNumber numberWithInt:target3.y];
bounce3.duration = 2;
bounce3.repeatCount = HUGE_VALF;
bounce3.autoreverses = YES;
[self.ghost3.layer addAnimation:bounce3 forKey:@“position”];
Xử lý tương tự với 2 ghost, code như phía dưới.
CGPoint origin2 = self.ghost2.center;
CGPoint target2 = CGPointMake(self.ghost2.center.x, self.ghost2.center.y+284);
CABasicAnimation *bounce2 = [CABasicAnimation animationWithKeyPath:@“position.y”];
bounce2.fromValue = [NSNumber numberWithInt:origin2.y];
bounce2.toValue = [NSNumber numberWithInt:target2.y];
bounce2.duration = 2;
bounce2.repeatCount = HUGE_VALF;
bounce2.autoreverses = YES;
[self.ghost2.layer addAnimation:bounce2 forKey:@“position”];

CGPoint origin3 = self.ghost3.center;
CGPoint target3 = CGPointMake(self.ghost3.center.x, self.ghost3.center.y-284);
CABasicAnimation *bounce3 = [CABasicAnimation animationWithKeyPath:@“position.y”];
bounce3.fromValue = [NSNumber numberWithInt:origin3.y];
bounce3.toValue = [NSNumber numberWithInt:target3.y];
bounce3.duration = 2;
bounce3.repeatCount = HUGE_VALF;
bounce3.autoreverses = YES;
[self.ghost3.layer addAnimation:bounce3 forKey:@“position”];
Compile and Test the App
Sau khi compile và chạy thử, nếu mọi thứ ổn, bạn sẽ thấy pacman và maze.
Tham khảo : http://www.appcoda.com/ios-game-tutorial-maze-part-1/
