Giới thiệu MotionLayout
MotionLayout là 1 class mới trong thư viện ConstraintLayout 2.0, giúp developer Android quản lý các motion và widget animation trong ứng dụng. Trong bài viết này sẽ hướng dẫn bạn cách thêm library vào application và bắt đầu sử dụng những khái niêm và tính năng của MotionLayout. Note: Library ...
MotionLayout là 1 class mới trong thư việnConstraintLayout 2.0, giúp developer Android quản lý các motion và widget animation trong ứng dụng. Trong bài viết này sẽ hướng dẫn bạn cách thêm library vào application và bắt đầu sử dụng những khái niêm và tính năng của MotionLayout. Note:
Library là bản alpha 1, và có thể thay đổi trước khi release chính thức. During the alpha release cycle specifically, changes in API / naming are more likely, in reaction Trong chu kỳ phát hành alpha cụ thể, các thay đổi về API/ naming là có nhiều khả năng. Vui lòng báo cáo mọi lỗi hoặc yêu cầu tính năng trên issue tracker, dưới ConstraintLayout component.
1. Why MotionLayout?
Android framework đã cung cấp một vài cách để adding animation trong application:
- Animated Vector Drawable
- Property Animation framework
- LayoutTransition animations
- Layout transitions with TransitionManager
- CoordinatorLayout Phần này sẽ trình bày MotionLayout khác với các giải pháp hiện có MotionLayout, như tên của nó, là layout đầu tiên của tất cả các layout có nghĩa là các layout phải được đặt bên trong MotionLayout. Nó thực chất là subclass của ConstraintLayout, được xây dựng dựa trên khả năng bố cục phong phú của nó. MotionLayout được tạo ra để thu hẹp khoảng cách giữa layout transition và xử lý motion phức tạp. Bạn có thể nghĩ nó về mặt khả năng về mặt pha trộn giữa property animation framework, TransitionManager, and CoordinatorLayout.
A mix between the property animation framework, layout transitions with TransitionManager, and CoordinatorLayout
Nó cho phép bạn mô tả transition giữa 2 layout (giống TransitionManager), nhưng cũng có thể animation cho bất cứ properties nào (không chỉ là layout attributes). Hơn thế nó, nó hỗ trợ seekable transition, giống CoordinatorLayout (transition có thể điều khiển hoàn toàn bỷ touch và transition đến 1 điểm bất kỳ ngay lập tức). Nó hỗ trợ xử lý touch và keyframes, cho phép developer dễ dàng customize transition theo nhu cầu của riêng họ.
MotionLayout is fully declarative
Ngoài phạm vi này, sự khác biệt chính khác là Motionlayout được khai báo đầy đủ - bạn hoàn toàn có thể mô tả trong file XML complex transition - no code is expected (nếu bạn cần thể hiện motion trong code, animation framework property đã cung cấp một cách tuyệt vời để thực hiện nó).
MotionLayout tooling
While we are actively working on this tool, it’s not available yet. It will likely be available once the library reaches stable / beta.

Cuối cùng, như 1 phần của ConstraintLayout 2.0, nó support tương thích ngược với cấp API 18
2 Limitations
MotionLayout sẽ chỉ cung cấp khả năng của nó cho direct children - trái với TransitionManager, nó có thể làm việc với nested layout hierarchies cũng như Activity transition.
3 When to use it
Bạn sử dụng nó khi bạn muốn move, resize hoặc animate các phần tử UI thực tế -button, title bar, ... - phần tử mà user có thể tương tác.
Use MotionLayout when animating UI elements the user will interact with
Điều quan trọng là nhận ra rằng motion thực hiện một số mục đích - nó không đơn giản là hiệu ứng đặc biệt vô cớ trong application, nó nên được sử dụng để giúp user hiểu được application đang làm. Material Design principles website là introduction tốt giới thiệu các khái niệm để tham khảo.
4 Adding MotionLayout to your project
Add ConstraintLayout 2.0 in Gradle file:
dependencies {
    implementation 'com.android.support.constraint:constraint-layout:2.0.0-alpha1'
    }
5 Using MotionLayout
Motionlayout là subclass của ConstraintLayout, bạn có thể đối xử với nó như layout bình thường. Để chuyển Constraintlayout đã tồn tại sang MotionLayout rất dễ dàng bằng cách thay thể class name from:
<android.support.constraint.ConstraintLayout .../>
to Motionlayout:
<android.support.constraint.motion.MotionLayout .../>
Sự khác biệt chính giữ ConstraintLayout với Motionlayout ở XML là mô tả thực tế những gì MotionLayout sẽ làm không nhất thiết phải chứ trong tệp sơ đồ bố trí. Thay vào đó MotionLayout thường giữ tất cả thông tin này trong tệp XML mà nó tham chiếu vào thông tin này sẽ được ưu tiên hơn thông tin trong layout file. Bằng vào cách này layout file có thể chỉ chứa View và properties - không phải position hoặc chuyển động của chúng.
ConstraintSets
Nếu bạn chưa ConstraintSets với ConstraintLayout, bạn nên xem đoạn video ngắn dưới đây from Sean McQuillan (@objcode): ConstraintSet animation Ý tưởng chung với ConstraintSet là chúng đóng gói tất cả các quy tác cho layout của bạn và bạn có thể sử dụng multiple ConstraintSet, bạn có thể quyết định tập các quy tắc nào đó của mình để áp dụng,mà không phhair tạo lại các views của bạn.
Kết hợp với TransitionManager, nó cung cấp một cách tương đối dễ dàng để tạo animations với ConstraintLayout, như video ở trên.
MotionLayout cơ bản được xây dựng trene ý tưởng này và mở rộng khá niệm này nhiều hơn nữa.
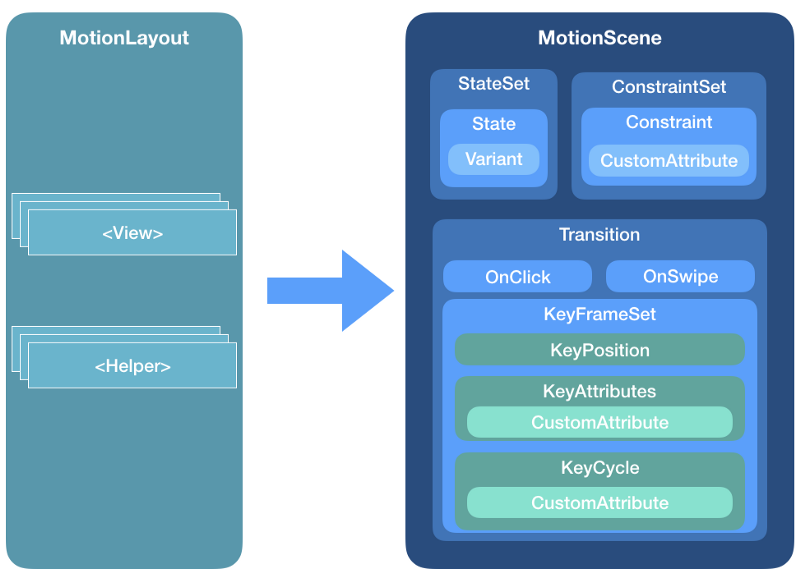
MotionScene
Như đã đề cập, trái với layout thông thường, đặc tả của MotionLayout được lưu giữ trong XML file, MotionScene, được lưu trữ trong res/xml directory.
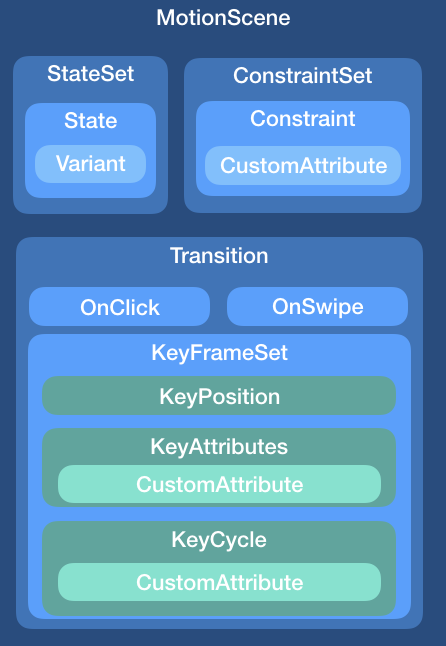
MotionScene file có thể chứa tất cả những gì cần thiết để chỉ định animation:
- ConstraintSets được sử dụng
- Chyển đổi giữa các ConstraintSets
- Xử lý keyframes, touch ,...
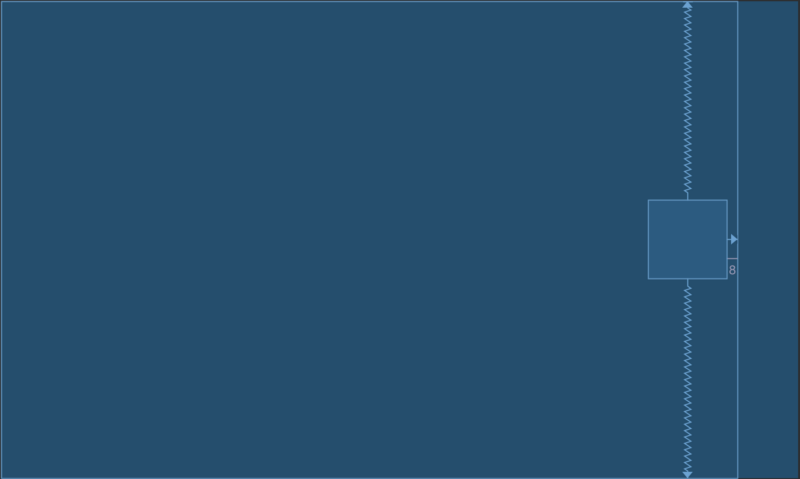
Ví dụ, đơn giản là di chuyển View từ đầu này sang đầu kia của màn hình mà bạn có thể kéo bằng ngón tay:
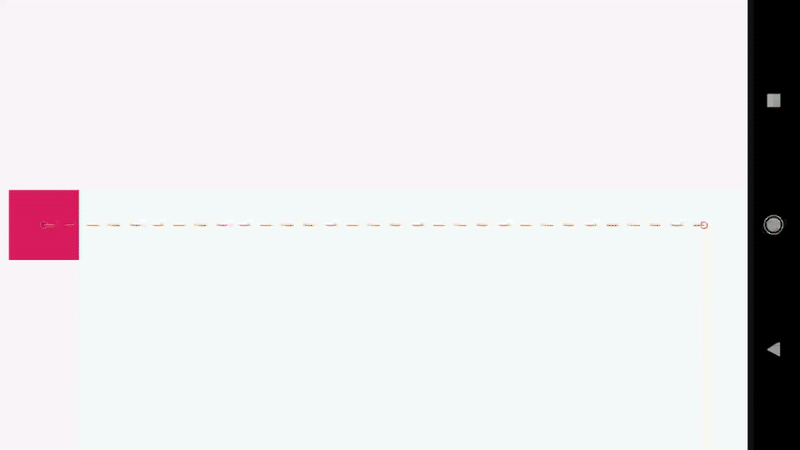
Example 01 : reference existing layouts
Với ConstraintLayout, bạn sẽ tạo ra 2 ConstraintSets — một cho vị trí đầu tiên (với widget bên trái màn hình),và một là ở vị trí thứ 2 với widget bên phải màn hình
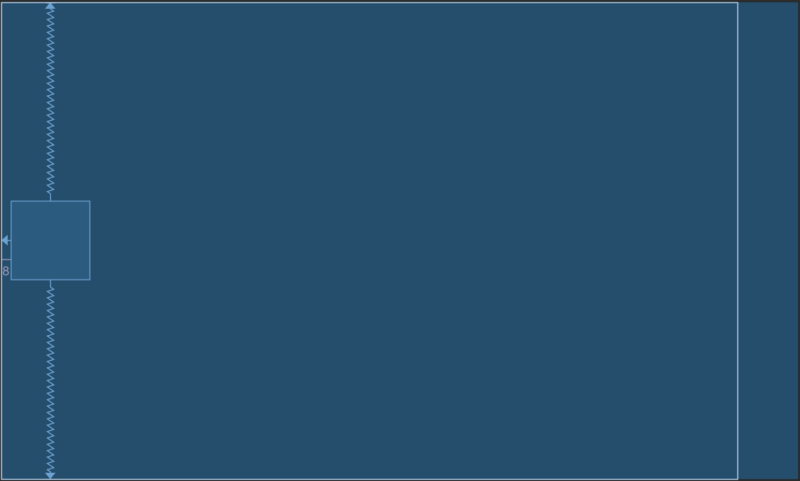
Start layout:
<?xml version="1.0" encoding="utf-8"?>
<android.support.constraint.ConstraintLayout xmlns:android="http://schemas.android.com/apk/res/android"
    xmlns:tools="http://schemas.android.com/tools"
    xmlns:app="http://schemas.android.com/apk/res-auto"
    android:layout_awidth="match_parent"
    android:layout_height="match_parent">

    <View
        android:id="@+id/button"
        android:background="@color/colorAccent"
        android:layout_awidth="64dp"
        android:layout_height="64dp"
        android:layout_marginStart="8dp"
        android:text="Button"
        app:layout_constraintBottom_toBottomOf="parent"
        app:layout_constraintStart_toStartOf="parent"
        app:layout_constraintTop_toTopOf="parent" />

</android.support.constraint.ConstraintLayout>
End layout:
<?xml version="1.0" encoding="utf-8"?>
<android.support.constraint.ConstraintLayout xmlns:android="http://schemas.android.com/apk/res/android"
    xmlns:tools="http://schemas.android.com/tools"
    xmlns:app="http://schemas.android.com/apk/res-auto"
    android:layout_awidth="match_parent"
    android:layout_height="match_parent">

    <View
        android:id="@+id/button"
        android:background="@color/colorAccent"
        android:layout_awidth="64dp"
        android:layout_height="64dp"
        android:layout_marginEnd="8dp"
        android:text="Button"
        app:layout_constraintBottom_toBottomOf="parent"
        app:layout_constraintEnd_toEndOf="parent"
        app:layout_constraintTop_toTopOf="parent" />

</android.support.constraint.ConstraintLayout>
Với ConstraintLayout, bạn có thể khởi tạo với 2 ConstraintSets ra khỏi hai bố cục đó, rồi áp dụng chúng (và nếu sử dụng TransitionManager, transition sẽ là animated). Một vấn đề với cách tiếp cận này là khi quá trình transition bắt đầu nó không bị gián đoạn. Bạn cũng không thể yêu cầu hệ thống đi đến 1 điểm cụ thể.
MotionLayout giải quyết tất cả những vấn đề này. Dưới đây là cách bạn có thể tạo cùng một thứ và thậm chí tái sử dụng những layout được hiện có đó để khởi tạo 2 trạng thái. Đầu tiên, chúng ta sẽ tạo MotionLayout file cho widget:
<?xml version="1.0" encoding="utf-8"?>
<android.support.constraint.motion.MotionLayout xmlns:android="http://schemas.android.com/apk/res/android"
    xmlns:app="http://schemas.android.com/apk/res-auto"
    xmlns:tools="http://schemas.android.com/tools"
    android:id="@+id/motionLayout"
    android:layout_awidth="match_parent"
    android:layout_height="match_parent"
    app:layoutDescription="@xml/scene_01"
    tools:showPaths="true">

    <View
        android:id="@+id/button"
        android:layout_awidth="64dp"
        android:layout_height="64dp"
        android:background="@color/colorAccent"
        android:text="Button" />

</android.support.constraint.motion.MotionLayout>
Chú ý tệp bố cục được references đến MotionScene file — scene_01
Here it is:
<?xml version="1.0" encoding="utf-8"?>
<MotionScene
    xmlns:motion="http://schemas.android.com/apk/res-auto">

    <Transition
        motion:constraintSetStart="@layout/motion_01_cl_start"
        motion:constraintSetEnd="@layout/motion_01_cl_end"
        motion:duration="1000">
        <OnSwipe
            motion:touchAnchorId="@+id/button"
            motion:touchAnchorSide="right"
            motion:dragDirection="dragRight" />
    </Transition>

</MotionScene>
scene_01 chỉ đinh transition mặc định, bằng cách cho biết start và end ConstraintSet (motion_01_cl_start & motion_01_cl_end, như bên trên). Cũng lưu ý rằng chúng ta đã chỉ định OnSwipe xử lý transiton.
OnSwipe handler
Nhìn lại scene_01.xml file, chúng ta chỉ định xử lý OnSwipe, chứa trong định nghĩaTransition . Vai trò của trình xử lý này cho phép bạn thúc đẩy transition bằng cách matching với chuyển động của ngón tay.
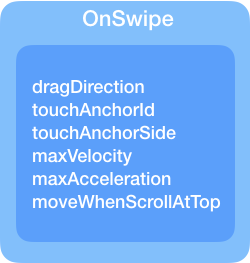
Một vài thông tin cần thiết lập:
touchAnchorId: object chúng ta nên theo dõi (here, @+id/button) touchAnchorSide: mặt của object cần theo dõi ngón tay của bạn (right / left / top / bottom) dragDirection: hướng của motion chúng ta đang theo dõi (dragRight / dragLeft / dragUp / dragDown sẽ định xác định bằng giá trị tiến trình được đặt từ 0 đến 1)
Example 02 : self-contained MotionScene
Ví dụ đầu tiên giúp bạn tạo được MotionLayout một cách đơn giản nhanh chóng, cuối cùng sử dụng layout mà bạn có thể đã có nếu bạn hiện đang sử dụng ConstraintSets để thực hiện animation cơ bản.
MotionLayout cũng hỗ trợ mô tả các ConstraintSets trực tiếp trong MotionScene file, trong res/xml directory. Nó mang lại một vài lợi thế:
- Một file duy nhất để duy trì các ConstraintSets khác nhau
- Chức năng bổ sung xử lý các thuộc tính trực quan và thuộc tính tùy chỉnh khác nhau
- future-proof: sắp tới MotionEditor trong Android Studio sẽ có khả năng hỗ trợ các MotionScene files khép kín.
Interpolated Attributes
Các thuộc tính được chỉ định trong ConstraintSets trong MotionScene file bao gồm nhiều hơn các layout thông thường. Ngoài vị trí và giới hạn, các attributes sẽ tự được interpolated bởi MotionLayout:
alpha visibility elevation rotation, rotation[X/Y] translation[X/Y/Z] scaleX/Y
Tạo lại ví dụ đầu tiên với MotionScene file. MotionLayout file giống như trong example 01, chỉ references đến scene_02.xml :
<?xml version="1.0" encoding="utf-8"?>
<android.support.constraint.motion.MotionLayout
    xmlns:android="http://schemas.android.com/apk/res/android"
    xmlns:tools="http://schemas.android.com/tools"
    xmlns:app="http://schemas.android.com/apk/res-auto"
    android:id="@+id/motionLayout"
    app:layoutDescription="@xml/scene_02"
    android:layout_awidth="match_parent"
    android:layout_height="match_parent">

    <View
        android:id="@+id/button"
        android:background="@color/colorAccent"
        android:layout_awidth="64dp"
        android:layout_height="64dp"
        android:text="Button" />

</android.support.constraint.motion.MotionLayout>
MotionScene là nơi mọi thứ khác nhau được định nghĩa; Transition được định nghĩa tương tự, nhưng chúng ta đặc định nghĩa start và end ConstraintSets trực tiếp trong file. Sự khác biệt chính từ file layout bình thường là chúng ta không chỉ định loại widget được sử dụng ở đay —thay thế vào đó chúng ta sẽ đặt rằng buộc như là attribute của phần từ Constraint.
<?xml version="1.0" encoding="utf-8"?>
<MotionScene xmlns:android="http://schemas.android.com/apk/res/android"
    xmlns:motion="http://schemas.android.com/apk/res-auto">

    <Transition
        motion:constraintSetStart="@+id/start"
        motion:constraintSetEnd="@+id/end"
        motion:duration="1000">
        <OnSwipe
            motion:touchAnchorId="@+id/button"
            motion:touchAnchorSide="right"
            motion:dragDirection="dragRight" />
    </Transition>

    <ConstraintSet android:id="@+id/start">
        <Constraint
            android:id="@+id/button"
            android:layout_awidth="64dp"
            android:layout_height="64dp"
            android:layout_marginStart="8dp"
            motion:layout_constraintBottom_toBottomOf="parent"
            motion:layout_constraintStart_toStartOf="parent"
            motion:layout_constraintTop_toTopOf="parent" />
    </ConstraintSet>

    <ConstraintSet android:id="@+id/end">
        <Constraint
            android:id="@+id/button"
            android:layout_awidth="64dp"
            android:layout_height="64dp"
            android:layout_marginEnd="8dp"
            motion:layout_constraintBottom_toBottomOf="parent"
            motion:layout_constraintEnd_toEndOf="parent"
            motion:layout_constraintTop_toTopOf="parent" />
    </ConstraintSet>

</MotionScene>
MotionLayout attributes for development
MotionLayout có một vài attributes bạn muốn chỉ định để giúp bạn trong quá trình phát triển:
app:layoutDescription=”reference” phải trỏ đến MotionScene XML file, như chúng ta đã thấy trước đó app:applyMotionScene=”boolean” cho phép bạn áp dụng hoặc không áp dụng MotionScene [default=true] app:showPaths=”boolean” hiển thị hoặc không hiển thị đường dẫn chuyển động [default=false]. Nhớ tắt nó trong quá trình build application! app:progress=”float” cho phép bạn chỉ định tiếp độ transition từ 0 đến 1 app:currentState=”reference” cho phép bạn bắt buộc ConstraintSet cụ thể
Bạn có thể tìm thấy một số source code ở đây ConstraintLayout examples github repository.
