How to publish Android 3rd party libraries to Bintray
It’s a great dedication of the 3rd party libraries makers who work hard to make the useful libraries. We can also contribute to the Android world by sharing our libraries! Basic Knowledge Android developers generally use jcenter() or mavenCentral() repository in the gradle build script ...
It’s a great dedication of the 3rd party libraries makers who work hard to make the useful libraries. We can also contribute to the Android world by sharing our libraries!
Basic Knowledge
Android developers generally use jcenter() or mavenCentral() repository in the gradle build script to download the 3rd party libraries. They both are Maven repository where JCenter is hosted by bintray.com as well as Maven-Central is hosted by sonatype.org. Each library-package is stored in the repository centers with 04 key parameters are groupId, artifactId, version & type. There are different kind of snippets like Maven, Gradle , Ivy to download any published library.
Example:
To download retrofit library we need to consider the following key parameters:
groupId : com.squareup.retrofit2
artifactId : retrofit
version : 2.4.0
So, the snippets will be like following:
(Maven)
<dependency>
  <groupId>com.squareup.retrofit2</groupId>
  <artifactId>retrofit</artifactId>
  <version>2.4.0</version>
</dependency>

(Gradle)
dependencies {
    implementation 'com.squareup.retrofit2:retrofit:2.4.0'
}
The output of the above snippets are same, just the developers need to care about the key parameters while downloading library. If you want to study more about it then you can visit here.
Remember, Android Studio doesn't use Maven as its builder, it uses Gradle by default. But, Gradle can use Maven repositories to fetch dependencies, so it's a matter of taking the information that would go into the POM file and using it in Gradle format.
Example:
repositories {
    maven { url 'http://audiobox.keytwo.net' }
}

dependencies {
    compile 'io.socket:socket.io-client:0.2.1'
}
This article describes briefly about how to create a sample library project in Android studio & publish it into the JCenter to distribute for the developers. In this case, I will use the bintray.com where you can find several repositories including Maven. Bintray is a popular platform & you can use it to publish your libraries!
So, I am describing the work-flow step by step.
Step - 1: Create a new project in Android Studio
First of all, create a new "Hello-World" project in Android-Studio. After indexing the project directories, observe 02 gradle scripts namely build.gradle are created by default. One file inside of the root directory is your project's build gradle file. Another is the application module where you can define the android configuration & essential dependencies. Now, you need to make another module to add library.
Step - 2: Add a new library module inside the project
Now, go to File > New > New Module from the top menu in Android studio.
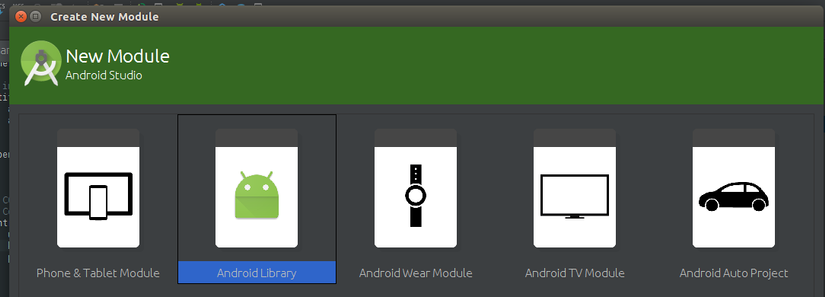
Here, you will get a popup with lots of option. Now, select Android Library option & click Next. Then configure your library module like the following example.

Then, Click Next to see the last popup with some options of adding activity. After finishing the popup you will see the newly created library module.
Step - 3: Signup into Bintray to publish your library
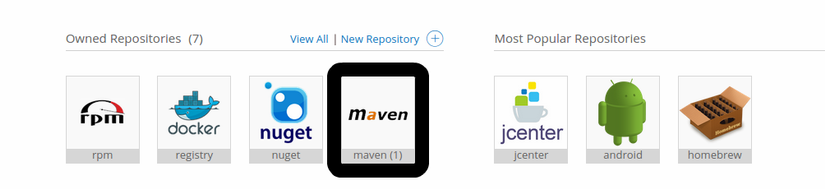
After creating your account into Bintray, you will see few free repositories from where I will use Maven to publish & maintain the library.
Then, visit your profile Edit page here & you can see an option of API Key. Just keep the key secret for further using.

So, the basic structure is ready & now it's time to code!
Step - 4: Add bintray plugin into Project's build.gradle file
To interact with Bintray, at first you need to include the bintray plugin in the build.gradle file of your project inside the root directory with the following script.
(Gradle file - Project)

buildscript {
    repositories {
        jcenter()
    }
    dependencies {
        ...
        classpath 'com.jfrog.bintray.gradle:gradle-bintray-plugin:1.2'
        classpath 'com.github.dcendents:android-maven-gradle-plugin:1.3'
    }
}
...
Step - 5: Configure the build.gradle file of library module
Now, you need to add several functional snippets into the build.gradle of library module like:
- Applying bintray plugin,
- Specifying POM details,
- Generating sources-jar & javadoc-jar,
- Configuring bintray plugin etc.
The total build script is like following:
(Gradle file - library module)

apply plugin: 'com.android.library'
apply plugin: 'com.jfrog.bintray'
apply plugin: 'com.github.dcendents.android-maven'

// specify POM details.
group = 'com.licon.samplelibrary' // Library's package name
version = '1.0.0' // Library's version number

android {
    compileSdkVersion 23
    buildToolsVersion "23.0.1"

    defaultConfig {
        minSdkVersion 15
        targetSdkVersion 23
        versionCode 1
        versionName "1.0"
    }
    buildTypes {
        release {
            minifyEnabled false
            proguardFiles getDefaultProguardFile('proguard-android.txt'), 'proguard-rules.pro'
        }
    }
}

// Generate sources-jar
task generateSourcesJar(type: Jar) {
    from android.sourceSets.main.java.srcDirs
    classifier 'sources'
}

// Generate javadoc-jar
task generateJavadocs(type: Javadoc) {
    source = android.sourceSets.main.java.srcDirs
    classpath += project.files(android.getBootClasspath()
            .join(File.pathSeparator))
}

task generateJavadocsJar(type: Jar) {
    from generateJavadocs.destinationDir
    classifier 'javadoc'
}

generateJavadocsJar.dependsOn generateJavadocs

// include the generated jars
artifacts {
    archives generateJavadocsJar
    archives generateSourcesJar
}

dependencies {

}

// Configure your bintray plugin
bintray {
    user = 'user-name' // your Bintray's user-name
    key = '--YOUR---KEY---HERE--' //your private API-key of Bintray
    pkg {
        repo = 'maven'
        name = 'com.licon.samplelibrary' // Library's package name

        version {
            name = '1.0.0'
            desc = 'My test upload from liconrepo & this is a sample description'
            released  = new Date()
            vcsTag = '1.0.0'
        }

        licenses = ['Apache-2.0']  // Library's licence
        vcsUrl = 'https://github.com/liconrepo/SampleLibrary.git' // Library's vcs url
        websiteUrl = 'https://github.com/liconrepo/SampleLibrary' // Website url
    }
    configurations = ['archives']
}
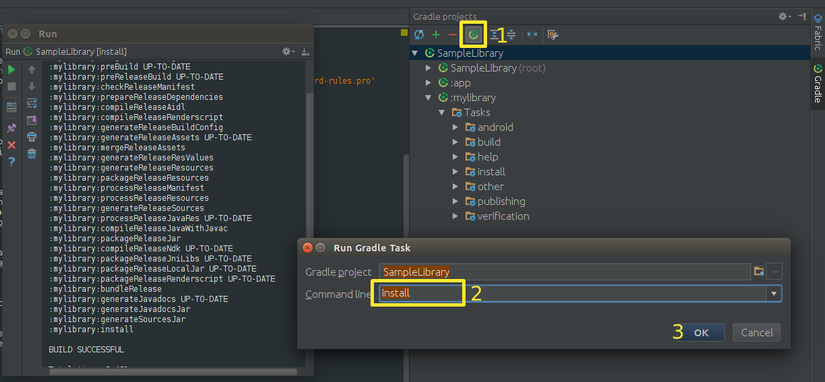
Step - 6: Run & install your library module task
Open the gradle projects window & search for install like following screenshot. After installing your library module, it will be ready to use!
Step - 7: Create a sample library
Since our library module is ready, so we can create a sample library to publish it into the Bintray. So, create a new class into the specified package according to the bintray plugin. In my case, I am going to make this in "com.licon.mylibrary" package inside the library directory.
Here, I am going to make a sample class including a function.
package com.licon.samplelibrary;

import java.util.Calendar;
import java.util.Date;

public class LibActivity {
    public static Date getTime() {
        Calendar calendar= Calendar.getInstance();
        return calendar.getTime();
    }
}
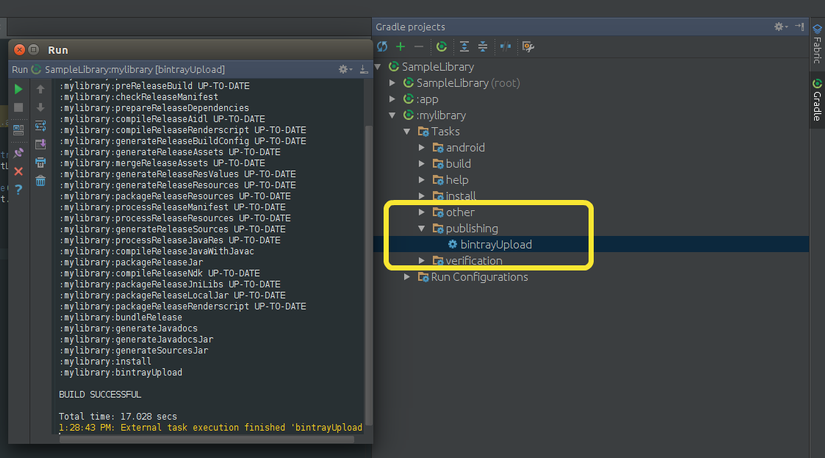
Step - 8: Upload your library to bintray.com
After creating & building the library project you can upload it from the gradle window of Android studio. Before uploading it, you can re-check your library files & the bintray plugin settings. If everything is fine, search for the bintrayUpload command in gradle window like below:
Step - 9: Configure your library & publish it to the JCenter from Maven
After uploading your library, you can check your library into the following url:
https://bintray.com/your-user-name/maven/your-library-package
In the bintray.com page, you will get notification to publish your library. After publishing your library you can add it to JCenter as the following screenshot.
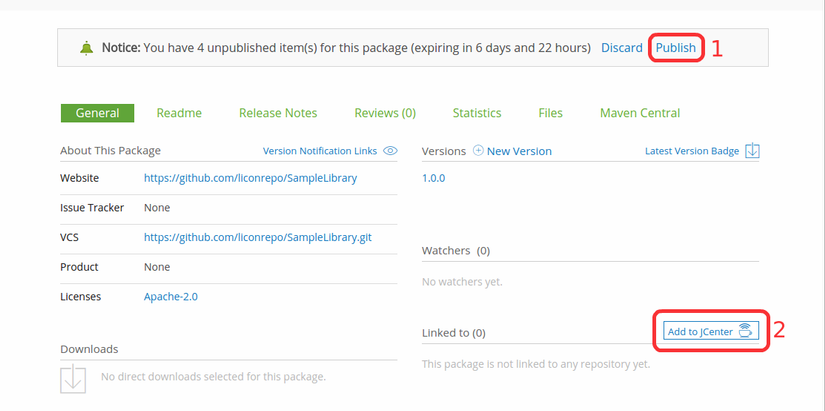
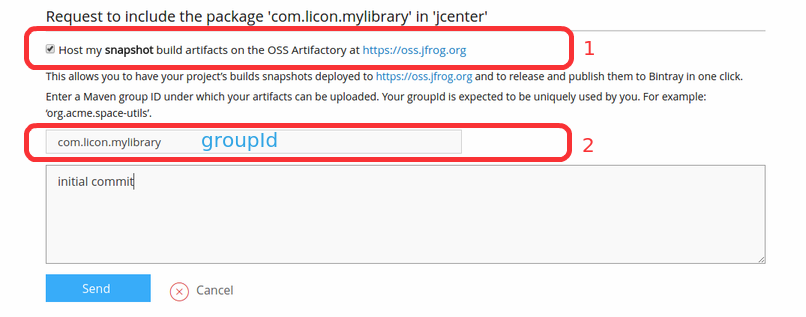
You can see the groupId, artifactId, version & type what you included while installing your bintray plugin inside your library project.

Using the published library
You need to wait until the authority of JCenter will review & approve your request, if the library is not published into JCenter repository, then write your maven url into project's build.gradle file to use the library.
(Gradle)

allprojects {
    repositories {
        jcenter()
        maven {
            url 'https://dl.bintray.com/user-name/maven'
        }
    }
}

 ....

dependencies {
    compile 'com.licon.samplelibrary:mylibrary:1.0.0@aar' // 'groupId:artifactId:version@type'
}
Or, If the library is already published into JCenter repository, then the command is:
(Gradle)

allprojects {
    repositories {
        jcenter()
    }
}

 ....

dependencies {
    compile 'com.licon.samplelibrary:mylibrary:1.0.0' // 'groupId:artifactId:version'
}
After compiling the library, you can use it anywhere. I didn't write about uploading your project to online repository like github or bit-bucket. But you might already noticed that your project should be kept in the online repository url which is specified into bintray plugin. After uploading to bintray, it will sync in-between bintray & online repository urls by the version number.
Here, I am just putting a sample example on using my newly created library.
package com.licon.test;

import android.app.Activity;
import android.os.Bundle;
import android.util.Log;

import com.licon.samplelibrary.LibActivity;

public class MainActivity extends Activity {

    @Override
    protected void onCreate(Bundle savedInstanceState) {
        super.onCreate(savedInstanceState);
        setContentView(R.layout.activity_main);

        Log.d("result:", "" + LibActivity.getTime());
    }
}
You can find a sample project of the whole tutorial here.
Message to the library-makers
Before deleting any material, you must understand that Bintray is a cooperative forum for sharing, not just a mindless platform. Any package, version or file you have published may now be an integral part of someone else’s project. In a community like Bintray, people rely on each other’s material and their work may be damaged when someone removes from Bintray information that they need.
Courtesy: Bintray-docs.
References
- http://blog.raffaeu.com/archive/2016/01/20/publish-android-library-to-maven-using-android-studio-1-5.aspx
- http://blog.bintray.com/2015/02/09/android-studio-migration-from-maven-central-to-jcenter/
- http://inthecheesefactory.com/blog/how-to-upload-library-to-jcenter-maven-central-as-dependency/en
Happy Coding!
