12/08/2018, 10:49
Hướng dẫn xây dựng web java với maven + wicket + spring
Trong bài viết này hướng dẫn tích hợp Apache Wicket với Spring Framework để tạo website Thư viện sẽ sử dụng trong bài viết này: Wicket phiên bản: 1.4.17 Wicket-Spring phiên bản: 1.4.17 Spring Framework phiên bản 3.05 RELEASE Project Structure: Cấu trúc thư mục dự án không có gì đặc ...
Trong bài viết này hướng dẫn tích hợp Apache Wicket với Spring Framework để tạo website
Thư viện sẽ sử dụng trong bài viết này:
- Wicket phiên bản: 1.4.17
- Wicket-Spring phiên bản: 1.4.17
- Spring Framework phiên bản 3.05 RELEASE
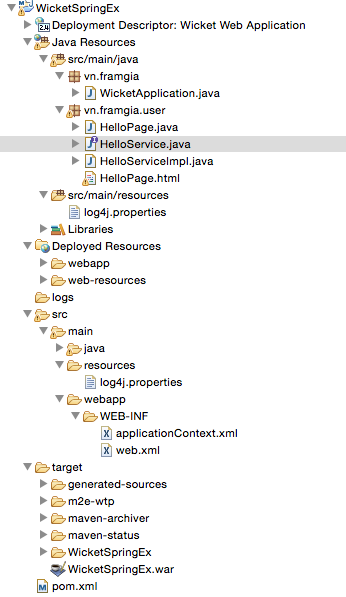
- Project Structure: Cấu trúc thư mục dự án không có gì đặc biệt, chỉ là 1 dự án theo cấu trúc Maven chuẩn
- Project Dependency
    <dependencies>

            <dependency>
                <groupId>org.apache.wicket</groupId>
                <artifactId>wicket</artifactId>
                <version>1.4.17</version>
            </dependency>

            <dependency>
                <groupId>org.apache.wicket</groupId>
                <artifactId>wicket-spring</artifactId>
                <version>1.4.17</version>
            </dependency>

            <dependency>
                <groupId>org.springframework</groupId>
                <artifactId>spring-core</artifactId>
                <version>3.0.5.RELEASE</version>
            </dependency>

            <dependency>
                <groupId>org.springframework</groupId>
                <artifactId>spring-context</artifactId>
                <version>3.0.5.RELEASE</version>
            </dependency>

            <dependency>
                <groupId>org.springframework</groupId>
                <artifactId>spring-web</artifactId>
                <version>3.0.5.RELEASE</version>
            </dependency>

            <dependency>
                <groupId>org.slf4j</groupId>
                <artifactId>slf4j-log4j12</artifactId>
                <version>1.5.6</version>
            </dependency>

        </dependencies>
-
Spring Bean
Tạo Spring bean, sử dụng annotate @Service
package vn.framgia.user;

    public interface HelloService {

        String getHelloWorldMsg();

	}
	package vn.framgia.user;

    import org.springframework.stereotype.Service;

    @Service
    public class HelloServiceImpl implements HelloService {

        public String getHelloWorldMsg() {
            return "Spring : hello world!!!!";
        }

    }
-
Tiêm khởi tạo service trong Spring container
Tạo file applicationContext.xml, thêm tính năng tự động tìm kiếm khởi tạo các component của spring
File : applicationContext.xml
    <beans xmlns="http://www.springframework.org/schema/beans"
        xmlns:xsi="http://www.w3.org/2001/XMLSchema-instance" xmlns:context="http://www.springframework.org/schema/context"
        xsi:schemaLocation="http://www.springframework.org/schema/beans
    http://www.springframework.org/schema/beans/spring-beans-3.0.xsd
    http://www.springframework.org/schema/context
    http://www.springframework.org/schema/context/spring-context-3.0.xsd">


        <context:component-scan base-package="vn.framgia.user" />

    </beans>
-
Tích hợp giữa wicket và Spring
Viết lại phương thức init() của WebApplicaion Và thêm phương thức lắng nghe SpringComponent
addComponentInstantiationListener(new SpringComponentInjector(this));
Tạo file WicketApplication.java:
        package vn.framgia;

        import org.apache.wicket.protocol.http.WebApplication;
        import org.apache.wicket.spring.injection.annot.SpringComponentInjector;

        import vn.framgia.user.HelloPage;

        public class WicketApplication extends WebApplication {

            @Override
            public Class<HelloPage> getHomePage() {

                // return default page
                return HelloPage.class;
            }

            @Override
            protected void init() {

                super.init();
                addComponentInstantiationListener(new SpringComponentInjector(this));
            }
        }
-
Tạo một page wicket: một page wicket sẽ bao gồm 1 file java và 1 file html trùng tên
Tạo file HelloPage.java
    package vn.framgia.user;

    import org.apache.wicket.PageParameters;
    import org.apache.wicket.markup.html.basic.Label;
    import org.apache.wicket.markup.html.WebPage;
    import org.apache.wicket.spring.injection.annot.SpringBean;

    public class HelloPage extends WebPage {

        // Sử dụng spring jnject.
        @SpringBean
        private HelloService helloService;

        public SimplePage(final PageParameters parameters) {

            add(new Label("msg", helloService.getHelloWorldMsg()));
        }
    }
Tạo file HelloPage.html
    <html>
    <body>
        <h1>Wicket + Spring integration example</h1>

        <h2 wicket:id="msg"></h2>

    </body>
    </html>
- web.xml : Bước cuối cùng cần phải định nghĩa wicket và spring trong file web.xml
    <?xml version="1.0" encoding="ISO-8859-1"?>
    <web-app xmlns="http://java.sun.com/xml/ns/j2ee" xmlns:xsi="http://www.w3.org/2001/XMLSchema-instance"
        xsi:schemaLocation="http://java.sun.com/xml/ns/j2ee http://java.sun.com/xml/ns/j2ee/web-app_2_4.xsd"
        version="2.4">
        <display-name>Wicket Web Application</display-name>

        <filter>
            <filter-name>wicket.wicketTest</filter-name>
            <filter-class>org.apache.wicket.protocol.http.WicketFilter</filter-class>
            <init-param>
                <param-name>applicationClassName</param-name>
                <param-value>vn.framgia.WicketApplication</param-value>
            </init-param>
        </filter>

        <filter-mapping>
            <filter-name>wicket.wicketTest</filter-name>
            <url-pattern>/*</url-pattern>
        </filter-mapping>

        <listener>
            <listener-class>org.springframework.web.context.ContextLoaderListener</listener-class>
        </listener>

    </web-app>
-
Thực hiện deploy lên server Tomcat
- vào thư mục chứa source code
- Dùng lệnh maven sau để tạo file war:
-
mvn install -DskipTests
4. Copy file WicketSpringEx.war vào thư mục webapp của Tomcat
5. Vào thư bin của tomcat khởi động tomcat
- window: run file startup.bat
- linux or mac: run file startup.sh
9. Vào trình duyệt start web: http://localhost:8080/WicketSpringEx/

Source code example: https://github.com/ngocitbk/WicketSpringEx
