Lập trình Android – Bài 5: Thiết kế giao diện với LinearLayoout
Lập trình Android – Bài 5: Thiết kế giao diện với LinearLayoout Tháng Bảy 7, 2016 nguyenvanquan7826 TUT Android 4 responses Như bài trước mình đã nói, LinearLayout là ViewGroup chứa các View khác và quản lý theo chiều ngang hoặc ...
Lập trình Android – Bài 5: Thiết kế giao diện với LinearLayoout
Như bài trước mình đã nói, LinearLayout là ViewGroup chứa các View khác và quản lý theo chiều ngang hoặc chiều dọc (tùy ta quy định). Giống như chúng ta xếp hàng vậy, xếp theo hàng ngang hoặc hàng dọc. Do vậy khi sử dụng LinearLayout chúng ta khá dễ dàng để xử lỹ giao diện. Bây giờ chúng ta đi thực hành thiết kế giao diện một số ứng dụng bằng LinearLayout cho thành thạo.
[qads]
1. Thiết kế giao diện Login với LinearLayout
Giao diện này hôm trước chúng ta đã thiết kế với RelativeLayout một cách đơn giản, giờ thử áp dụng với LinearLayout xem sao.
Chúng ta nhớ lại giao diện như sau:
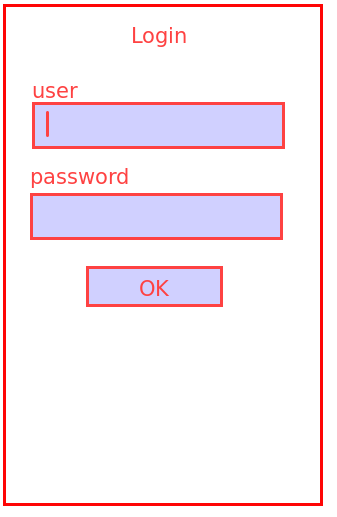
Như vậy, chúng ta hình dung trong đầu rằng giao diện này gồm các phần tử được xếp dọc từ trên xuống dưới. Các bạn xem code sau:
<?xml version="1.0" encoding="utf-8"?>
<LinearLayout xmlns:android="http://schemas.android.com/apk/res/android"
    android:layout_awidth="match_parent"
    android:layout_height="match_parent"
    android:orientation="vertical">

    <TextView
        android:id="@+id/tvLogin"
        android:layout_awidth="wrap_content"
        android:layout_height="wrap_content"
        android:layout_gravity="center"
        android:text="Login"
        android:textSize="24sp" />

    <TextView
        android:id="@+id/tvUser"
        android:layout_awidth="wrap_content"
        android:layout_height="wrap_content"
        android:text="user" />

    <EditText
        android:id="@+id/editUser"
        android:layout_awidth="match_parent"
        android:layout_height="wrap_content" />

    <TextView
        android:id="@+id/tvPassword"
        android:layout_awidth="wrap_content"
        android:layout_height="wrap_content"
        android:text="password" />

    <EditText
        android:id="@+id/editPassword"
        android:layout_awidth="match_parent"
        android:layout_height="wrap_content" />

    <Button
        android:id="@+id/btnOk"
        android:layout_awidth="wrap_content"
        android:layout_height="wrap_content"
        android:layout_gravity="center"
        android:text="ok" />

</LinearLayout>
Với code này các bạn sẽ có một giao diện giống với hôm trước và giống với hình mô tả bên trên.
Các bạn để ý một số thuộc tính sau trong code trên:
Trước tiên là thẻ LinearLayout
android:orientation=”vertical” : Với LinearLayout, nó quản lý giao diện theo hàng dọc và hàng ngang. Chính thuộc tính orientation này quy định chiều của các phần tử bên trong nó. vertical sẽ là dọc và horizontal sẽ là ngang.
Tiếp theo là thẻ TextView Login và thẻ Button
android:layout_gravity=”center”: Thuộc tính này có nhiệm vụ làm cho cả layout của đối tựợng đó (TextView Login và Button) được căn giữa. Tức là cả phần khung được căn giữa chữ không phải chỉ nội dung của nó được căn giữa. Các bạn nhớ lại hôm trước chúng ta có một thuộc tính tương tự là android:gravity, nó chỉ để căn nội dung của đối tượng ở giữa.
Như vậy các bạn có thể nghĩ đến một cách làm khác với giao diện của chúng ta. Đó là cho thẻ LinearLayout có nội dung bên trong ở giữa. Như vậy chúng ta không cần căn chỉnh TextView Login và Button Ok nhiều mà chỉ cần cho chiều ngang của chúng vừa đủ với nội dung là được. Tự khắc nó sẽ ra giữa vì chúng nằm bên trong LinearLayout gốc nên nó là nội dung của LinearLayout, mà nội dung của LinearLayout thì nó ở giữa rồi. Tuy nhiên TextView User và TextView Password lại cần điểu chỉnh để thiều ngang lấy hết màn hình vì nếu không chúng cũng sẽ ra giữa. Như vậy code sẽ như sau:
<?xml version="1.0" encoding="utf-8"?>
<LinearLayout xmlns:android="http://schemas.android.com/apk/res/android"
    android:layout_awidth="match_parent"
    android:layout_height="match_parent"
    android:gravity="center"
    android:orientation="vertical">

    <TextView
        android:id="@+id/tvLogin"
        android:layout_awidth="wrap_content"
        android:layout_height="wrap_content"
        android:text="Login"
        android:textSize="24sp" />

    <TextView
        android:id="@+id/tvUser"
        android:layout_awidth="match_parent"
        android:layout_height="wrap_content"
        android:text="user" />

    <EditText
        android:id="@+id/editUser"
        android:layout_awidth="match_parent"
        android:layout_height="wrap_content" />

    <TextView
        android:id="@+id/tvPassword"
        android:layout_awidth="match_parent"
        android:layout_height="wrap_content"
        android:text="password" />

    <EditText
        android:id="@+id/editPassword"
        android:layout_awidth="match_parent"
        android:layout_height="wrap_content" />

    <Button
        android:id="@+id/btnOk"
        android:layout_awidth="wrap_content"
        android:layout_height="wrap_content"
        android:text="ok" />

</LinearLayout>
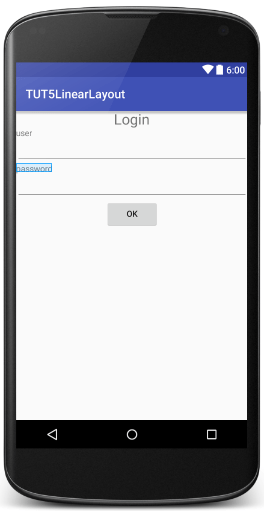
Ở đây các bạn sẽ thấy giao diện của chúng ta gồm các phần tử được căn giữa như mong muốn. Duy chỉ có một điều là Mọi phần tử cũng ở chính giữa theo chiều dọc như hình dưới: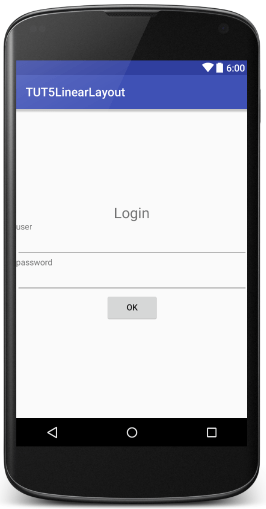
Đó là vì thuộc tính android:gravity=”center” có nhiệm vụ làm nội dung của LinearLayout ở chính giữa theo chiều ngang và theo cả chiều dọc (center). Để khắc phục tính trạng này, bạn thay giá trị center bằng center_horizontal là giữa theo chiều ngang, vì chúng ta không muốn giữa theo chiều dọc. Các bài khác các bạn có thể muốn dùng chính giữa theo chiều dọc thì dùng giá trị center_vertical.
2. Thiết kế giao diện Máy tính bỏ túi (Calculator) bằng LinearLayout
Chúng ta sẽ làm thử một chiếc máy tính bỏ túi có các chức năng cộng, trừ, nhân, chia cơ bản nhé. Các bạn chú ý làm tốt giao diện của nó, vì bài sau mình sẽ làm một bài thực hành xử lý để hoàn thiện chiếc máy tính này như thật luôn.
Bây giờ chúng ta click chuột phải vào thư mục /res/layoout -> new -> Layout resource file -> Đặt tên file là layout_calculator.xml -> OK Và mở file đó ra.
Chúng ta tưởng tượng chiếc máy tính này có những chức năng và hình dáng cơ bản như sau: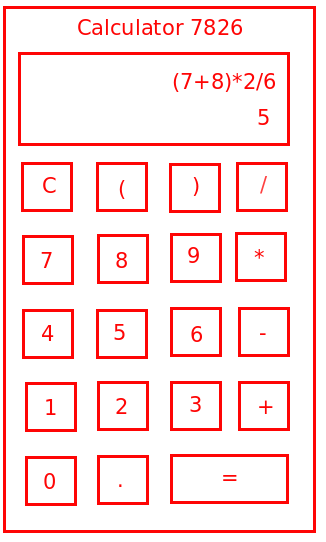
Như vậy, chúng ta sẽ lên kế hoạch để sử dụng và bố trí các layout như sau:
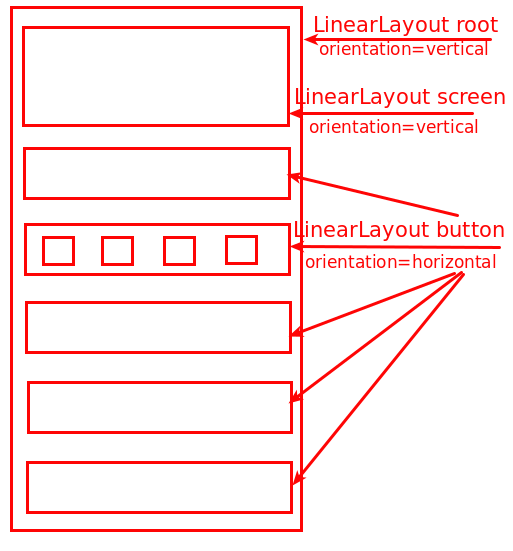
Từ đó, chúng ta sẽ có code như sau:
<?xml version="1.0" encoding="utf-8"?>
<LinearLayout xmlns:android="http://schemas.android.com/apk/res/android"
    android:layout_awidth="match_parent"
    android:layout_height="match_parent"
    android:orientation="vertical">

    <LinearLayout
        android:layout_awidth="match_parent"
        android:layout_height="wrap_content"
        android:orientation="vertical"
        android:padding="8dp">

        <TextView
            android:id="@+id/tvMath"
            android:layout_awidth="match_parent"
            android:layout_height="wrap_content"
            android:gravity="right|center_vertical"
            android:minHeight="48dp"
            android:text="0"
            android:textSize="24sp" />

        <TextView
            android:id="@+id/tvResult"
            android:layout_awidth="match_parent"
            android:layout_height="wrap_content"
            android:gravity="right|center_vertical"
            android:minHeight="48dp"
            android:text="0"
            android:textSize="24sp" />

    </LinearLayout>

    <LinearLayout
        android:layout_awidth="match_parent"
        android:layout_height="wrap_content"
        android:orientation="horizontal">

        <Button
            android:id="@+id/btnC"
            android:layout_awidth="wrap_content"
            android:layout_height="match_parent"
            android:text="C"
            android:textSize="20sp" />

        <Button
            android:id="@+id/btnOpen"
            android:layout_awidth="wrap_content"
            android:layout_height="match_parent"
            android:text="("
            android:textSize="20sp" />

        <Button
            android:id="@+id/btnClose"
            android:layout_awidth="wrap_content"
            android:layout_height="match_parent"
            android:text=")"
            android:textSize="20sp" />

        <Button
            android:id="@+id/btnDiv"
            android:layout_awidth="wrap_content"
            android:layout_height="match_parent"
            android:text="/"
            android:textSize="20sp" />
    </LinearLayout>

    <LinearLayout
        android:layout_awidth="match_parent"
        android:layout_height="wrap_content"
        android:orientation="horizontal">

        <Button
            android:id="@+id/btn7"
            android:layout_awidth="wrap_content"
            android:layout_height="match_parent"
            android:text="7"
            android:textSize="20sp" />

        <Button
            android:id="@+id/btn8"
            android:layout_awidth="wrap_content"
            android:layout_height="match_parent"
            android:text="8"
            android:textSize="20sp" />

        <Button
            android:id="@+id/btn9"
            android:layout_awidth="wrap_content"
            android:layout_height="match_parent"
            android:text="9"
            android:textSize="20sp" />

        <Button
            android:id="@+id/btnMul"
            android:layout_awidth="wrap_content"
            android:layout_height="match_parent"
            android:text="*"
            android:textSize="20sp" />
    </LinearLayout>

    <LinearLayout
        android:layout_awidth="match_parent"
        android:layout_height="wrap_content"
        android:orientation="horizontal">

        <Button
            android:id="@+id/btn4"
            android:layout_awidth="wrap_content"
            android:layout_height="match_parent"
            android:text="4"
            android:textSize="20sp" />

        <Button
            android:id="@+id/btn5"
            android:layout_awidth="wrap_content"
            android:layout_height="match_parent"
            android:text="5"
            android:textSize="20sp" />

        <Button
            android:id="@+id/btn6"
            android:layout_awidth="wrap_content"
            android:layout_height="match_parent"
            android:text="6"
            android:textSize="20sp" />

        <Button
            android:id="@+id/btnSub"
            android:layout_awidth="wrap_content"
            android:layout_height="match_parent"
            android:text="-"
            android:textSize="20sp" />
    </LinearLayout>

    <LinearLayout
        android:layout_awidth="match_parent"
        android:layout_height="wrap_content"
        android:orientation="horizontal">

        <Button
            android:id="@+id/btn1"
            android:layout_awidth="wrap_content"
            android:layout_height="match_parent"
            android:text="1"
            android:textSize="20sp" />

        <Button
            android:id="@+id/btn2"
            android:layout_awidth="wrap_content"
            android:layout_height="match_parent"
            android:text="2"
            android:textSize="20sp" />

        <Button
            android:id="@+id/btn3"
            android:layout_awidth="wrap_content"
            android:layout_height="match_parent"
            android:text="3"
            android:textSize="20sp" />

        <Button
            android:id="@+id/btnPlus"
            android:layout_awidth="wrap_content"
            android:layout_height="match_parent"
            android:text="+"
            android:textSize="20sp" />
    </LinearLayout>

    <LinearLayout
        android:layout_awidth="match_parent"
        android:layout_height="wrap_content"
        android:orientation="horizontal">

        <Button
            android:id="@+id/btn0"
            android:layout_awidth="wrap_content"
            android:layout_height="match_parent"
            android:text="0"
            android:textSize="20sp" />

        <Button
            android:id="@+id/btnDot"
            android:layout_awidth="wrap_content"
            android:layout_height="match_parent"
            android:text="."
            android:textSize="20sp" />

        <Button
            android:id="@+id/btnResult"
            android:layout_awidth="wrap_content"
            android:layout_height="match_parent"
            android:text="="
            android:textSize="20sp" />

    </LinearLayout>

</LinearLayout>
Từ đó chúng ta cơ bản có khung như sau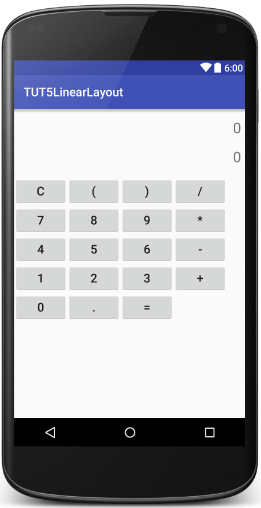
Các bạn để ý code chúng ta rất dài nhưng hoàn toàn giống nhau cơ bản ở các button, vì vậy các bạn làm 1 hàng button rồi copy thành 5 hàng là sẽ rất nhanh chóng.
Nhìn giao diện xem trước các bạn sẽ thấy nó không như mong muốn của chúng ta, thậm chí nếu xoay ngang màn hình để xem thì sẽ thấy giao diện bị như sau:
Vì vậy chúng ta cần tìm cách khắc phục làm sao cho:
– Các button cách đều và có kích thước bằng nhau và lấp đầy chiều ngang của màn hình, riêng button Result (dấu bằng) thì sẽ chiếm diện tích bằng 2 lần button bình thường.
– Các hàng cách đều nhau và lấp đầy chiều dọc của màn hình.
Để thực hiện được các Button trong 1 hàng có kích thước bằng nhau và lấp đầy chiều ngang của màn hình chúng ta sử dụng thuộc tính android:layout_weight. weight nghĩa là trọng số. Tức chúng ta thiết kế các phần tử dựa vào trọng số – tỷ lệ kích thước. Để button có kích thước bằng nhau và tràn hết chiều ngang, chúng ta cho trọng số của chúng bằng nhau. Ví dụ với hàng đầu tiên chúng ta sẽ có code như sau:
<LinearLayout
        android:layout_awidth="match_parent"
        android:layout_height="wrap_content"
        android:orientation="horizontal">

        <Button
            android:id="@+id/btnC"
            android:layout_awidth="wrap_content"
            android:layout_height="match_parent"
            android:layout_weight="1"
            android:text="C"
            android:textSize="20sp" />

        <Button
            android:id="@+id/btnOpen"
            android:layout_awidth="wrap_content"
            android:layout_height="match_parent"
            android:layout_weight="1"
            android:text="("
            android:textSize="20sp" />

        <Button
            android:id="@+id/btnClose"
            android:layout_awidth="wrap_content"
            android:layout_height="match_parent"
            android:layout_weight="1"
            android:text=")"
            android:textSize="20sp" />

        <Button
            android:id="@+id/btnDiv"
            android:layout_awidth="wrap_content"
            android:layout_height="match_parent"
            android:layout_weight="1"
            android:text="/"
            android:textSize="20sp" />
    </LinearLayout>
Vì LinearLayout cha của các button đang là chiều ngang, nên thuộc tính android:layout_weight sẽ được áp dụng cho chiều ngang. Trong trường hợp LinearLayout là chiều dọc, thì thuộc tính này sẽ áp dụng cho chiều dọc của các phần tử.
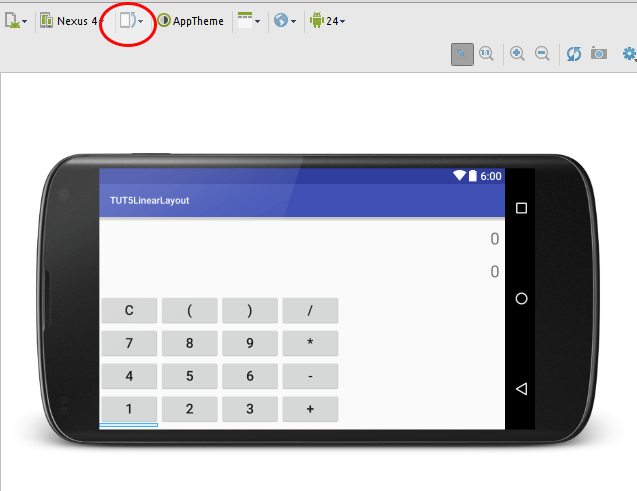
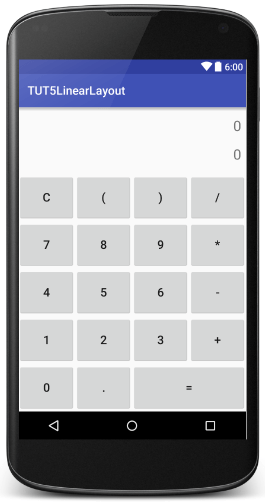
Và chúng ta được giao diện như thế này dù các bạn có để chế độ chiều dọc hay xoay ngang màn hình nó cũng vậy, vẫn đẹp.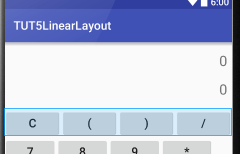
Tuy nhiên trong nhiều trường hợp, khi các bạn cho trọng số của chúng bằng nhau, nhưng với text trong button dài thì chúng sẽ có kích thước khác nhau, các bạn có thể thử sửa cho text của button mở ngoặc dài như thế này.
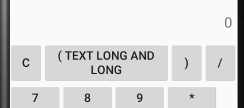
Nguyên nhân là do thuộc tính android:layout_awidth đang có giá trị là wrap_content nên nó bắt buộc phải vừa đủ với nội dung trước đã.
Để khắc phục cho nó hoàn toàn bằng nhau, các bạn cho kích thước của chiều ngang button là 0dp. Ở đây các bạn chú ý là cho kích thước chiều ngang bằng 0dp vì layout cha của chúng ta đang là chiều ngang, nếu layout cha là chiều dọc thì chúng ta lại phải cho kích thước chiều dọc của các phần tử bằng 0dp.
Vậy code hoàn chỉnh của hàng đầu tiên sẽ như sau:
<LinearLayout
        android:layout_awidth="match_parent"
        android:layout_height="wrap_content"
        android:orientation="horizontal">

        <Button
            android:id="@+id/btnC"
            android:layout_awidth="0dp"
            android:layout_height="match_parent"
            android:layout_weight="1"
            android:text="C"
            android:textSize="20sp" />

        <Button
            android:id="@+id/btnOpen"
            android:layout_awidth="0dp"
            android:layout_height="match_parent"
            android:layout_weight="1"
            android:text="("
            android:textSize="20sp" />

        <Button
            android:id="@+id/btnClose"
            android:layout_awidth="0dp"
            android:layout_height="match_parent"
            android:layout_weight="1"
            android:text=")"
            android:textSize="20sp" />

        <Button
            android:id="@+id/btnDiv"
            android:layout_awidth="0dp"
            android:layout_height="match_parent"
            android:layout_weight="1"
            android:text="/"
            android:textSize="20sp" />
    </LinearLayout>
Các dòng tiếp theo chúng ta làm tương tự. Một điều nữa là Button bằng, chúng ta cần cho nó có kích thước gấp 2 lần các Button khác, do vậy ta sẽ đặt trọng số của nó là 2. Giao diện mới của chúng ta đây:
Tiếp theo chúng ta phải làm sao để chiều cao của các hàng bằng nhau và lấp đầy hết màn hình. Ý tưởng tương tự nảy ra. Chúng ta đặt trọng số cho các hàng đó, tức là đặt android:layout_weight cho các LinearLayout ở các dòng bằng nhau. Nhưng chú ý, Layout cha chứa chúng đang có chiều là dọc, nên chúng ta phải đặt android:layout_height=”0dp”.
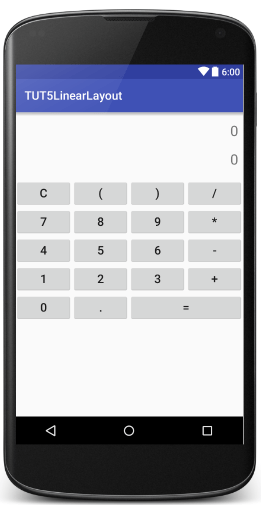
Cuối cùng giao diện của chúng ta sẽ được chuẩn như sau:
Với code như sau:
<?xml version="1.0" encoding="utf-8"?>
<LinearLayout xmlns:android="http://schemas.android.com/apk/res/android"
    android:layout_awidth="match_parent"
    android:layout_height="match_parent"
    android:orientation="vertical">

    <LinearLayout
        android:layout_awidth="match_parent"
        android:layout_height="wrap_content"
        android:orientation="vertical"
        android:padding="8dp">

        <TextView
            android:id="@+id/tvMath"
            android:layout_awidth="match_parent"
            android:layout_height="wrap_content"
            android:gravity="right|center_vertical"
            android:minHeight="48dp"
            android:text="0"
            android:textSize="24sp" />

        <TextView
            android:id="@+id/tvResult"
            android:layout_awidth="match_parent"
            android:layout_height="wrap_content"
            android:gravity="right|center_vertical"
            android:minHeight="48dp"
            android:text="0"
            android:textSize="24sp" />

    </LinearLayout>

    <LinearLayout
        android:layout_awidth="match_parent"
        android:layout_height="0dp"
        android:layout_weight="1"
        android:orientation="horizontal">

        <Button
            android:id="@+id/btnC"
            android:layout_awidth="0dp"
            android:layout_height="match_parent"
            android:layout_weight="1"
            android:text="C"
            android:textSize="20sp" />

        <Button
            android:id="@+id/btnOpen"
            android:layout_awidth="0dp"
            android:layout_height="match_parent"
            android:layout_weight="1"
            android:text="("
            android:textSize="20sp" />

        <Button
            android:id="@+id/btnClose"
            android:layout_awidth="0dp"
            android:layout_height="match_parent"
            android:layout_weight="1"
            android:text=")"
            android:textSize="20sp" />

        <Button
            android:id="@+id/btnDiv"
            android:layout_awidth="0dp"
            android:layout_height="match_parent"
            android:layout_weight="1"
            android:text="/"
            android:textSize="20sp" />
    </LinearLayout>

    <LinearLayout
        android:layout_awidth="match_parent"
        android:layout_height="0dp"
        android:layout_weight="1"
        android:orientation="horizontal">

        <Button
            android:id="@+id/btn7"
            android:layout_awidth="0dp"
            android:layout_height="match_parent"
            android:layout_weight="1"
            android:text="7"
            android:textSize="20sp" />

        <Button
            android:id="@+id/btn8"
            android:layout_awidth="0dp"
            android:layout_height="match_parent"
            android:layout_weight="1"
            android:text="8"
            android:textSize="20sp" />

        <Button
            android:id="@+id/btn9"
            android:layout_awidth="0dp"
            android:layout_height="match_parent"
            android:layout_weight="1"
            android:text="9"
            android:textSize="20sp" />

        <Button
            android:id="@+id/btnMul"
            android:layout_awidth="0dp"
            android:layout_height="match_parent"
            android:layout_weight="1"
            android:text="*"
            android:textSize="20sp" />
    </LinearLayout>

    <LinearLayout
        android:layout_awidth="match_parent"
        android:layout_height="0dp"
        android:layout_weight="1"
        android:orientation="horizontal">

        <Button
            android:id="@+id/btn4"
            android:layout_awidth="0dp"
            android:layout_height="match_parent"
            android:layout_weight="1"
            android:text="4"
            android:textSize="20sp" />

        <Button
            android:id="@+id/btn5"
            android:layout_awidth="0dp"
            android:layout_height="match_parent"
            android:layout_weight="1"
            android:text="5"
            android:textSize="20sp" />

        <Button
            android:id="@+id/btn6"
            android:layout_awidth="0dp"
            android:layout_height="match_parent"
            android:layout_weight="1"
            android:text="6"
            android:textSize="20sp" />

        <Button
            android:id="@+id/btnSub"
            android:layout_awidth="0dp"
            android:layout_height="match_parent"
            android:layout_weight="1"
            android:text="-"
            android:textSize="20sp" />
    </LinearLayout>

    <LinearLayout
        android:layout_awidth="match_parent"
        android:layout_height="0dp"
        android:layout_weight="1"
        android:orientation="horizontal">

        <Button
            android:id="@+id/btn1"
            android:layout_awidth="0dp"
            android:layout_height="match_parent"
            android:layout_weight="1"
            android:text="1"
            android:textSize="20sp" />

        <Button
            android:id="@+id/btn2"
            android:layout_awidth="0dp"
            android:layout_height="match_parent"
            android:layout_weight="1"
            android:text="2"
            android:textSize="20sp" />

        <Button
            android:id="@+id/btn3"
            android:layout_awidth="0dp"
            android:layout_height="match_parent"
            android:layout_weight="1"
            android:text="3"
            android:textSize="20sp" />

        <Button
            android:id="@+id/btnPlus"
            android:layout_awidth="0dp"
            android:layout_height="match_parent"
            android:layout_weight="1"
            android:text="+"
            android:textSize="20sp" />
    </LinearLayout>

    <LinearLayout
        android:layout_awidth="match_parent"
        android:layout_height="0dp"
        android:layout_weight="1"
        android:orientation="horizontal">

        <Button
            android:id="@+id/btn0"
            android:layout_awidth="0dp"
            android:layout_height="match_parent"
            android:layout_weight="1"
            android:text="0"
            android:textSize="20sp" />

        <Button
            android:id="@+id/btnDot"
            android:layout_awidth="0dp"
            android:layout_height="match_parent"
            android:layout_weight="1"
            android:text="."
            android:textSize="20sp" />

        <Button
            android:id="@+id/btnResult"
            android:layout_awidth="0dp"
            android:layout_height="match_parent"
            android:layout_weight="2"
            android:text="="
            android:textSize="20sp" />
    </LinearLayout>

</LinearLayout>
Bài này đến đây tương đối là dài rồi, tuy nhiên mình vẫn muốn hướng dẫn cho các bạn thử tiếp cách thiết kế giao diện Chat bằng LinearLayout. Vì ngày trước mình cứ ngỡ sẽ không thể làm được bằng LinearLayout nhưng vừa rồi, qua một chia sẻ trên face, mình đã biết được một mẹo khá hay.
3. Thiết kế giao diện Chat bằng LinearLayout
Như bài hôm trước thiết kế giao diện Chat bằng RelativeLayout, chúng ta hình dung lại giao diện.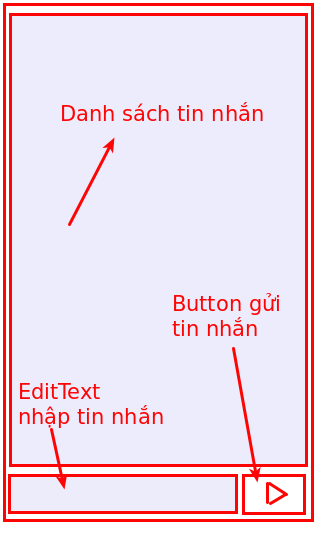
Các bạn tạo file layout mới giống như cách tạo file layout cho calculator nhé.
Như vậy, chúng ta có thể cơ bản bố trí cách sắp xếp như sau: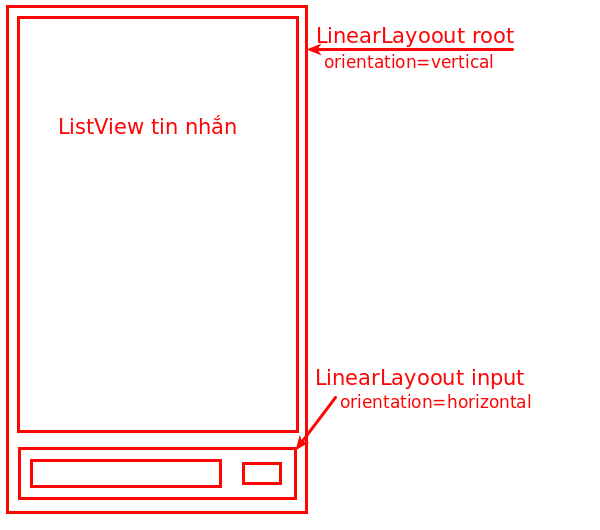
Trong đó, chúng ta cũng phải dùng các thuộc tính weight để phân chia tỷ lệ giao diện vì không biết được chính xác các loại màn hình có kích thước như thế nào.
– ListView chiếm 9 phần chiều cao
– LayoutInput chiếm 1 phần chiều cao
– Trong LayoutInput thì EditText chiếm 4 phần, Button Send chiếm 1 phần.
<?xml version="1.0" encoding="utf-8"?>
<LinearLayout xmlns:android="http://schemas.android.com/apk/res/android"
    android:layout_awidth="match_parent"
    android:layout_height="match_parent"
    android:orientation="vertical">

    <ListView
        android:id="@+id/lvChat"
        android:layout_awidth="match_parent"
        android:layout_height="0dp"
        android:layout_weight="9" />

    <LinearLayout
        android:layout_awidth="match_parent"
        android:layout_height="0dp"
        android:layout_weight="1"
        android:orientation="horizontal">

        <EditText
            android:id="@+id/editChat"
            android:layout_awidth="0dp"
            android:layout_height="match_parent"
            android:layout_weight="4" />

        <ImageButton
            android:id="@+id/btnSend"
            android:layout_awidth="0dp"
            android:layout_height="match_parent"
            android:layout_weight="1"
            android:src="@drawable/ic_send" />
    </LinearLayout>
</LinearLayout>

Nhìn rất đẹp và chuẩn như chúng ta mong muốn, tuy nhiên nếu các bạn xoay ngang màn hình thì sẽ thấy như sau: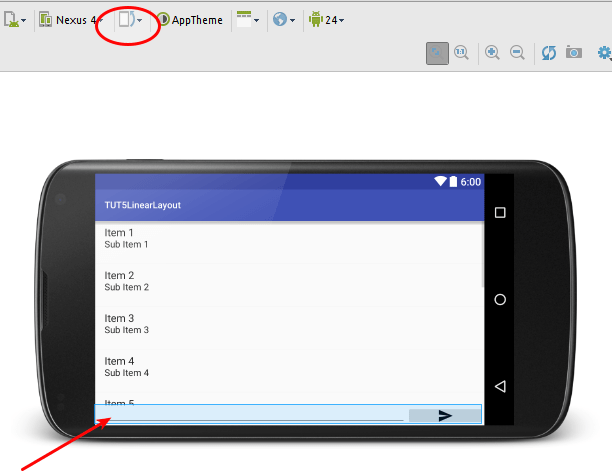
Như các bạn thấy, phần LayoutInput sẽ bị co lại bé, vì khi xoay, chiều cao giảm mà nó lại chỉ chiếm có 1 phần nên bị bé và sẽ mất nét, mất chữ. Còn Button Send thì lại bị phình chiều ngang ra.
Để khắc phục, chúng ta không đặt trọng số cho LayoutInput mà chỉ đặt wrap_content cho chiều cao, chiều rộng của button send cũng không đặt trọng số chỉ đặt wrap_content mà thôi. Và vì các đối tượng Button Send, LayoutInput không có trọng số, nên ListView và EditText các bạn có thể để trọng số bất kỳ nào đó, mình thích là 1.
<?xml version="1.0" encoding="utf-8"?>
<LinearLayout xmlns:android="http://schemas.android.com/apk/res/android"
    android:layout_awidth="match_parent"
    android:layout_height="match_parent"
    android:orientation="vertical">

    <ListView
        android:id="@+id/lvChat"
        android:layout_awidth="match_parent"
        android:layout_height="0dp"
        android:layout_weight="1" />

    <LinearLayout
        android:layout_awidth="match_parent"
        android:layout_height="wrap_content"
        android:orientation="horizontal">

        <EditText
            android:id="@+id/editChat"
            android:layout_awidth="0dp"
            android:layout_height="match_parent"
            android:layout_weight="1" />

        <ImageButton
            android:id="@+id/btnSend"
            android:layout_awidth="wrap_content"
            android:layout_height="match_parent"
            android:src="@drawable/ic_send" />
    </LinearLayout>
</LinearLayout>
Các bạn sẽ thấy giao diện dù ở màn hình nào, to hay nhỏ, ngang hay dọc thì sẽ không bị vỡ như trên nữa. Rất ngon lành cành đào. ^^.
Nếu có ý kiến hoặc đánh giá, thắc mắc gì, các bạn vui lòng comment bên dưới nhé.