Magento grid admin với custom column
Mình sẽ tạo 1 trang list trong Admin của Magento. Trang này sẽ: Sử dụng layout của Grid (1 template có sẵn của magento chuyên dùng cho trang list) Hiển thị toàn bộ danh sách Customer giống như phần “Manage Customer” Thay cột edit = 1 cột mới có button để gọi ajax và thực hiện 1 ...
Mình sẽ tạo 1 trang list trong Admin của Magento. Trang này sẽ:
- Sử dụng layout của Grid (1 template có sẵn của magento chuyên dùng cho trang list)
- Hiển thị toàn bộ danh sách Customer giống như phần “Manage Customer”
- Thay cột edit = 1 cột mới có button để gọi ajax và thực hiện 1 hành động nào đó
- Thêm 1 cột để lọc ra các Customer đã có ít nhất 1 order có trạng thái là complete
Đầu tiên ta cần phải tạo ra trang list trước để hiển thị toàn bộ danh sách Customer. Phần này khá đơn giản, ta có thể copy lại các block của phần “Manage Customer” cho nhanh. Module mình tạo ra có tên là DT_Adminhtml với file config.xml như sau:
<?xml version="1.0"?>
<config>
    <modules>
        <DT_Adminhtml>
            <version>0.1.0</version>
        </DT_Adminhtml>
    </modules>
    <global>
        <blocks>
            <dt_adminhtml>
                <class>DT_Adminhtml_Block</class>
            </dt_adminhtml>
        </blocks>
    </global>
    <admin>
        <routers>
            <adminhtml>
                <args>
                    <modules>
                        <dt_adminhtml before="Mage_Adminhtml">DT_Adminhtml</dt_adminhtml>
                    </modules>
                </args>
            </adminhtml>
        </routers>
    </admin>
</config>
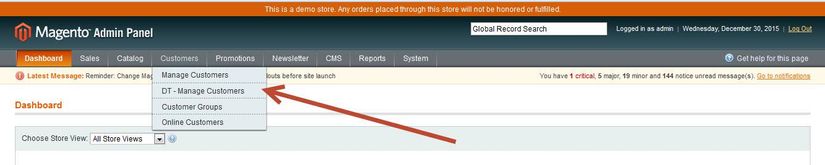
file adminhtml.xml(Để hiển thị đường dẫn trên menu của Customer) như sau:
<?xml version="1.0"?>
<config>
    <menu>
        <customer translate="title" module="customer">
            <children>
                <dt_test translate="title" module="customer">
                    <title>DT - Manage Customers</title>
                    <action>adminhtml/customer_test/</action>
                    <sort_order>0</sort_order>
                </dt_test>
            </children>
         </customer>
    </menu>
    <acl>
        <resources>
            <admin>
                <children>
                    <customer translate="title" module="customer">
                        <children>
                            <dt_test translate="title">
                                <title>DT - Manage Customers</title>
                                <sort_order>10</sort_order>
                            </dt_test>
                        </children>
                    </customer>
                </children>
            </admin>
        </resources>
    </acl>
</config>
Lưu ý: Vì mình đã khai báo override controller của Mage_Adminhtml trong file config.xml nên mọi controller trong folder controllers của mình giờ sẽ chạy với front_name là của module Adminhtml nên đường dẫn để chạy controller mà mình sẽ tạo là: adminhtml/customer_test/
Xóa cache đi rồi vào lại Admin, ta sẽ thấy hiện ra trên menu:
Tiếp theo ta cần tạo controller để hiển thị trang list. Mình đặt controller của mình với tên và đường dẫn như sau để tương ứng với đường dẫn đã khai báo trong file adminhtml.xml: appcodelocalDTAdminhtmlcontrollersCustomerTestController.php
<?php

class DT_Adminhtml_Customer_TestController extends Mage_Adminhtml_Controller_Action
{
    public function indexAction()
    {
        $this->_title($this->__('Customer Test'));
        $this->loadLayout();
        $this->_setActiveMenu('customer/customer');
        $this->_addContent($this->getLayout()->createBlock('dt_adminhtml/customer_test'));
        $this->renderLayout();
    }

    public function gridAction()
    {
        $this->loadLayout();
        $this->getResponse()->setBody(
            $this->getLayout()->createBlock('dt_adminhtml/customer_test_grid')->toHtml()
        );
    }
}
Hàm indexAction là hàm sẽ hiển thị ra trang list của chúng ta khi click vào link trên menu. Còn hàm gridAction sẽ được thực thi khi chúng ta sử dụng filter, search trên layout của grid (sử dụng ajax)
$this->_addContent($this->getLayout()->createBlock('dt_adminhtml/customer_test'));
Trong hàm addContent này ta sẽ khởi tạo block container DT_Adminhtml_Block_Customer_Test extend từ block Mage_Adminhtml_Block_Widget_Grid_Container: class DT_Adminhtml_Block_Customer_Test extends Mage_Adminhtml_Block_Widget_Grid_Container
{
    public function __construct()
    {
        $this->_blockGroup = 'dt_adminhtml'; // Tên của block group của module hiện tại
        $this->_controller = 'customer_test'; // cái này sẽ dùng làm đường dẫn để gọi ra block con DT_Adminhtml_Block_Customer_Test_Grid nên ko thể đặt tên tùy tiện được
        $this->_headerText = Mage::helper('dt_adminhtml')->__('List Customer');

        parent::__construct();
        $this->_removeButton('add'); // Bỏ nút add của template Grid đi
    }
}
Từ block container này sẽ kế thừa block Mage_Adminhtml_Block_Widget_Grid_Container nên nó sẽ tự động gọi block grid dựa trên _blockGroup và _controller được khai báo trong block container. Vậy nên tiếp theo chúng ta sẽ tạo block grid: DT_Adminhtml_Block_Customer_Test_Grid
class DT_Adminhtml_Block_Customer_Test_Grid extends Mage_Adminhtml_Block_Widget_Grid
{
    public function __construct()
    {
        parent::__construct();
        $this->setId('dtTestGrid');
        $this->setDefaultSort('entity_id');
        $this->setSaveParametersInSession(true);
        $this->setUseAjax(true);
        $this->setTemplate('dt_adminhtml/customer_grid.phtml');
    }

    protected function _prepareCollection()
    {
        $collection = Mage::getResourceModel('customer/customer_collection')
            ->addNameToSelect()
            ->addAttributeToSelect('email')
            ->addAttributeToSelect('created_at')
            ->addAttributeToSelect('group_id')
            ->joinAttribute('billing_postcode', 'customer_address/postcode', 'default_billing', null, 'left')
            ->joinAttribute('billing_city', 'customer_address/city', 'default_billing', null, 'left')
            ->joinAttribute('billing_telephone', 'customer_address/telephone', 'default_billing', null, 'left')
            ->joinAttribute('billing_region', 'customer_address/region', 'default_billing', null, 'left')
            ->joinAttribute('billing_country_id', 'customer_address/country_id', 'default_billing', null, 'left');

        $this->setCollection($collection);

        return parent::_prepareCollection();
    }

    protected function _prepareColumns()
    {
        $this->addColumn('entity_id', array(
            'header'    => Mage::helper('customer')->__('ID'),
            'awidth'     => '50px',
            'index'     => 'entity_id',
            'type'  => 'number',
        ));
        $this->addColumn('name', array(
            'header'    => Mage::helper('customer')->__('Name'),
            'index'     => 'name'
        ));
        $this->addColumn('email', array(
            'header'    => Mage::helper('customer')->__('Email'),
            'awidth'     => '150',
            'index'     => 'email'
        ));

        $groups = Mage::getResourceModel('customer/group_collection')
            ->addFieldToFilter('customer_group_id', array('gt'=> 0))
            ->load()
            ->toOptionHash();

        $this->addColumn('group', array(
            'header'    =>  Mage::helper('customer')->__('Group'),
            'awidth'     =>  '100',
            'index'     =>  'group_id',
            'type'      =>  'options',
            'options'   =>  $groups,
        ));

        $this->addColumn('Telephone', array(
            'header'    => Mage::helper('customer')->__('Telephone'),
            'awidth'     => '100',
            'index'     => 'billing_telephone'
        ));

        $this->addColumn('billing_postcode', array(
            'header'    => Mage::helper('customer')->__('ZIP'),
            'awidth'     => '90',
            'index'     => 'billing_postcode',
        ));

        $this->addColumn('billing_country_id', array(
            'header'    => Mage::helper('customer')->__('Country'),
            'awidth'     => '100',
            'type'      => 'country',
            'index'     => 'billing_country_id',
        ));

        $this->addColumn('billing_region', array(
            'header'    => Mage::helper('customer')->__('State/Province'),
            'awidth'     => '100',
            'index'     => 'billing_region',
        ));

        $this->addColumn('customer_since', array(
            'header'    => Mage::helper('customer')->__('Customer Since'),
            'type'      => 'datetime',
            'align'     => 'center',
            'index'     => 'created_at',
            'gmtoffset' => true
        ));

        if (!Mage::app()->isSingleStoreMode()) {
            $this->addColumn('website_id', array(
                'header'    => Mage::helper('customer')->__('Website'),
                'align'     => 'center',
                'awidth'     => '80px',
                'type'      => 'options',
                'options'   => Mage::getSingleton('adminhtml/system_store')->getWebsiteOptionHash(true),
                'index'     => 'website_id',
            ));
        }

        return parent::_prepareColumns();
    }

    public function getGridUrl()
    {
        return $this->getUrl('*/*/grid', array('_current'=>true));
    }
}
Giải thích 1 chút: Block grid này kế thừa block grid của Magento và nó sửa template mặc định của grid, nhưng mình sẽ sử dụng template của mình để thêm vào đó 1 số đoạn javascript.
$this->setTemplate('dt_adminhtml/customer_grid.phtml');
Vậy nên chúng ta sẽ tạo ra file appdesignadminhtmldefaultdefault emplatedt_adminhtmlcustomer_grid.phtml giống hệt với file appdesignadminhtmldefaultdefault emplatewidgetgrid.phtml
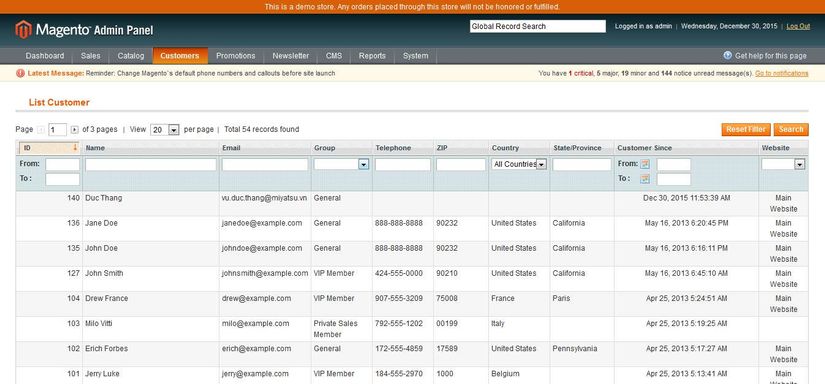
Hàm __prepareCollection() _là hàm khởi tạo collection và lấy ra danh sách customer. Nó sẽ được sử dụng trong template của grid.
Hàm _prepareColumns() chính là hàm để tạo ra các column trên trang grid. Trang list mà mình tạo ra giống với trang list của “Manage Customers” nhưng có bỏ đi 2 cột: cột check box và côt action.
Click vào link trên menu và xem thử trang list của chúng ta nào:
Vậy là đã có trang list, giờ mình sẽ thêm 1 cột mới vào cho trang list này thông qua hàm __prepareColumns()_. Bạn hãy xem qua hàm addColumn của grid nhé:
$this->addColumn('entity_id', array(
	'header'    => Mage::helper('customer')->__('ID'),
	'awidth'     => '50px',
	'index'     => 'entity_id',
	'type'  => 'number'
));
‘entity_id’ đầu tiên là tên của column
‘header’ Là tên hiển thị của column
‘awidth’ Là chiều rộng của column
‘index’ Là key để sử dụng cho việc filter, search. Key này ko đặt bừa bãi được. Grid của magento sẽ sử dụng key này để đưa vào câu query như là tên 1 cột (khi lấy ra danh sách customer trong hàm _prepareCollection()). Hoặc trong 1 số column đặc biệt hoặc column mới do chúng ta tạo ra, ta sẽ sử dụng key này để sửa lại collection của grid và hiển thị ra dữ liệu theo ý muốn.
‘type’ Phần này cũng vậy, type này sẽ ảnh hưởng tới cách hiển thị dữ liệu của column. Bạn có thể tham khảo 1 số loại type có sẵn mà Magento tạo ra như: text, price, currency, … trong Mage_Adminhtml_Block_Widget_Grid_Column.
Giờ chúng ta sẽ thêm 2 column mới cho trang list bằng cách sử dụng hàm addColumn() trong hàm __prepareColumn()_:
$this->addColumn('check_action', array(
	'header'    => Mage::helper('customer')->__('Check Action'),
	'id'        => 'entity_id',
	'awidth'     => '180',
	'renderer'  => 'DT_Adminhtml_Block_Customer_Test_Renderer_Check',
	'filter'    => false,
	'sortable'  => false,
));

$this->addColumn('loyal_customer', array(
    'header'    =>  Mage::helper('customer')->__('Loyal Customer'),
    'awidth'     =>
