React-Redux at client side and Rails at Server side
Hiện nay Reactjs là một thư viện mạnh mẽ khá phổ biến được phát triển bởi Facebook. Khi làm việc với React hay các dự án ứng dụng Single Page nói chung, có một khái niệm rất quan trọng là Trạng thái(state) của ứng dụng. Vậy state của ứng dụng là gì? Một ứng dụng web hoạt động cần dữ liệu từ phía ...
Hiện nay Reactjs là một thư viện mạnh mẽ khá phổ biến được phát triển bởi Facebook. Khi làm việc với React hay các dự án ứng dụng Single Page nói chung, có một khái niệm rất quan trọng là Trạng thái(state) của ứng dụng. Vậy state của ứng dụng là gì? Một ứng dụng web hoạt động cần dữ liệu từ phía máy chủ, thao tác của người dùng,…tổng hợp các thứ này lại ta được trạng thái của ứng dụng. Nếu biết trạng thái này, có nghĩa là tại thời điểm X ta biết được máy chủ đã trả về dữ liệu gì, người dùng đã thao tác những gì, nhập vào dữ liệu gì. Các ứng dụng web hiện nay ngày càng phức tạp, việc biết được trạng thái này giúp cho công việc kiểm soát lỗi dễ dàng hơn, nhất là nó làm cho cách chúng ta lập trình cũng đơn giản hơn. Ví dụ, nếu bạn có một biểu mẫu mua hàng, giả sử có 5 bước: xác nhận đơn hàng, áp dụng mã khuyến mãi, điền thông tin giao hàng, thanh toán, hoàn tất. Với một ứng dụng web thông thường, nếu xảy ra lỗi ở bước 4, lập trình viên sẽ kiểm tra lại và nhập dữ liệu từ 1->4, tìm lỗi sau đó sửa lỗi, công đoạn này lặp đi lặp lại n lần!!! Nếu sử dụng Redux, mỗi công đoạn xem như một trạng thái và bạn không cần phải lặp lại bước 1->4 nữa. Vậy làm sao quản lý được trạng thái của ứng dụng. ReduxJS (dựa trên nền tảng Flux) nổi lên như là thư viện Javascript giúp quản lý trạng thái của ứng dụng được phát triển mạnh mẽ và dành được sự quan tâm lớn từ cộng đồng. Redux là gì, nó có các đặc điểm gì, cơ chế hoạt động ra sao, bạn có thể dễ dàng tìm thấy ở những bài viết khác trong viblo.asia này. Bài viết này sẽ trình bày project sử dụng react-redux phía client và Rails phía server.
1, Set up API Việc đầu tiên, chúng ta hãy tạo một API đơn giản với Rails. Set up project:
rails new demo--redux-api --api
Add gem:
    gem 'rack-cors'
    gem 'active_model_serializers', '~> 0.10.0'
Config json MIME type: config/initializers/active_model_serializer.rb
    api_mime_types = %W(
      application/vnd.api+json
      text/x-json
      application/json
    )
    Mime::Type.register 'application/vnd.api+json', :json, api_mime_types
Set up config/initializers/cors.rb:
    Rails.application.config.middleware.insert_before 0, Rack::Cors do
      allow do
        origins '*'

        resource '*',
          headers: :any,
          methods: [:get, :post, :put, :patch, :delete, :options, :head]
      end
    end
Bước tiếp theo là tạo một model Article với thuộc tính title kiểu string:
rails g model Article title:string
Set up routes:
    Rails.application.routes.draw do
      # For details on the DSL available within this file, see http://guides.rubyonrails.org/routing.html
      namespace :api do
        namespace :v1 do
            resources :articles
        end
      end
    end
Lần lượt tạo các method action: index(get), create(post), show(get), destroy(delete) cho Article. Trong file app/controllers/api/v1/articles_controller.rb:
    module Api
  module V1
    class ArticlesController < ApplicationController
      before_action :set_article, only: [:show, :destroy]

      def index
        render json: Article.all
      end

      def create
        @article = Article.create(article_params)
        if @article.save
          render json: @article, status: 201
        else
          render json: { errors: @article.errors.full_messages }, status: 422
        end
      end

      def show
        render json: @article = Article.find(params[:id])
      end

      def destroy
        @article.destroy
            render :show, status: :ok
          end

          private
          def set_article
            @article = Article.find params[:id]
          end

          def article_params
            params.permit(:title)
          end
        end
      end
    end
Về cơ bản đã xong, chi tiết các bạn có thể tham khảo trên: https://github.com/khuongnt1688/Shmarticle/tree/master/shmarticle-api 2, Bắt đầu với React-redux Có khá nhiều bộ React-redux-starter-kit được phát triển hiện nay, về cơ bản mỗi cái có cấu trúc như nhau, chỉ khác nhau đôi chút cách sắp sếp các thư mục, các file thành phần. Hoặc bạn có thể tự xây dựng mà không cần kit nào. Ở đây mình giới thiệu bộ công cụ khá hay và dễ dùng là: https://github.com/buckyroberts/React-Redux-Boilerplate Bộ công cụ này ngoài react, redux, còn tích hợp thêm một số tool hỗ trợ:
- React-routes: giúp điều hướng trong React
- Webpack: Biên dịch các file js, jade, coffee, less, sass, png... thành js, css, png tự động mỗi khi có thay đổi, và một số tính năng hữu ích khác.
- Babel: Biên dịch, convert để tích hợp các version mã javascript khác nhau.
Các bạn pull code từ: https://github.com/buckyroberts/React-Redux-Boilerplate Tiến hành install các thư viện cần thiết:
npm install
Khởi tạo webpack:
webpack
Bắt đầy chạy server, mặc định là cổng 3000:
npm run start
Trình duyệt sẽ tự động nhảy vào: http://localhost:3000/. Giẳ sử bạn đang chạy server-api của Rails với cổng khác, 5000 chẳng hạn.
Cơ bản đã xong phần khởi tạo, chúng ta sẽ tiến hành tìm hiểu và code các thành phần của React-redux Trước tiên: config lại file cấu hình babel và webpack như sau: Trong file .babelrc
    {
      "presets": [
        "es2015",
        "react",
        'stage-2'
      ],
        plugins: ['transform-class-properties', 'transform-object-rest-spread'],
      "env": {
        "development": {
          "presets": []
        }
      }
    }
Trong file webpack.config.js:
    var path = require('path');
    var webpack = require('webpack');

    module.exports = {
        devServer: {
            inline: true,
            contentBase: './src',
            port: 3000,
                historyApiFallback: true
        },
        devtool: 'cheap-module-eval-source-map',
        entry: './dev/js/index.js',
        module: {
            loaders: [
                {
                    test: /.js$/,
                    loaders: ['babel'],
                    exclude: /node_modules/
                },
                {
                    test: /.scss/,
                    loader: 'style-loader!css-loader!sass-loader'
                }
            ]
        },
        output: {
            path: 'src',
            filename: 'js/bundle.min.js'
        },
        plugins: [
            new webpack.optimize.OccurrenceOrderPlugin()
        ]
    };
Cơ chế làm việc của React-redux có thể được mô tả bằng hình ảnh dưới đây:
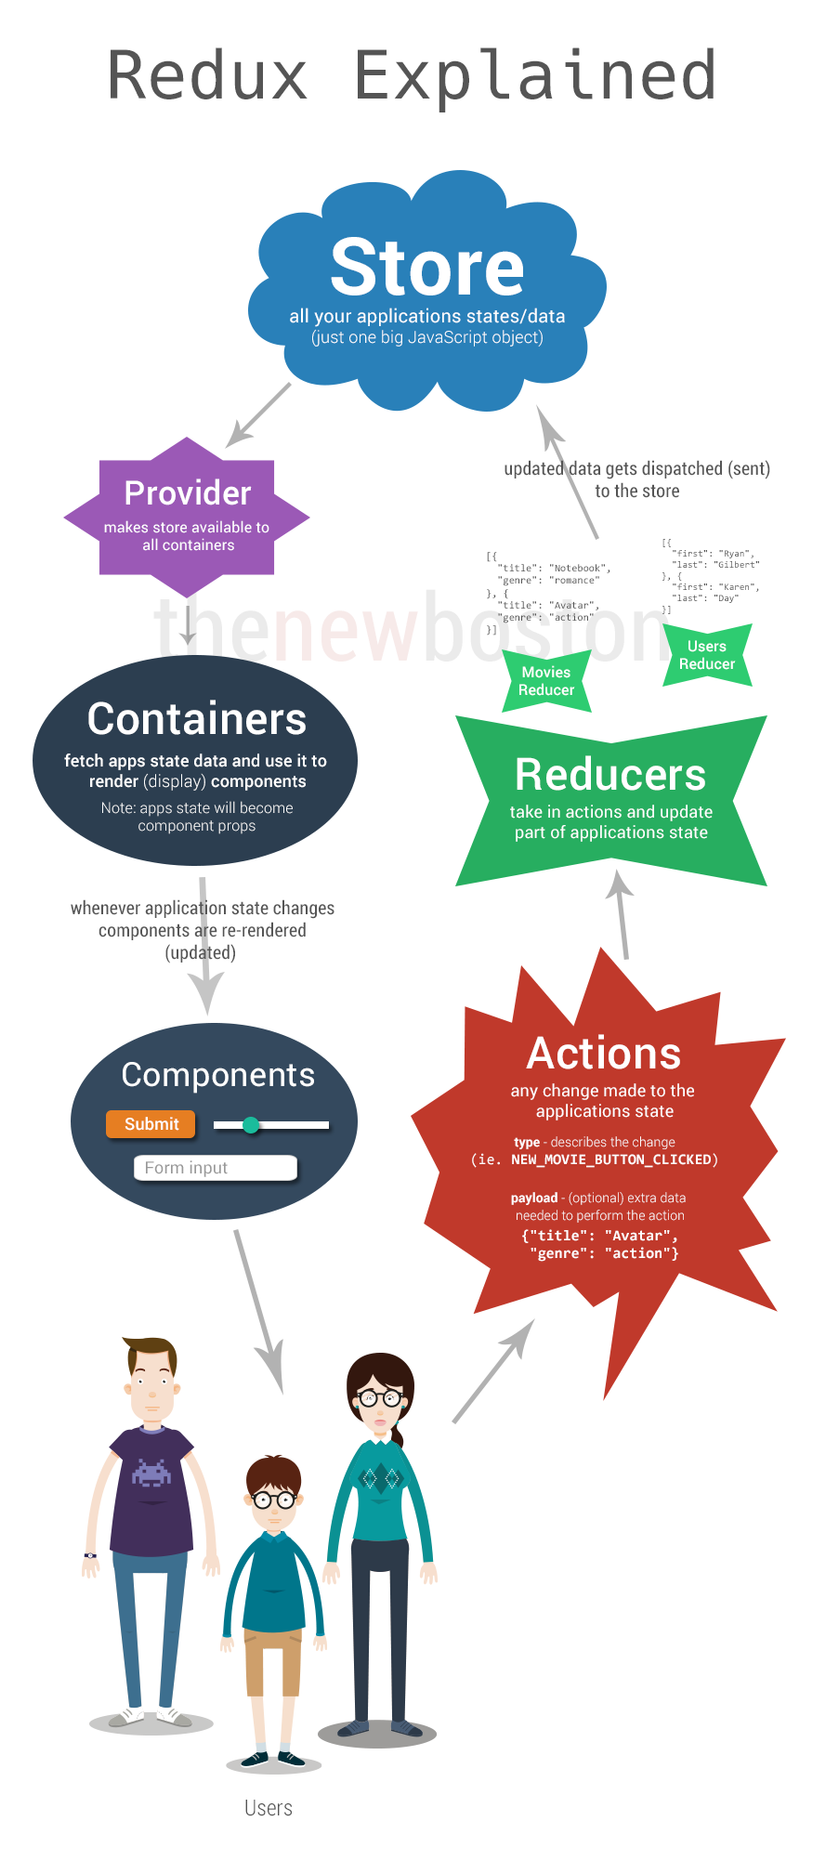
Ok, chúng ta sẽ bắt đầu từ đâu nhỉ?
Là người dùng của hệ thống bên phía client
Khi người dùng thao tác trên trình duyệt, click button hay một event nào đó thì Action sẽ được gọi. Action là những đối tượng mô tả cách chúng ta muốn thay đổi state. Bạn có thể hình dung action như là những API cho state của bạn. Trước khi vào code action, chúng ta hay chú ý đến file: dev/js/action/types.js. File này sẽ khai báo các hằng số constant để giải quyết việc xác định action nào. Những constant này sẽ được sử dụng bởi cả reducer và action:
    export const GET_ARTICLES = "GET_ARTICLES" ;
    export const GET_ARTICLE = "GET_ARTICLE" ;
    export const CREATE_ARTICLE = "CREATE_ARTICLE" ;
    export const DELETE_ARTICLE = "DELETE_ARTICLE" ;
Action creator sẽ trả về một object với type và payload. Type là một trong số những constant ActionTypes mà chúng ta đã tạo ở trên. Payload có thể là bất cứ thứ gì, nó sẽ được sử dụng để thay đổi global state của application. Trong file dev/js/action/index.js chúng ta sẽ khai báo các action index, create, delete hay show article:
    import {GET_ARTICLES, GET_ARTICLE, CREATE_ARTICLE, DELETE_ARTICLE} from './types';
    import  axios from 'axios';

    const API_URL = "http://localhost:5000/api/v1" ;

    export function getArticles(){
      const request = axios.get(`${API_URL}/articles`);
      return{
        type: GET_ARTICLES,
        payload: request
      };
    }

    export function createArticle(props){
      const request = axios.post(`${API_URL}/articles`, props);
      return{
        type: CREATE_ARTICLE,
        payload: request
      };
    }

    export function deleteArticle(id){
      const request = axios.delete(`${API_URL}/articles/${id}`);

      return{
        type: DELETE_ARTICLE,
        payload: request
      };
    }

    export function getArticle(id){
      const request = axios.get(`${API_URL}/articles/${id}`);

      return{
        type: GET_ARTICLE,
        payload: request
      };
    }
Giả sử bên API đang chạy với cổng 5000, import axios giúp tạo request đến bên api. Payload cho các action là request.
Sau khi action được dispatch, sẽ đến nhiệm vụ của Reducer. Reducer là những action handle giúp chi tiết hóa các action, nó kết nối giữa action và store, nó nhận vào type và payload action, từ đó biến đổi state cũ thành state mới, giả sử nếu chúng ta dispatch một action là createArticle thì reducer của nó sẽ nhận action đó và thêm article mới vào trong state. Lưu ý rằng, state ở đây là immutable. State trong redux phải là immutable. Bạn sẽ không thể thay đổi state mà phải trả về một object state mới, việc này nhằm mục đích tránh những side effect trong application, state chỉ thay đổi khi có action khác được dispatch, chúng ta sẽ nói sâu hơn về vấn đề tại sao state lại phải là immutable trong một bài khác, vì nó vượt qua khuôn khổ mà chúng ta muốn biết trong bài này. Trong file dev/js/reducers/index.js:
    import {combineReducers} from 'redux';
    import ArticlesReducer from './articles_reducer';
    import {reducer as formReducer} from 'redux-form';

    const allReducers = combineReducers({
      articles: ArticlesReducer,
      form: formReducer
    });

    export default allReducers
combineReducers giúp tổng hợp các reducers khác nhau lại thành allReducers. Chẳng hạn chúng ta có nhiều reducer như UserReducer, MovieReducer hay trong bài này là ArticleReducer. Việc import ArticleReducer từ file: dev/js/reducers/articles_reducer.js:
    import {GET_ARTICLES, GET_ARTICLE} from '../actions/types';

    const INITIAL_STATE = {all: [], article: null};

    export default function(state = INITIAL_STATE, action){
      switch(action.type){
        case GET_ARTICLES:
          return { ...state, all: action.payload.data} ;
        case GET_ARTICLE:
          return { ...state, article: action.payload.data} ;
        default:
          return state;
      }
    }
Về cơ bản, action GET_ARTICLES và GET_ARTICLE tương ứng với index và show articles. Cả 2 đều nhận giá trị trả về từ API, index thì giá trị trả về được truyền vào state all và tạo một state mới cho ứng dụng:
return { ...state, all: action.payload.data} ;
Còn show sẽ thay đổi ở state article:
return { ...state, article: action.payload.data} ;
Chúng ta đã có action, cũng đã có reducer để handle action. Giờ chúng ta sẽ đến store, đây là nơi lưu trữ state và cũng là nơi các thay đổi của state được phát đi và xử lý. Với redux, trạng thái state của ứng dụng được lưu trữ bởi 1 nguồn duy nhất, nó đơn giản chỉ là một biến javascript được lưu phía client. Redux cung cấp cho chúng ta function createStore. Chúng ta chỉ cần function này với những combined reducer chúng ta đã tạo trước đó để tạo store. Trong file dev/js/index.js:
    import 'babel-polyfill';
    import React from 'react';
    import ReactDOM from "react-dom";
    import {Provider} from 'react-redux';
    import {createStore, applyMiddleware} from 'redux';
    import {Router, browserHistory} from 'react-router';
    import thunk from 'redux-thunk';
    import promise from 'redux-promise';
    import createLogger from 'redux-logger';
    import allReducers from './reducers';
    import App from './components/App';
    import routes from './routes';

    const logger = createLogger();
    const store = createStore(
        allReducers,
        applyMiddleware(thunk, promise, logger)
    );

    ReactDOM.render(
        <Provider store={store}>
            <Router history={browserHistory} routes={routes} />
        </Provider>,
        document.getElementById('root')
    );
File này cũng khai báo để render ra DOM root. Cái mà view được khai báo trong file src/index.html:
    <!DOCTYPE html>
    <html lang="en">
    <head>
        <meta charset="UTF-8">
        <link rel="stylesheet" href="https://cdn.rawgit.com/twbs/bootstrap/v4-dev/dist/css/bootstrap.css">
        <title>Shmarticle</title>
    </head>
    <body>

        <div id="root"></div>
        <script src="js/bundle.min.js"></script>

    </body>
    </html>
Provider giúp điều phối giữa Store và các Containers. Như các bạn đã biết, tất cả state của ứng dụng đều được lưu trữ trong store. Provider sẽ xác định xem state này sẽ dành cho container nào.
Nó sẽ fetch dữ liệu state của ứng dụng tử store, và sử dụng nó để render(display) các components. Các state của ứng dụng lúc này sẽ trở thành các props của components. Chúng ta có 3 file để hiển thị các components tương ứng vơí các view index, new và show: dev/js/components/ArticlesHome.js:
    import React, {Component} from 'react';
    import {connect} from 'react-redux';
    import {getArticles} from '../actions/index';
    import {Link} from 'react-router';

    class ArticlesHome extends Component{
      componentWillMount(){
        this.props.getArticles();
      }

      renderArticles(){
        return this.props.articles.map((article) => {
          return (
            <li key={article.id}>
              <Link to={"articles/" + article.id }>
                <h4> {article.title} </h4>
              </Link>
            </li>
          )
        });
      }
      render(){
        return(
          <div className="container">

          <div>
          <Link to="articles/new" className="btn btn-warning">
          Create Article
          </Link>
          </div>

          Articles Home Page
          <ul className="list-group">
          {this.renderArticles()}
          </ul>
          </div>
        );
      }
    }

    function mapStateToProps(state){
      return {articles: state.articles.all }
    }

    export default connect(mapStateToProps, {getArticles: getArticles })(ArticlesHome);
Việc import {connect} from 'react-redux'; giúp nó có thể kết nối và sử dụng state app trong store. Export mặc định:
export default connect(mapStateToProps, {getArticles: getArticles })(ArticlesHome);
nó sẽ kết nối đến store, map state getArticles sẽ được truyền vào prop getArticles.
Tương tự với các file dev/js/components/NewArticle.js:
    import React, {Component, PropTypes} from 'react';
    import {reduxForm} from 'redux-form';
    import {createArticle} from '../actions/index';

    class NewArticle extends Component{
      static contextTypes = {
        router: PropTypes.object
      }

      onSubmit(props){
        this.props.createArticle(props)
          .then(() => {
            this.context.router.push('/');
          });
      }

      render(){
        const {fields:{title}, handleSubmit} = this.props;

        return(
          <div className="container">

          <h1> Create a new article </h1>

          <form onSubmit={handleSubmit(this.onSubmit.bind(this))}>

            <div className="form-group">
              <label>Title</label>
              <input type="text" className="form-control" {...title} />
            </div>
            <button type="submit" className="btn btn-success">Create</button>
          </form>

          </div>
        );
      }
    }

    export default reduxForm({
      form: 'NewArticleForm',
      fields: ['title']
    }, null, {createArticle})(NewArticle);
Và dev/js/components/SingleArticleShow.js:
    import React, {Component, PropTypes} from 'react';
    import {connect} from 'react-redux';
    import {getArticle, deleteArticle} from '../actions/index';

    class SingleArticleShow extends Component{
      static contextTypes = {
        router: PropTypes.object
      }

      componentWillMount(){
        this.props.getArticle(this.props.params.id);
      }

      deleteButtonClick(){
        this.props.deleteArticle(this.props.params.id)
          .then(() => {
            this.context.router.push('/');
          });
      }

      render(){
        if(!this.props.article){
          return <div> Getting article, please wait. </div>;
        }

        return(
          <div className="container">

          <h3>Title: {this.props.article.title} </h3>

          <button className="btn btn-warning" onClick={this.deleteButtonClick.bind(this)}>
            Delete Article
          </button>

          </div>
        );
      }
    }

    function mapStateToProps(state){
      return { article: state.articles.article};
    }


    export default connect(mapStateToProps, {getArticle, deleteArticle})(SingleArticleShow);
Chú ý khai báo routes sử dụng React-route trong file dev/js/routes.js:
    import React from 'react';
    import {Route, IndexRoute} from 'react-router';
    import App from './components/App';
    import ArticlesHome from './components/ArticlesHome';
    import NewArticle from './components/NewArticle';
    import SingleArticleShow from './components/SingleArticleShow';

    export default(
      <Route path="/" component={App}>
        <IndexRoute component={ArticlesHome} />
        <Route path="articles/new" component={NewArticle} />
        <Route path="articles/:id" component={
