Shader Unity - Vertex Animation: Tạo hiệu ứng lá cờ bay trong gió
Chào anh em. Hôm nay mình xin chia sẻ về Vertex Animation: Tạo hiệu ứng lá cờ bay trong gió bằng Shader ở Unity Bắt đầu nào. I, Workflow của Shader. Đầu tiên mình xin nói qua Workflow của shader dễ tiếp cận. Nếu bạn có 1 Mesh muốn vẽ nó lên screen thì Shader thực hiện những bước như sau. ...
Chào anh em. Hôm nay mình xin chia sẻ về Vertex Animation: Tạo hiệu ứng lá cờ bay trong gió bằng Shader ở Unity Bắt đầu nào.
I, Workflow của Shader.
Đầu tiên mình xin nói qua Workflow của shader dễ tiếp cận.
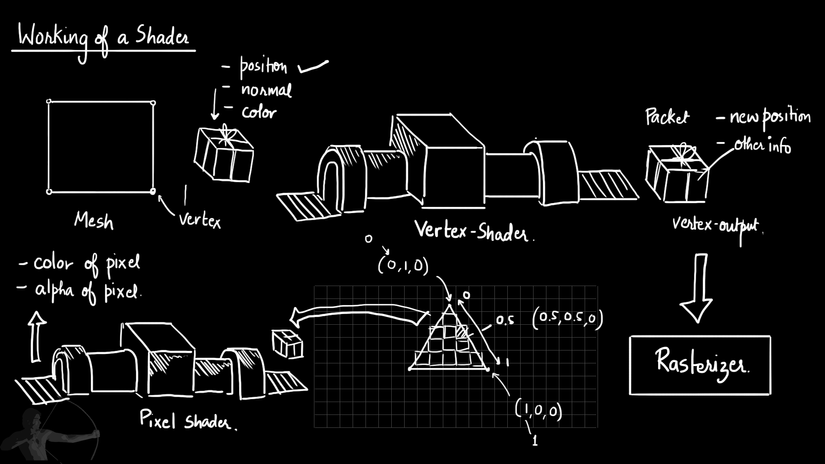
Nếu bạn có 1 Mesh muốn vẽ nó lên screen thì Shader thực hiện những bước như sau.
- Đầu tiên, Mesh thì cấu tạo từ nhiều vertex. Shader sẽ lấy các thông tin về các đỉnh này gồm position, vector normal, color.. và đóng gói vào những packet tạm gọi là Vertex Input.
- Những packet Vertex Input này sẽ được qua Vertex Shader cứ coi như là 1 cái máy để biến đổi về position và đầu ra là được các packet mới với các giá trị đã thay đổi rồi ta có được các Vertex Output.
- Các Vertex Output này sẽ được đưa tới Rasterijer. Rasterijer là hardware trên các thiết bị, nó giúp detect các pixel trên màn hình dựa trên các rule nhất định để vẽ các Vertex Output lên pixel tương ứng.
- Cuối cùng, các pixel này sẽ được lấy thông tin positon, color.. và đưa qua 1 cái máy khác là pixel shader hay còn gọi là fragment shader để xử lý, cho ta đầu ra cũng với các giá trị thay đổi về color of pixel, alpha of pixel.... để vẽ lên màn hình.
Tóm gọn là chức năng của Vertex Shader giúp thay đổi về position còn Fragment Shader giúp thay đổi về color, alpha... của Mesh lên màn hình.
II, Tạo hiệu ứng lá cờ bay trong gió.

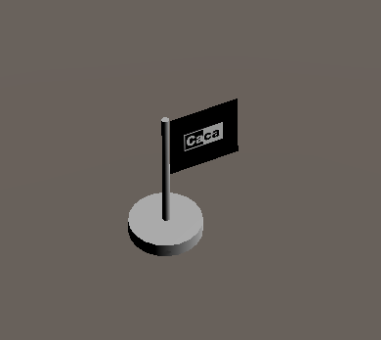
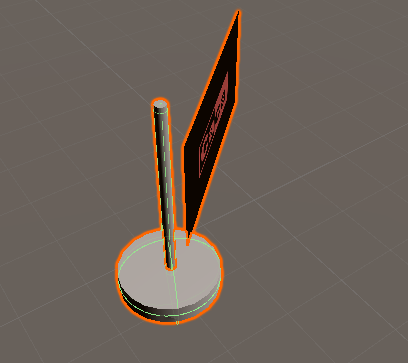
Ý tưởng ban đầu ta có 1 lá cờ như hình và thay phải thay đổi vị trí các vertex của mesh theo thời gian để tạo ra hiệu ứng sóng uốn lượn cho lá cờ. Và tất cả việc này chúng ta được thực hiện ở Vertex Shader.
Giờ mình tạo lá cờ với shader cơ bản.
 Code Shader cơ bản đó như sau.
// Upgrade NOTE: replaced 'mul(UNITY_MATRIX_MVP,*)' with 'UnityObjectToClipPos(*)'
Shader "Custom/ShaderFlag" {
	Properties {
		_MainColor ("Main Color", Color) = (1,1,1,1)
		_MainTexture("Main Texture", 2D) = "white" {}
	}

	SubShader {
		Pass {
			CGPROGRAM

			#pragma vertex vert
			#pragma fragment frag

			uniform half4 _MainColor;
			uniform sampler2D _MainTexture;

			// vertex shader input
			struct vertexInput
			{
				float4 vertex : POSITION; // vertex position
				float2 texcoord : TEXCOORD0; //texture coordinate
			};

			// vertex shader output (vertex to fragment)
			struct vertexOutput
			{
				float4 pos: SV_POSITION;
				float2 texcoord: TEXCOORD0;
			};

			vertexOutput vert(vertexInput i)
			{
				vertexOutput o;
				o.pos = UnityObjectToClipPos(i.vertex);
				o.texcoord.xy = i.texcoord.xy;
				return o;
			}
			fixed4 frag(vertexOutput i): SV_Target
			{
				fixed4 o;
				o = tex2D(_MainTexture,i.texcoord)*_MainColor;
				return o;
			}
			ENDCG
		}
	}
}
Để mình giải thích sơ qua về code của shader trên.
- Như ta thấy phần Properties là phần show các thuộc tính của Shader mà ta muốn tùy chỉnh ở Inspector trên Editor .
- Tiếp đến ta chú trọng vào 2 hàm đó là vert và frag. Thì như Workflow ở phần I thì vert tương ứng với Vertex Shader và frag tương ứng với Fragment Shader. Đầu vào của Vertex Shader với các giá trị tạo độ và trục tọa của nó và xuất ra tương tự rồi được làm input để đưa vào Fragment Shader.
- 2 Biến _MainColor và _MainTexture được ta tùy chỉnh thông qua Inspector và để Shader nhận được tùy chỉnh này thì ta cần phải khai vào thêm 2 biến ở trong phần Pass.
          uniform half4 _MainColor;
          uniform sampler2D _MainTexture;
uniform ở trên biểu thị là nó sẽ không đổi trong mọi điểm.
- Phần code o.pos = UnityObjectToClipPos(i.vertex); đây là biến các tọa độ của các mesh vào tọa độ trên màn hình được đặt ở hàm vert.
- Phần code o = tex2D(_MainTexture,i.texcoord)*_MainColor; tex2D đây là hàm đọc color texture rồi đưa vào shader và *_MainColor phối hợp với màu mà ta tùy chỉnh.
- Và Shader trong Unity được viết bằng ngôn ngữ CG/SLHL. Bạn có thể tham khảo thêm ở 1 số link dưới đây: https://docs.unity3d.com/Manual/SL-ShaderPrograms.html https://msdn.microsoft.com/en-us/library/windows/desktop/bb509561(v=vs.85).aspx http://developer.download.nvidia.com/CgTutorial/cg_tutorial_chapter01.html
Quay lại với bài toán là làm sao để lá cờ này sẽ bay bay trong gió được. Giờ mình có thể liên tưởng đến các phương trình đường thẳng tạo sóng như sin(x), cos(x)..
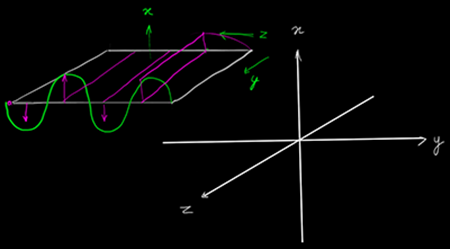 Áp dụng nó vào trong code. Thay đổi tọa độ Z của vertex
Chỉnh lại 1 ít code
		float4 vertexFlagAni(float4 verPos, float2 texcoord) {
				verPos.z = verPos.z + sin(texcoord.x);
				return verPos;
			}

			vertexOutput vert(vertexInput i)
			{
				vertexOutput o;
				i.vertex = vertexFlagAni(i.vertex,i.texcoord);
				o.pos = UnityObjectToClipPos(i.vertex);
				o.texcoord.xy = i.texcoord.xy;
				return o;
			}
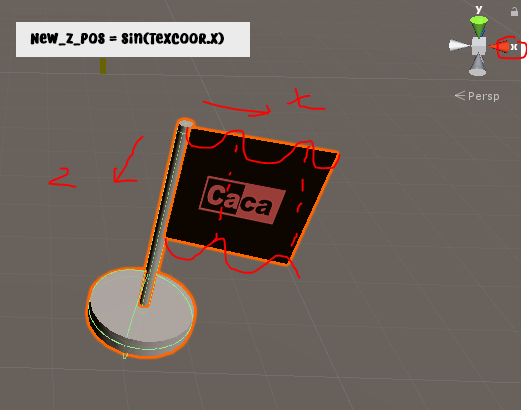
Ta thêm hàm vertexFlagAni hàm này giúp biến đổi tọa độ của các Vertex cụ thể là tọa độ Z. Và kết quả
 Như vậy là ta thấy tọa độ Z của các vertex đã thay đổi. Nhưng ta cần 1 yếu tố nữa là thêm time vào để tạo ra animation tạo sóng. Update tí code trong hàm vertexFlagAni.
	float4 vertexFlagAni(float4 verPos, float2 texcoord) {
				verPos.z = verPos.z + sin(texcoord.x - _Time.y);
				return verPos;
			}
_Time.y ở đây nói sẽ tương tự như Time trong Unity. Và tại sao lại phải dùng sin(texcoord.x - _Time.y); thì mình có thể mô tả qua hình ảnh.
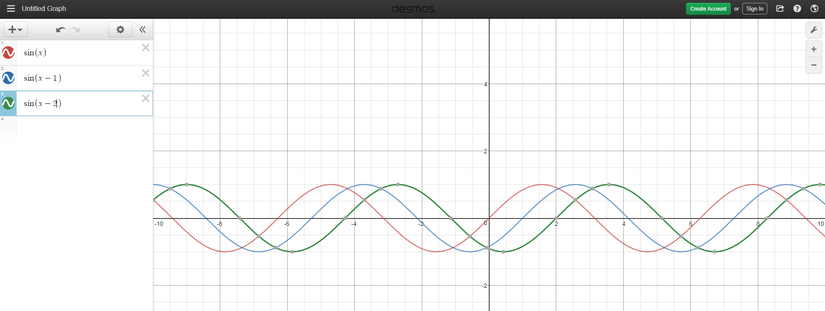 Bạn có thể test trên: https://www.desmos.com/calculator
Giờ mình bấm play để run và cho kết quả.
Bạn có thể test trên: https://www.desmos.com/calculator
Giờ mình bấm play để run và cho kết quả.
Lá cờ bắt đầu thay đổi theo thời gian. Vậy chúng ta cần update thêm ít code cho lá cờ bay hoàn chỉnh như thực tế. Full code
// Upgrade NOTE: replaced 'mul(UNITY_MATRIX_MVP,*)' with 'UnityObjectToClipPos(*)'
Shader "Custom/ShaderFlag" {
	Properties {
		_MainColor ("Main Color", Color) = (1,1,1,1)
		_MainTexture("Main Texture", 2D) = "white" {}
		_Speed("Speed Flag",Float) = 1
		_Amplitude("Amplitude Flag",Float) = 1
		_Frequency("Frequency Flag",Float) = 1
	}

	SubShader {
		Pass {
			CGPROGRAM

			#pragma vertex vert
			#pragma fragment frag

			uniform half4 _MainColor;
			uniform sampler2D _MainTexture;
			uniform float4 _MainTexture_ST;
			uniform float _Speed;
			uniform float _Amplitude;
			uniform float _Frequency;


			// vertex shader input
			struct vertexInput
			{
				float4 vertex : POSITION; // vertex position
				float2 texcoord : TEXCOORD0; //texture coordinate
			};

			// vertex shader output (vertex to fragment)
			struct vertexOutput
			{
				float4 pos: SV_POSITION;
				float2 texcoord: TEXCOORD0;
			};

			float4 vertexFlagAni(float4 verPos, float2 texcoord) {
				verPos.z = verPos.z + sin((texcoord.x - _Time.y*_Speed)*_Frequency)*(texcoord.x*_Amplitude);
				return verPos;
			}

			vertexOutput vert(vertexInput i)
			{
				vertexOutput o;
				i.vertex = vertexFlagAni(i.vertex,i.texcoord);
				o.pos = UnityObjectToClipPos(i.vertex);
				o.texcoord.xy = i.texcoord.xy;
				return o;
			}


			fixed4 frag(vertexOutput i): SV_Target
			{
				fixed4 o;
				o = tex2D(_MainTexture,i.texcoord)*_MainColor;
				return o;
			}
			ENDCG
		}
	}
}
Đồ thị của hàm sin((texcoord.x - _Time.y*_Speed)_Frequency)(texcoord.x*_Amplitude); các bạn có thể test trên https://www.desmos.com/calculator để hiểu thêm. Và kết quả cuối cùng
 Link download code: https://www.mediafire.com/file/8nodmi3i3h1hd6n
Mình xin kết bài tại đây. Cảm ơn anh em đã xem đến đây.
Hẹn gặp lại ^^!
Link download code: https://www.mediafire.com/file/8nodmi3i3h1hd6n
Mình xin kết bài tại đây. Cảm ơn anh em đã xem đến đây.
Hẹn gặp lại ^^!
