Tạo chức năng image slider/carousel trong blogspot
Image galleries, sliders và slideshows luôn luôn được sử dụng trong các trang web hay blog vì tính hữu dụng và ưu điểm của nó. Trong bài viết này, mình sẽ bày cho các bạn đang sử dụng blogspot làm blog một chiêu làm slider cho ảnh hết sức đẹp mắt và gây ấn tượng tốt cho khách viếng thăm blog của ...
Image galleries, sliders và slideshows luôn luôn được sử dụng trong các trang web hay blog vì tính hữu dụng và ưu điểm của nó. Trong bài viết này, mình sẽ bày cho các bạn đang sử dụng blogspot làm blog một chiêu làm slider cho ảnh hết sức đẹp mắt và gây ấn tượng tốt cho khách viếng thăm blog của các bạn.

Xem Demo
Bước 1 : Login vào Blogger Dashboard và chọn blog của các bạn.
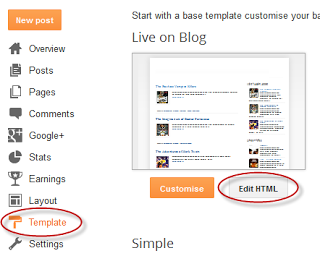
Bước 2 : Vào Template và click Edit HTML :

Bước 3 : Click vào bất kỳ nơi nào trong code rồi nhấn Ctrl + F tìm từ khóa </head>
Bước 4 : Ngay trên thẻ </head> vừa tìm được các bạn copy và dán đoạn code bên dưới vào bên trên nó :
<script src='http://www.google.com/jsapi'></script>
<script>
google.load("prototype","1.7.0.0");
google.load("scriptaculous", "1.9.0");
</script>

<script language='javascript' src='http://helplogger.googlecode.com/svn/trunk/Image Carousel/os.js' type='text/javascript'/>
<script language='javascript' src='http://helplogger.googlecode.com/svn/trunk/Image Carousel/carousel.js' type='text/javascript'/>
<script language='javascript' src='http://helplogger.googlecode.com/svn/trunk/Image Carousel/application.js' type='text/javascript'/>
Bước 5 : Bây giờ các bạn lại tìm thêm từ khóa mới là ]]></b:skin>

Bước 6 : Ngay bên trên nó, các bạn chèn đoạn code sau :
 .carousel {
position:relative;
clear:both;
left:20px; /* Distance from left */
margin-top:10px;
margin-bottom:20px;
border:2px solid #000; /* Carousel border */
background-color:#333333; /* Background color */
}
.carousel .navButton { cursor:pointer; display:block;
text-indent:-9999px;
background-repeat:none;
z-index:10;
}
.carousel .container {
position:absolute;
overflow:hidden;
}
.carousel .items {
position:absolute;  }
#Carousel2 {
height:88px; /* height of the container */
awidth:685px; /* awidth of the container */
}
#Carousel2 .container {
left:26px;
top:12px;
awidth:630px; /* awidth of the images container */
height:100px; /* height of the images container */
}
#Carousel2 .items { top:0; left:2px;
awidth:1700px; /* overall awidth of all the thumbnails */
}
#Carousel2 .item { height:70px; awidth:70px; float:left; clear:right; }
#Carousel2 .item .icon img { position:relative; left:0px; awidth:65px !important; height:65px; cursor:pointer;}
#Carousel2 .navButton { position:absolute; bottom:0px; awidth:24px; height:87px; }
#Carousel2 .navButton.previous { left:0px; background-image:url(https://3.bp.blogspot.com/-F5Qs-PaavL8/UoJNRUBO88I/AAAAAAAAEt0/RYwSNdin6vc/s1600/button-left.png); }
#Carousel2 .navButton.next { right:2px; background-image:url(https://2.bp.blogspot.com/-kOga7w7W0CA/UoJNRVJjaHI/AAAAAAAAEt4/GI7YgzSjl0o/s1600/button-right.png); }
#Carousel2 .item .key { display:none;}
#Carousel2 .item .picture { display:none;}
Bước 7 : Nhấn nút Save Template để lưu kết quả.
Bước 8 : Cuối cùng, vào Layout và click Add a Gadget link, rồi chọn HTML/Javascript từ pop-up box và dán đoạn code sau vào bên trong.
<div id="Carousel2" class="carousel">
<div class="button navButton previous" style="display:none;">Back</div>
<div class="button navButton next" style="display:none;">Forward</div>
<div class="container">
<div class="items">

<div class="item">
<div class="key caption">Thumb</div>
<div class="icon">
<a href="link URL"><img awidth="65" height="65" src="image URL" /></a></div>
<div class="picture"></div>
</div>

<div class="item">
<div class="key caption">Thumb</div>
<div class="icon">
<a href="link URL"><img awidth="65" height="65" src="image URL" /></a></div>
<div class="picture"></div>
</div>

<div class="item">
<div class="key caption">Thumb</div>
<div class="icon">
<a href="link URL"><img awidth="65" height="65" src="image URL" /></a></div>
<div class="picture"></div>
</div>

<div class="item">
<div class="key caption">Thumb</div>
<div class="icon">
<a href="link URL"><img awidth="65" height="65" src="image URL" /></a></div>
<div class="picture"></div>
</div>

<div class="item">
<div class="key caption">Thumb</div>
<div class="icon">
<a href="link URL"><img awidth="65" height="65" src="image URL" /></a></div>
<div class="picture"></div>
</div>

<div class="item">
<div class="key caption">Thumb</div>
<div class="icon">
<a href="link URL"><img awidth="65" height="65" src="image URL" /></a></div>
<div class="picture"></div>
</div>

<div class="item">
<div class="key caption">Thumb</div>
<div class="icon">
<a href="link URL"><img awidth="65" height="65" src="image URL" /></a></div>
<div class="picture"></div>
</div>

<div class="item">
<div class="key caption">Thumb</div>
<div class="icon">
<a href="link URL"><img awidth="65" height="65" src="image URL" /></a></div>
<div class="picture"></div>
</div>

<div class="item">
<div class="key caption">Thumb</div>
<div class="icon">
<a href="link URL"><img awidth="65" height="65" src="image URL" /></a></div>
<div class="picture"></div>
</div>

<div class="item">
<div class="key caption">Thumb</div>
<div class="icon">
<a href="link URL"><img awidth="65" height="65" src="image URL" /></a></div>
<div class="picture"></div>
</div>

<div class="item">
<div class="key caption">Thumb</div>
<div class="icon">
<a href="link URL"><img awidth="65" height="65" src="image URL" /></a></div>
<div class="picture"></div>
</div>

<div class="item">
<div class="key caption">Thumb</div>
<div class="icon">
<a href="link URL"><img awidth="65" height="65" src="image URL" /></a></div>
<div class="picture"></div>
</div>

<div class="item">
<div class="key caption">Thumb</div>
<div class="icon">
<a href="link URL"><img awidth="65" height="65" src="image URL" /></a></div>
<div class="picture"></div>
</div>

<div class="item">
<div class="key caption">Thumb</div>
<div class="icon">
<a href="link URL"><img awidth="65" height="65" src="image URL" /></a></div>
<div class="picture"></div>
</div>

<div class="item">
<div class="key caption">Thumb</div>
<div class="icon">
<a href="link URL"><img awidth="65" height="65" src="image URL" /></a></div>
<div class="picture"></div>
</div>

<div class="item">
<div class="key caption">Thumb</div>
<div class="icon">
<a href="link URL"><img awidth="65" height="65" src="image URL" /></a></div>
<div class="picture"></div>
</div>

<div class="item">
<div class="key caption">Thumb</div>
<div class="icon">
<a href="link URL"><img awidth="65" height="65" src="image URL" /></a></div>
<div class="picture"></div>
</div>

<div class="item">
<div class="key caption">Thumb</div>
<div class="icon">
<a href="link URL"><img awidth="65" height="65" src="image URL" /></a></div>
<div class="picture"></div>
</div>

<div class="item">
<div class="key caption">Thumb</div>
<div class="icon">
<a href="link URL"><img awidth="65" height="65" src="image URL" /></a></div>
<div class="picture"></div>
</div>

</div>
</div>
</div>
Các bạn nhớ thay thế link URL là đường link mà ảnh sẽ tới và image URL là đường link của ảnh.
Thế là xong, bây giờ các bạn đã có một slider ảnh tuyệt đẹp để dùng trên blog của mình rồi, nếu có gì thắc mắc thì đừng ngần ngại để lại lời nhắn dưới dạng comments nhé. Mình sẽ giúp các bạn hoàn thành bài viết này.
Chuyên Mục: Blogspot
Bài viết được đăng bởi webmaster
