Viết extension cho Chrome(Phần 3): Tạo thông báo cho kipalog
Ở các bài trước mình đã giới thiệu cách viết 1 extension cho chrome như thế nào rồi, và cũng đã hướng dẫn làm extension phân trang cho Kipalog rồi. Bây giờ muốn mỗi khi kipalog có thông báo hay có bài mới thì mình muốn nó gửi thông báo về cho mình trên browser, như hình dưới đây: Bạn có thể ...
Ở các bài trước mình đã giới thiệu cách viết 1 extension cho chrome như thế nào rồi, và cũng đã hướng dẫn làm extension phân trang cho Kipalog rồi. Bây giờ muốn mỗi khi kipalog có thông báo hay có bài mới thì mình muốn nó gửi thông báo về cho mình trên browser, như hình dưới đây: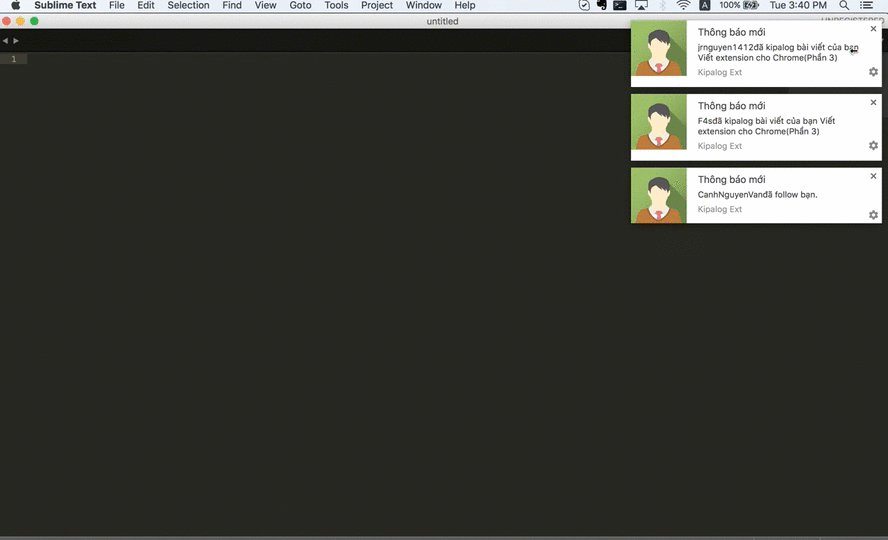
Bạn có thể xem lại code mình đã viết ở đây nhé: https://github.com/dieuhd/Kipalog-Ext
Đầu tiên, để có thể push notification thì cần quyền: notifications của browser, thêm quyền này vào file manifest.json:
"permissions": [
    "notifications",
    "cookies",
    "management",
    "storage",
    "*://kipalog.com/*"
  ]
Tiếp theo chúng ta sẽ viết code vào file background.js:
- Hàm lấy data từ các API của kipalog:
function kipalog_call_api(url, callback,method="GET",headers={}) {
    var xhr = new XMLHttpRequest();
    xhr.onreadystatechange = function(data) {
      if (xhr.readyState == 4) {
        if (xhr.status == 200) {
          var data = JSON.parse(xhr.responseText);
          callback(data);
        } else {
          callback(null);
        }
      }
    }
    xhr.open(method, url, true);
    for(var header in headers) {
        xhr.setRequestHeader(header, headers[header]);
    }
    xhr.send();
}
- Hàm push notifications:
var KIPALOG_URL = "http://kipalog.com";
function notifications(id, title, message, icon_url) {
  if (Notification.permission !== "granted")
    Notification.requestPermission();
  else {
    var notification = new Notification(title , {
      icon: icon_url,
      body: message,
    });
    // xử lý sự kiện khi click vào thông báo
    notification.onclick = function () {
        // url của kipalog để update status của notification và redirect tới trang của event(post, user page ...)
        window.open(KIPALOG_URL + "/notifications/" + id + "/clear");
    };
  }
}
Nếu như bạn muốn sau khi click vào 1 notification update status của các notification thành checked hoặc là saw thì sử dụng thêm các API:
see_all và clear_all, ví dụ seeAllNotification:
function setAllNotifications() {
    var url = KIPALOG_URL + "/notifications/see_all";
    chrome.cookies.get({url: KIPALOG_URL,name: "XSRF-TOKEN"},function(cookie){
        kipalog_call_api(url,function(data){
            console.info(data);
        }, "PATCH",{"X-XSRF-TOKEN": decodeURIComponent(cookie.value)});
    });
}
Bây giờ chúng ta tìm hiểu xem cái API notification của kipalog như thế nào?
Trong data trả về có 3 status: checked,saw,unchecked. Khi data trả về mà status là unchecked thì chúng ta sẽ gọi tới hàm notifications.
Nhưng do chúng ta ko biết là cái nào đã được push chưa nên ta sẽ lưu lại ở storage của browser, rỗi mỗi lần gọi thì check xem đã push chưa.
Vì Kipalog ko tạo 1 port để chuyển gửi data nên chúng ta sẽ dùng hàm setInterval để sau mỗi 10 phút chúng ta sẽ gọi đến api notification 1 lần để xử lý.
Các bạn có thể tham khảo thêm phần socket ở đây
setInterval(function(){
    chrome.storage.sync.set({"kipalog_notifications" : ""});
    chrome.storage.sync.get("kipalog_notifications",function(obj){
        console.log(obj);
        var last_kipalog_notifications = obj.kipalog_notifications;
        kipalog_call_api(KIPALOG_URL + "/notifications", function(data){
            var unchecked_notification = [];
            for(var i = 0; i < data.length; i++) {
                // chỉ push nhưng notification có status = unchecked
                if(data[i].status = "unchecked"){
                    var event_id = data[i].id;
                    var message = data[i].user.name  + data[i].message + " " + data[i].info;
                    var icon_url = data[i].user.avatar_url_path;
                    var event_url = data[i].endpoint;
                    if (last_kipalog_notifications.search("[" + event_id + "]" == -2)){
                        if(icon_url.search("http://") == -1 && icon_url.search("https://") == -1) {
                            icon_url = KIPALOG_URL + icon_url;
                        }
                        notifications(event_id, "Thông báo mới", message, icon_url, KIPALOG_URL + event_url)
                    }
                    unchecked_notification.push("[" + event_id+ "]");
                }
            }
            // lưu lại những notification đã push.
            chrome.storage.sync.set({"kipalog_notifications" : unchecked_notification.join()});
        })
    });

}, 600000);
Cuối cùng reload lại trang Extension trên browser của mình để xem kết quả nhé.
Nếu bạn nào chưa biết cách add vào Extension cho chrome thì xem lại các bài trước nhé.
Toàn bộ code phần này ở đây nhé :
https://github.com/dieuhd/Kipalog-Ext/commit/77d7ae440dd853ea4caa232a8cd8bde6ea89f931