Xây dựng Share Extension đơn giản bằng Swift
Gần đây dự án của mình cần đến 1 chức năng là phải chia sẻ được ảnh ở Photos vào ứng dụng của mình. Sau khi tìm hiểu thì mình muốn chia sẻ kinh nghiệm của mình khi làm một ứng dụng để có thể chia sẻ ảnh được từ Photos vào app của mình mà ko cần phải đang bật app Khởi tạo project tên ...
Gần đây dự án của mình cần đến 1 chức năng là phải chia sẻ được ảnh ở Photos vào ứng dụng của mình. Sau khi tìm hiểu thì mình muốn chia sẻ kinh nghiệm của mình khi làm một ứng dụng để có thể chia sẻ ảnh được từ Photos vào app của mình mà ko cần phải đang bật app
Khởi tạo project
tên SimpleShareExtension: đây chính là ứng dụng để dùng cho việc chia sẻ ảnh
Chúng ta sẽ tạo UI cho ứng dụng của mình
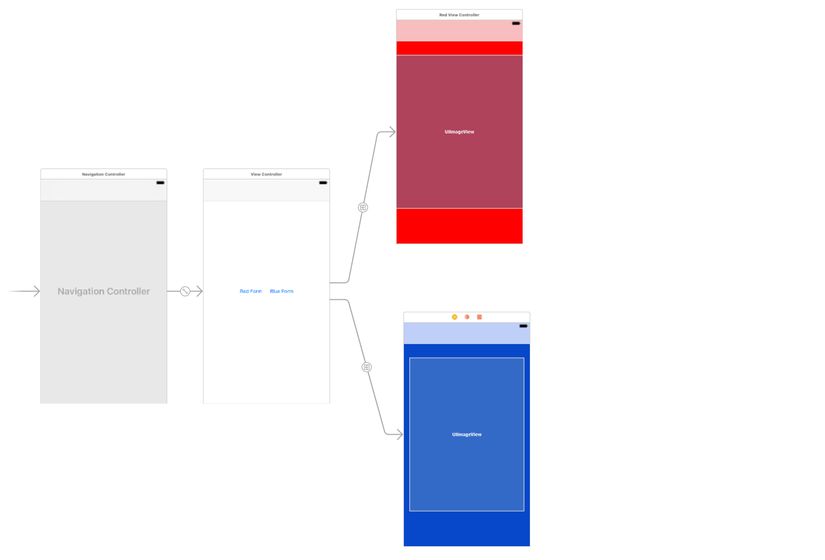 Chỉ đơn giản gồm có 2 ViewController để xem detail ảnh ta vừa đc chia sẻ, và View cha để lựa chọn
Tiếp theo là tạo Share Extension cho ứng dụng của mình
Chọn vào Project của mình sau đó chọn Editor => Add Target => IOS => Application Extention => Share Extension

Giờ ta đã có Share Extension trong app và tiếp theo sẽ cấu hình cho nó để có thể hoạt động theo ý muốn
- Đầu tiên sẽ phải enable chức năng App Group
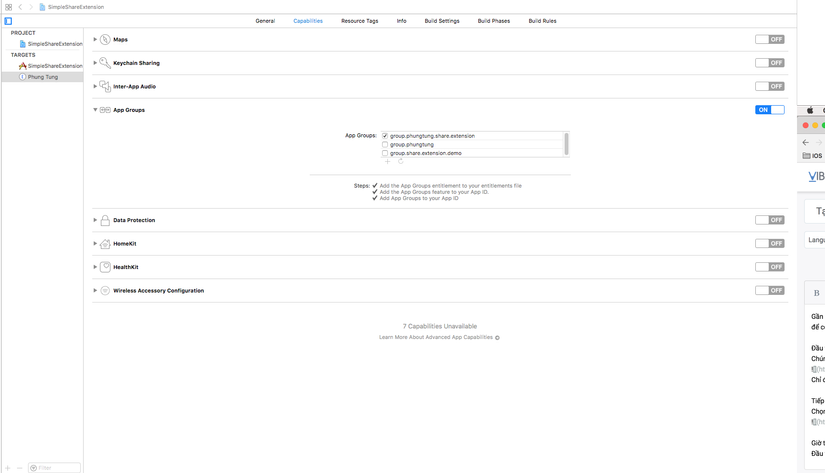 chọn vào Project của mình > chọn đến Target vừa add, bật on App Group > add app Group
để làm được thì bạn sẽ cần có 1 Apple ID và điền tên bạn muốn đặt cho app group này
Chú ý: tên này phải là theo sau của Bundle ID của bạn
VD: Bundle Id của bạn là: NguyenVanA thì tên của group sẽ là NguyenVanA.Share.Extension
Làm tương tự cho 2 Target của project của bạn để sau khi share ở App Photos app của bạn mới có thể nhận dữ liệu vừa share
chọn vào Project của mình > chọn đến Target vừa add, bật on App Group > add app Group
để làm được thì bạn sẽ cần có 1 Apple ID và điền tên bạn muốn đặt cho app group này
Chú ý: tên này phải là theo sau của Bundle ID của bạn
VD: Bundle Id của bạn là: NguyenVanA thì tên của group sẽ là NguyenVanA.Share.Extension
Làm tương tự cho 2 Target của project của bạn để sau khi share ở App Photos app của bạn mới có thể nhận dữ liệu vừa share
Bây giờ đến phần code để app hoạt động như ý muốn
Chúng ta có 2 View và tạo 2 class cho chúng lần lượt là RedViewController và BlueViewControllerBlueViewController RedViewController
class RedViewController: UIViewController {
    @IBOutlet weak var imageView: UIImageView!
    let suiteName = "group.deegeu.swift.share.extension"
    let redDefaultKey = "RedColorImage"

    // Simply reads the selected image from NSUserDefaults and displays the
    // image
    override func viewDidLoad() {
        super.viewDidLoad()
        if let prefs = UserDefaults(suiteName: suiteName) {
            if let imageData = prefs.object(forKey: redDefaultKey) as? Data {
                DispatchQueue.main.async(execute: { () -> Void in
                    self.imageView.image = UIImage(data: imageData)
                })
            }
        }
    }
}
BlueViewController
class BlueViewController: UIViewController {
    @IBOutlet weak var imageView: UIImageView!
    let suiteName = "group.deegeu.swift.share.extension"
    let blueDefaultKey = "BlueColorImage"

    // Simply reads the selected image from NSUserDefaults and displays the
    // image
    override func viewDidLoad() {
        super.viewDidLoad()
        if let prefs = UserDefaults(suiteName: suiteName) {
            if let imageData = prefs.object(forKey: blueDefaultKey) as? Data {
                DispatchQueue.main.async(execute: { () -> Void in
                    self.imageView.image = UIImage(data: imageData)
                })
            }
        }
    }

}
ShareViewControllerViewController
import UIKit
import Social
import MobileCoreServices

class ShareViewController: SLComposeServiceViewController, ColorSelectionViewControllerDelegate {

    let suiteName = "group.deegeu.swift.share.extension"
    let redDefaultKey = "RedColorImage"
    let blueDefaultKey = "BlueColorImage"

    var selectedImage: UIImage?
    var selectedColorName = "Default"


    override func viewDidLoad() {
        super.viewDidLoad()
    }

    // This method is used to validate the input from the user. If they type too many characters,
    // or select something invalid, this returns false.
    override func isContentValid() -> Bool {
        return true
    }

    // Called after the user selects an image from the photos
    override func didSelectPost() {
        // This is called after the user selects Post.
        // Make sure we have a valid extension item
        if let content = extensionContext!.inputItems[0] as? NSExtensionItem {
            let contentType = kUTTypeImage as String

            // Verify the provider is valid
            if let contents = content.attachments as? [NSItemProvider] {

                // look for images
                for attachment in contents {
                    if attachment.hasItemConformingToTypeIdentifier(contentType) {
                        attachment.loadItem(forTypeIdentifier: contentType, options: nil) { data, error in

                            let url = data as! URL
                            if (!self.selectedColorName.isEmpty) {
                                if let imageData = try? Data(contentsOf: url) {
                                    if (self.selectedColorName == "Default") {
                                        self.saveImage(self.redDefaultKey, imageData: imageData)
                                        self.saveImage(self.blueDefaultKey, imageData: imageData)
                                    } else if (self.selectedColorName == "Red") {
                                        self.saveImage(self.redDefaultKey, imageData: imageData)
                                    } else {
                                        // must be blue
                                        self.saveImage(self.blueDefaultKey, imageData: imageData)
                                    }
                                }
                            }
                        }
                    }
                }
            }
        }

        // Inform the host that we're done, so it un-blocks its UI.
        self.extensionContext!.completeRequest(returningItems: [], completionHandler: nil)
    }

    // Returns an array of colors. In our case it's red, blue or default. These are built configuration
    // items, not just the string.
    override func configurationItems() -> [Any]! {
        // To add configuration options via table cells at the bottom of the sheet, return an array of SLComposeSheetConfigurationItem here.
        return [colorConfigurationItem]
    }

    // Builds a configuration item when we need it. This one is for the "Color"
    // configuration item.
    lazy var colorConfigurationItem: SLComposeSheetConfigurationItem = {
        let item = SLComposeSheetConfigurationItem()
        item?.title = "Color"
        item?.value = self.selectedColorName
        item?.tapHandler = self.showColorSelection
        return item!
    }()

    // Shows a view controller when the user selects a configuration item
    func showColorSelection() {
        let controller = ColorSelectionViewController(style: .plain)
        controller.selectedColorName = colorConfigurationItem.value
        controller.delegate = self
        pushConfigurationViewController(controller)
    }

    // One the user selects a configuration item (color), we remember the value and pop
    // the color selection view controller
    func colorSelection(_ sender: ColorSelectionViewController, selectedValue: String) {
        colorConfigurationItem.value = selectedValue
        selectedColorName = selectedValue
        popConfigurationViewController()
    }

    // Saves an image to user defaults.
    func saveImage(_ color: String, imageData: Data) {
        if let prefs = UserDefaults(suiteName: suiteName) {
            prefs.removeObject(forKey: color)
            prefs.set(imageData, forKey: color)
        }
    }

}
các bạn nhớ import thư viện MobileCoreServices nhé
Và để chọn được View nào sẽ hiển thị ảnh vừa đc chia sẻ chúng ta sẽ tạo thêm 1 Class để làm việc đó là ColorSlectionViewController
@objc(ColorSelectionViewControllerDelegate)
protocol ColorSelectionViewControllerDelegate {
    @objc optional func colorSelection(
        _ sender: ColorSelectionViewController,
        selectedValue: String)
}

class ColorSelectionViewController : UITableViewController {

    let colorSelections = [ "Default", "Red", "Blue" ]
    let tableviewCellIdentifier = "colorSelectionCell"
    var selectedColorName : String = "Default"
    var delegate: ColorSelectionViewControllerDelegate?

    required init?(coder aDecoder: NSCoder) {
        super.init(coder: aDecoder)
    }

    // Initialize the tableview
    override init(style: UITableViewStyle) {
        super.init(style: style)
        tableView.register(UITableViewCell.classForCoder(),
                forCellReuseIdentifier: tableviewCellIdentifier)
        title = "Choose Color"
    }

    // We only have three choices, but there's no reason this tableview can't be populated
    // dynamically from CoreData, NSDefaults, or something else.
    override func tableView(_ tableView: UITableView, numberOfRowsInSection section: Int) -> Int {
        return 3
    }

    // This just populates each row in the table, and if we've selected it, we'll check it
    override func tableView(_ tableView: UITableView, cellForRowAt indexPath: IndexPath) -> UITableViewCell {
        let cell = tableView.dequeueReusableCell(
            withIdentifier: tableviewCellIdentifier,
            for: indexPath) as UITableViewCell

        let text = colorSelections[indexPath.row]
        cell.textLabel!.text = text

        if text == selectedColorName {
            cell.accessoryType = .checkmark
        } else {
            cell.accessoryType = .none
        }
        return cell
    }

    // Save the value the user picks
    override func tableView(_ tableView: UITableView, didSelectRowAt indexPath: IndexPath) {
        if let theDelegate = delegate {
            selectedColorName = colorSelections[indexPath.row]
            theDelegate.colorSelection!(self, selectedValue: selectedColorName)
        }
    }
}
Như vậy chúng ta đã hoàn thành xong việc xây dựng 1 ứng dụng chia sẻ đơn giản viết bằng swift, bây giờ hãy build và run ứng dụng của mình để nhìn thấy thành quả của mình nhé. Chúc các bạn thành công!
