Deep linking với React Native
Bài viết được dịch từ: http://ihor.burlachenko.com/deep-linking-with-react-native/ Trong bài viết này, tôi sẽ giới thiệu cho các bạn cách để thêm deep links vào dự án React Native, hoạt động tốt với cả IOS và Android. Tôi sẽ sử dụng thư viện navigation là react-native-router-flux, tuy nhiên, bạn ...
Bài viết được dịch từ: http://ihor.burlachenko.com/deep-linking-with-react-native/
Trong bài viết này, tôi sẽ giới thiệu cho các bạn cách để thêm deep links vào dự án React Native, hoạt động tốt với cả IOS và Android. Tôi sẽ sử dụng thư viện navigation là react-native-router-flux, tuy nhiên, bạn có thể sử dụng cách này với bất cứ thư viện navigation nào cũng đc, vì nó ko phụ thuộc gì vào thư viện cả.
Vậy deep link là gì?
Deep link cho phép chúng ta mở một màn hình bất kì của mobile app chứ ko đơn giản chỉ là khởi động app. Ví dụ fb://profile/4 là một deep link. Nếu bạn có app Facebook đc cài đặt trong máy và bạn thử bấm vào link đó, nó sẽ mở app Facebook và show màn hình profile của Mark Zuckerberg.
App mẫu
Tôi đã chuẩn bị một app mẫu, có 2 màn hình. Màn hình thứ nhất cho phép ta nhập tên, và khi submit, nó sẽ chuyển sang màn hình thứ hai với lời chào. Mục tiêu của chúng ta sẽ là dùng deep link đi kèm với parameter name để đi đến màn hình thứ hai. Bạn có thể xem source code ở đây.
Deep linking với React Native
Để xử lý những link gửi đến app React, chúng ta sẽ sử dụng Linking API từ React Native. Theo như docs, để xử lý những URL khởi điểm để bật app lên, chúng ta dùng code sau:
Linking
    .getInitialURL()
    .then(url => handleOpenURL({ url }))
    .catch(console.error);
Để xử lý những URL đc gửi đến khi app đang chạy ở background, chúng ta cần thêm một listener:
Linking.addEventListener('url', handleOpenURL);
handleOpenURL sẽ navigate đến đúng màn hình cần thiết dựa trên URL. Tôi sẽ sử dụng crossroads để parse đường dẫn. Thư viện này thì hơi bị overkill so với một app nhỏ, nhưng mà nó sẽ trở nên rất hữu ích khi app của bạn to dần.
let scheme = 'exampleapp';
handleOpenURL(event) {
    if (event.url && event.url.indexOf(scheme + '://') === 0) {
        crossroads.parse(event.url.slice(scheme.length + 3));
    }
}
Bạn có thể để đoạn code này ở đâu cũng đc. Ở project mẫu này, tôi sẽ tạo một component mới là LinkedRouter và listen những links đc gửi đến ở componentDidMount:
import React from 'react';
import { Linking } from 'react-native';
import { Router } from 'react-native-router-flux';

class LinkedRouter extends React.Component {
    constructor(props) {
        super(props);

        this.handleOpenURL = this.handleOpenURL.bind(this);
    }

    componentDidMount() {
        Linking
            .getInitialURL()
            .then(url => this.handleOpenURL({ url }))
            .catch(console.error);

        Linking.addEventListener('url', this.handleOpenURL);
    }

    componentWillUnmount() {
        Linking.removeEventListener('url', this.handleOpenURL);
    }

    handleOpenURL(event) {
        if (event.url && event.url.indexOf(this.props.scheme + '://') === 0) {
            crossroads.parse(event.url.slice(this.props.scheme.length + 3));
        }
    }

    render() {
        return <Router { ...this.props }/>;
    }
}

LinkedRouter.propTypes = {
    scheme: React.PropTypes.string.isRequired
};
Giờ chỉ còn lại mỗi việc map đúng URL vào đúng màn hình là xong. Ở đây, tôi sẽ viết nó ở chỗ config router. Chúng ta sẽ gán màn hình Greeting tương đương với đường dẫn greetings/{name}, và truyền parameter thành props.
import React from 'react';
import { Scene, Actions } from 'react-native-router-flux';
import crossroads from 'crossroads';

import LinkedRouter from './components/LinkedRouter';
import HomeScreen from './components/HomeScreen';
import GreetingScreen from './components/GreetingScreen';

const scenes = Actions.create(
    <Scene key="root">
        <Scene key="home" title="Home" component={HomeScreen} initial={true}/>
        <Scene key="greeting" title="Greeting" component={GreetingScreen}/>
    </Scene>
);

// Mapping incoming URLs to scenes
crossroads.addRoute('greetings/{name}', name => Actions.greeting({ name }));

export default <LinkedRouter scenes={scenes} scheme="exampleapp"/>;
Đến lúc này thì app của chúng ta đã sẵn sàng để nhận link. Giờ thêm một ít config cho từng platform IOS hoặc Android nữa là xong.
Với IOS
Với IOS, chúng ta sẽ sử dụng thư viện RCTLinking có sẵn trong React Native. Chúng ta làm như sau:
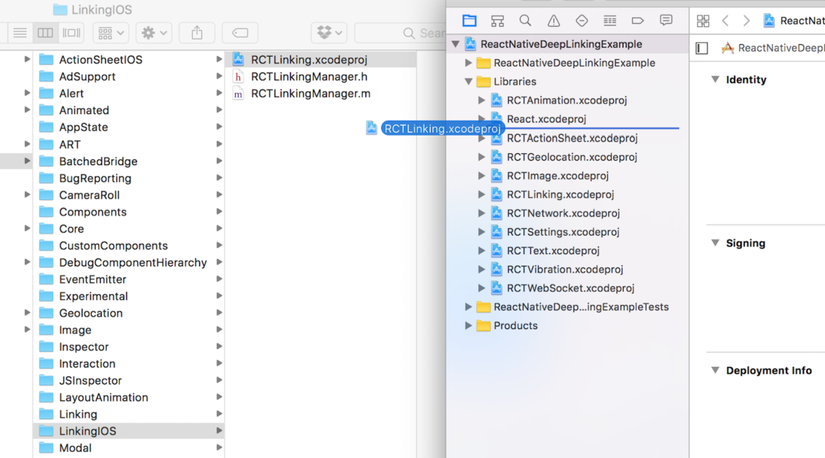
- Mở file *.xcodeproj với XCode.
- Kéo RCTLinking.xcodeproj từ node_modules/react-native/Libraries/LinkingIOS đến thư mục Libraries của project.
- Bấm vào project chọn Build Phases và kéo cái static library từ thư mục RTCLinking Products đến Link Binary With Libraries.

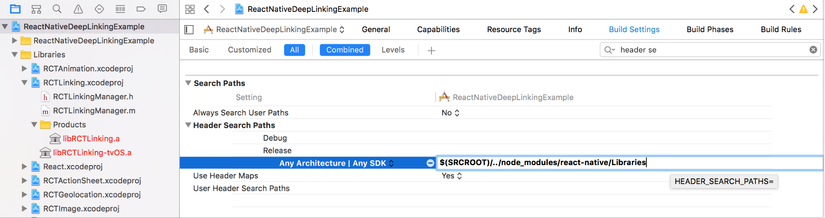
- Bấm vào project lần nữa, chọn Build Settings, tìm phần Header Search Paths và điền $(SRCROOT)/../node_modules/react-native/Libraries vào đây
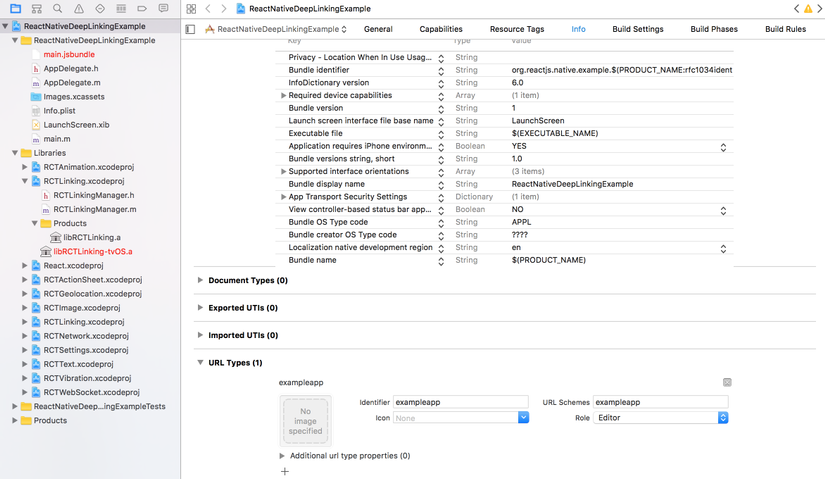
- Bấm vào project lần nữa, chọn Info và thêm URL type ở dưới cùng. Tôi sẽ để là exampleapp ở đây.
 Nếu bạn muốn listen link gửi đến app trong lúc app đang chạy, bạn sẽ cần thêm những dòng sau vào file *AppDelegate.m:
 #import "React/RCTLinkingManager.h"

 - (BOOL)application:(UIApplication *)application openURL:(NSURL *)url
   sourceApplication:(NSString *)sourceApplication annotation:(id)annotation
 {
   return [RCTLinkingManager application:application openURL:url
                       sourceApplication:sourceApplication annotation:annotation];
 }

 // Only if your app is using [Universal Links](https://developer.apple.com/library/prerelease/ios/documentation/General/Conceptual/AppSearch/UniversalLinks.html).
 - (BOOL)application:(UIApplication *)application continueUserActivity:(NSUserActivity *)userActivity
  restorationHandler:(void (^)(NSArray * _Nullable))restorationHandler
 {
  return [RCTLinkingManager application:application
                   continueUserActivity:userActivity
                     restorationHandler:restorationHandler];
 }
Bây giờ, bạn có thể vào Safari và gõ exampleapp://greetings/World vào thanh địa chỉ. Bạn sẽ đc dẫn đến màn hình Greeting.
Với Android
Để cho phép deep link với Android, chúng ta cần thêm intent filter để phản hồi lại các action request từ các ứng dụng khác. Intent filter được viết trong file android/app/src/main/AndroidManifest.xml. Chúng ta thêm như sau:
<activity
   android:name=".MainActivity"
   android:label="@string/app_name"
   android:configChanges="keyboard|keyboardHidden|orientation|screenSize">
   <intent-filter>
       <action android:name="android.intent.action.MAIN" />
       <category android:name="android.intent.category.LAUNCHER" />
   </intent-filter>

   <intent-filter>
       <action android:name="android.intent.action.VIEW"/>
       <category android:name="android.intent.category.DEFAULT"/>
       <category android:name="android.intent.category.BROWSABLE"/>
       <data android:scheme="exampleapp"
           android:host="greetings"
           android:pathPrefix="/" />
   </intent-filter>
</activity>
Sau khi update file manifest, bạn có thể bật app bằng giả lập Android và chạy lệnh sau trong terminal để test:
adb shell am start -a android.intent.action.VIEW -d "exampleapp://greetings/World" com.reactnativedeeplinkingexample
và bạn sẽ thấy màn hình Greeeting hiện lên với dòng chữ Hello World.
