Giới thiệu thư viện validate cho Vue JS
Vue.js, gọi tắt là Vue, là một framework linh động dùng để xây dựng giao diện người dùng. Khác với các framework nguyên khối, Vue được thiết kế từ đầu theo hướng cho phép và khuyến khích việc phát triển ứng dụng theo các bước. Hôm nay mình xin phép được giới thiệu một thư viện validation cho ...
Vue.js, gọi tắt là Vue, là một framework linh động dùng để xây dựng giao diện người dùng. Khác với các framework nguyên khối, Vue được thiết kế từ đầu theo hướng cho phép và khuyến khích việc phát triển ứng dụng theo các bước.
Hôm nay mình xin phép được giới thiệu một thư viện validation cho VueJS đó là Vee Validate. https://github.com/baianat/vee-validate Chúng ta bắt đầu luôn nhé
Đầu tiên mình sẽ init một project Laravel đã, vì mình sẽ viết luôn ứng dụng Vue JS ngay trong project Laravel. Mình sẽ tạo 1 router là /vue để init app Vue. Ta có nội dung file resourcesassetsjsapp.js:
/**
 * First we will load all of this project's JavaScript dependencies which
 * includes Vue and other libraries. It is a great starting point when
 * building robust, powerful web applications using Vue and Laravel.
 */

require('./bootstrap');

window.Vue = require('vue');

/**
 * Next, we will create a fresh Vue application instance and attach it to
 * the page. Then, you may begin adding components to this application
 * or customize the JavaScript scaffolding to fit your unique needs.
 */

Vue.component('example-component', require('./components/ExampleComponent.vue'));

const app = new Vue({
    el: '#app'
});
Cài đặt Vee validate ta có thể cài qua npm như sau: npm install vee-validate --save. Sau đó ta khai báo vào file app.js ở trên:
import VeeValidate from 'vee-validate';
Vue.use(VeeValidate);
Để sử dụng Vee validate rất đơn giản ta chỉ cần thêm directive v-validate và định nghĩa rules về input đó là OK. Nó trông như sau:
<input v-validate="'required|email'" type="text" name="email">
Vì vee-validate lấy cảm hứng từ Laravel Validation nên ta có thể định nghĩa v-validate giống như trong Laravel. Hoặc ta có thể định nghĩa dưới dạng object như sau:
<input v-validate="{ required: true, email: true, regex: /[0-9]+/ }" type="text" name="email">
Ta có kết quả dạng như sau:
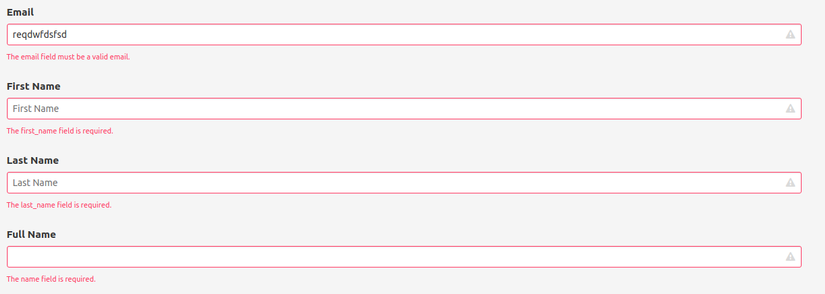
Validation rules
Để có thể hiển thị lỗi ta cần thêm 1 thẻ span như sau:
<span v-show="errors.has('email')" class="help is-danger">{{ errors.first('email') }}</span>
Và cũng tương tự như Laravel thì Vee cũng có những Validation rules như sau:
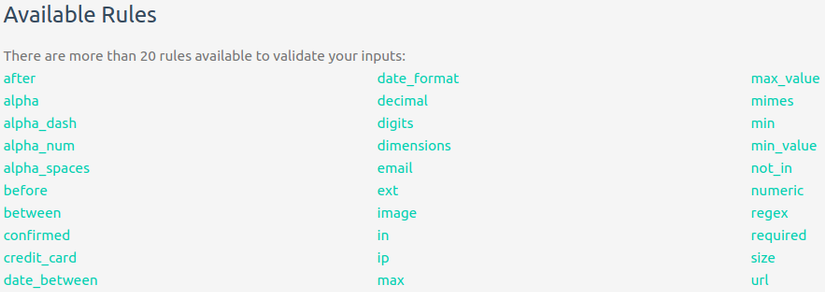 Tương ứng cách sử dụng các bạn có thể tham khảo ở đây.
Configuration
Ta có thể thay đổi các config mặc định bằng cách sau:
const config = {
  errorBagName: 'errors', // change if property conflicts
  fieldsBagName: 'fields',
  delay: 0,
  locale: 'en',
  dictionary: null,
  strict: true,
  classes: false,
  classNames: {
    touched: 'touched', // the control has been blurred
    untouched: 'untouched', // the control hasn't been blurred
    valid: 'valid', // model is valid
    invalid: 'invalid', // model is invalid
    pristine: 'pristine', // control has not been interacted with
    dirty: 'dirty' // control has been interacted with
  },
  events: 'input|blur',
  inject: true,
  validity: false,
  aria: true,
  i18n: null // the vue-i18n plugin instance,
  i18nRootKey: 'validations' // the nested key under which the validation messsages will be located
};

Vue.use(VeeValidate, config);
Custom rules
Để tự tạo 1 rules cho riêng mình ta có thể khai báo theo hướng dẫn như sau:
import { Validator } from 'vee-validate';
const myRule = {
  getMessage(field, params, data) {
      return (data && data.message) || 'Something went wrong';
  },
  validate(value) {
    return new Promise(resolve => {
      resolve({
        valid: value === 'trigger' ? false : !! value,
        data: value !== 'trigger' ? undefined : { message: 'Not this value' }
      });
    });
  }
};
Validator.extend('truthy', myRule);

let instance = new Validator({ trueField: 'truthy' });
Custom messages
import { Validator } from 'vee-validate';
const dictionary = {
  en: {
    messages:{
      alpha: () => 'Some English Message'
    }
  },
  ar: {
    messages: {
      alpha: () => 'Some Arabic Message'
    }
  }
};

// Override and merge the dictionaries
Validator.localize(dictionary);

const validator = new Validator({ first_name: 'alpha' });

validator.localize('ar'); // now this validator will generate messages in arabic.
Như vậy mình vừa giới thiệu đến các bạn thư viện Vee Validate dùng cho VueJS. Ngoài các phần cơ bản trên thì thư viện này còn hỗ trợ Localization, Component Injections... Các bạn có thể tìm hiểu thêm tại trang chủ của thư viện: http://vee-validate.logaretm.com
Cảm ơn các bạn đã đọc bài viết!