Java Design Patterns (P1)
Chào các bạn, Bài này tôi sẽ giới thiệu qua về Design Patterns và một số patterns hay sử dụng trong phát triển phần mềm. Một số lợi ích của việc sử dụng design patterns là: Design Patterns định nghĩa và cung cấp các tiếp cận chuẩn industry trong việc giải quyết các vấn đề có tính lặp lại. ...
Chào các bạn, Bài này tôi sẽ giới thiệu qua về Design Patterns và một số patterns hay sử dụng trong phát triển phần mềm.
Một số lợi ích của việc sử dụng design patterns là:
- Design Patterns định nghĩa và cung cấp các tiếp cận chuẩn industry trong việc giải quyết các vấn đề có tính lặp lại. Nó giúp tiết kiệm thời gian khi chúng ta sử dụng một cách hợp lý theo hoàn cảnh phù hợp. Có rất nhiều design patterns chũng ta có thể sự dụng trong quá trình phát triển phần mềm.
- Sử dụng design pattern làm tăng tính tái sử dụng, dẫn đến hiệu quả hơn trong maintain code, giúp giảm chi phí trong quá trình phát triển.
- Khi các design patterns được định nghĩa, nó làm cho code đơn giản, dễ hiểu , dễ debug hơn. Giúp phát triển phần mềm 1 cách nhanh chóng và các members trong team cũng dế dàng hiểu hơn.
Java Design Pattersn chia ra làm 3 loại là: Creational, Structural, Behavioral.
Creational design patterns cung cấp giải pháp để tạo ra 1 instance nhanh chóng bằng các cách phù hợp. Các hình thức cơ bản của việc tạo ra đối tượng có thể dẫn đến các vấn đề thiết kế hoặc là không muốn thêm các kiến trúc phức tạp, thì Creational design patterns sẽ giải quyết vấn đề này bằng các controll việc tạo đối tượng bằng các cách khác nhau. Có 5 creational design patterns được sử dụng phổ biến:
- Singleton Pattern
- Factory Pattern
- Abstract Factory Pattern
- Builder Pattern
- Prototype Pattern
1. Singleton Pattern
Mẫu Singleton là một trong những mẫu thiết kế đơn giản nhất trong Java. Pattern này liên quan đến việc một class duy nhất có trách nhiệm tạo ra một đối tượng trong khi đảm bảo rằng chỉ có một đối tượng được tạo ra. Class này cung cấp một cách để truy cập đối tượng duy nhất của nó mà có thể được truy cập trực tiếp mà không cần phải tạo ra 1 đối tượng mới khác để sử dụng. Singleton được sử dụng cho logging, driver objects, caching và thread. Singleton design pattern cũng được sử dụng trong các patterns khác như Abstract Factory, Builder, Prototype, Facade. Để implement Singleton pattern, chúng ta có các cách tiếp cận khác nhau, nhưng tất cả đều follow theo concepts sau:
- Private constructor để giới hạn việc tạo đối tượng của class từ class khác.
- Private static variable trên cùng 1 class để chỉ có thể truy suất từ bản thân class đó.
- Public static method để trả về instance của class, đây chính là global access point ra thế giới bên ngoài. Trong phần tiếp theo chúng ta sẽ nói về các cách tiếp cận khách nhau của Singleton design pattern trong việc inplement.
A. Eager Initialization
Trong Eager Initialization, instance được tạo trong thời điểm class được loading, đây là cách dễ dàng nhất để tạo ra singleton class nhưng nó có 1 điểm hạn chế đó là có thể instance được tạo ra nhưng lại không được sử dụng. Dưới đây là ví dụ về việc implement static initialization singleton class:
package com.journaldev.singleton;
public class EagerInitializedSingleton {
    private static final EagerInitializedSingleton instance = new
    EagerInitializedSingleton();
    //private constructor to avoid client applications to use
    constructor
    private EagerInitializedSingleton() {}
    public static EagerInitializedSingleton getInstance() {
        return instance;
    }
}
- Với cách tiếp cận trên sẽ gây ra lãng phí tài nguyên đối với trường hợp class được loading lên nhưng lại không được sử dụng. Và việc tiếp cận này cũng không được cung cấp khả năng handle exception.
B. Static block initialization.
- Static block initialization được implement tương tự như eager initialization nhưng cũng cấp thêm khả năng handle exception không trường hợp không thể new instance.
package com.journaldev.singleton;
public class StaticBlockSingleton {
    private static StaticBlockSingleton instance;
    private StaticBlockSingleton() {}
        //static block initialization for exception handling
    static {
        try {
            instance = new StaticBlockSingleton();
        } catch (Exception e) {
            throw new RuntimeException("Exception occured in creating
                singleton instance ");
            }
        }
        public static StaticBlockSingleton getInstance() {
            return instance;
        }
    }
- Cả eager initialization và static block initialization đều tạo đối tượng trước khi nó được sử dụng, vì vậy nó không phải là 1 best practice để sử dụng.
C. Lazy Initialization
Lazy initialization khắc phục được nhược điểm của eager initialization và static block initialization khi instance chỉ được tạo ra khi cần dùng tới.
package com.journaldev.singleton;
public class LazyInitializedSingleton {
    private static LazyInitializedSingleton instance;
    private LazyInitializedSingleton() {}

    public static LazyInitializedSingleton getInstance() {
        if (instance == null) {
            instance = new LazyInitializedSingleton();
        }
        return instance;
    }
}
Cách cài đặt trên sẽ hoạt động tốt đối với trường hợp môi trường chạy là single threaded nhưng khi đến với multiple threaded systems thì nó có nảy sinh các hạn chế nhất định. Tại cùng 1 thời điểm 2 thread sẽ sinh ra đồng thời 2 instance khác nhau từ đó làm block singleton class.
D. Thread Safe Singleton.
Cách dễ dàng nhất để tạo ra thread-safe là creat singleton class là tạo ra 1 global access method synchronized khi đó trong 1 thời điểm chỉ có một thread được execute.
package com.journaldev.singleton;
public class ThreadSafeSingleton {
    private static ThreadSafeSingleton instance;
    private ThreadSafeSingleton() {}
    public static synchronized ThreadSafeSingleton getInstance() {
        if (instance == null) {
            instance = new ThreadSafeSingleton();
        }
        return instance;
    }
}
2. Factory Pattern
Factory Pattern là một Creational Design Pattern được sử dụng rộng rãi trong JDK cũng như trong framework là Spring hay Struts. Trong Factory pattern, chúng ta tạo ra các Object mà không cần expose các creation logic tới client, chúng refer tới new created object bằng cách sử dụng các common interface. Một ví dụ về việc cài đặt Factory Pattern là:
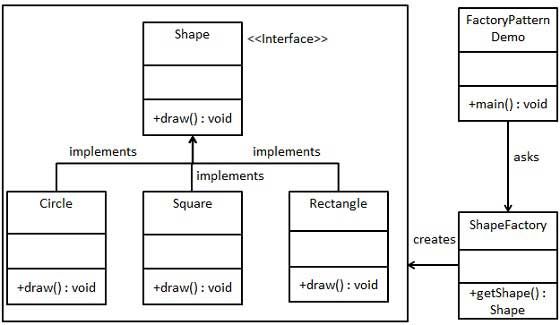
- Chúng ta sẽ tạo ra 1 interface là Shape và concreate class sẽ implement Shape interface. Factory class là ShapeFactory sẽ được defined theo step.
- ShapeFactory sẽ get Shape object, nó sẽ pass các info ( circle, rectangle, square ) để get kiểu object nó cần:
Mô hình ví dụ demo:
A. Implementation:
- Step 1: Create interface:
Shape.java
public interface Shape {
  void draw();
}
- Step 2: Create concrete classes implement interface
Rectangle.java
public class Rectangle implements Shape {

   @Override
   public void draw() {
      System.out.println("Inside Rectangle::draw() method.");
   }
}
Square.java
public class Square implements Shape {

   @Override
   public void draw() {
      System.out.println("Inside Square::draw() method.");
   }
}
Circle.java
public class Circle implements Shape {

   @Override
   public void draw() {
      System.out.println("Inside Circle::draw() method.");
   }
}
- Step 3: Generate ra object phù hợp dựa trên các thông tin đầu vào.
ShapeFactory.java
public class ShapeFactory {

    //use getShape method to get object of type shape
    public Shape getShape(String shapeType) {
        if (shapeType == null) {
            return null;
        }
        if (shapeType.equalsIgnoreCase("CIRCLE")) {
            return new Circle();

        } else if (shapeType.equalsIgnoreCase("RECTANGLE")) {
            return new Rectangle();

        } else if (shapeType.equalsIgnoreCase("SQUARE")) {
            return new Square();
        }

        return null;
    }
}
- Step 4: User Factory để get về concrete class phù hợp:
FactoryPatternDemo.java
public class FactoryPatternDemo {

    public static void main(String[] args) {
        ShapeFactory shapeFactory = new ShapeFactory();

        //get an object of Circle and call its draw method.
        Shape shape1 = shapeFactory.getShape("CIRCLE");

        //call draw method of Circle
        shape1.draw();

        //get an object of Rectangle and call its draw method.
        Shape shape2 = shapeFactory.getShape("RECTANGLE");

        //call draw method of Rectangle
        shape2.draw();

        //get an object of Square and call its draw method.
        Shape shape3 = shapeFactory.getShape("SQUARE");

        //call draw method of circle
        shape3.draw();
    }
}
- Step 5. Verify output:
Inside Circle::draw() method.
Inside Rectangle::draw() method.
Inside Square::draw() method.
B. Lợi ích của Factory Pattern:
- Factory pattern cung cấp cách tiếp cận để code interface hơn là việc implementation.
- Factory làm cho code rebust, không bị trùng lặp và dễ dàng implement hơn.
- Factory pattern cung cấp các abstraaction giữa việc implementation và các class sử dụng thông qua kế thừa.
C. Factory Pattern Examples in JDK
- java.util.Calendar, ResourceBundle and NumberFormat.
- valueOf() method in wrapper classes like Boolean, Integer etc.
3. Abstract Factory Pattern
Abstract Factory tương tự như Factory Pattern ngoại trừ việc nó giống như factory của factories. Trong factory design pattern bạn có single Factory class trả về các sub-class khác nhau dựa trên các input được cung cấp. Factory class sử dụng các mệnh đề if-else hoặc switch case để đạt được điều này. Trong Abstract Factory pattern, chúng ta sẽ loại bỏ các if-else block trên và có các factory cho mỗi sub-class và sau đó Abstract Factory class sẽ trả về các sub-class dựa trên các input là các factory class. Ví dụ minh họa:
A. Super Class and Sub-Classes
package com.journaldev.design.model;
public abstract class Computer {
    public abstract String getRAM();
    public abstract String getHDD();
    public abstract String getCPU();
    @Override
    public String toString() {
        return "RAM= " + this.getRAM() + ", HDD=" + this.getHDD() + ",
        CPU = "+this. getCPU();
    }
}
package com.journaldev.design.model;
public class PC extends Computer {
    private String ram;
    private String hdd;
    private String cpu;
    public PC(String ram, String hdd, String cpu) {
        this.ram = ram;
        this.hdd = hdd;
        this.cpu = cpu;
    }
    @Override
    public String getRAM() {
        return this.ram;
    }
    @Override
    public String getHDD() {
        return this.hdd;
    }
    @Override
    public String getCPU() {
        return this.cpu;
    }
}
package com.journaldev.design.model;
public class Server extends Computer {
    private String ram;
    private String hdd;
    private String cpu;
    public Server(String ram, String hdd, String cpu) {
        this.ram = ram;
        this.hdd = hdd;
        this.cpu = cpu;
    }
    @Override
    public String getRAM() {
        return this.ram;
    }
    @Override
    public String getHDD() {
        return this.hdd;
    }
    @Override
    public String getCPU() {
        return this.cpu;
    }
}
B. Factory Classes for Each sub-class
- Đầu tiên chúng ta cần tạo ra Abstract Factory interface hoặc abstract class:
package com. journaldev. design. abstractfactory;
import com.journaldev.design.model.Computer;
public interface ComputerAbstractFactory {
     public Computer createComputer();
}
- Chú ý rằng createComputer() method sẽ trả về một instance của super class Computer. Bây giờ chúng ta cần implement interface này và trả về là các sub-class tương ứng.
package com.journaldev.design.abstractfactory;
import com.journaldev.design.model.Computer;
import com.journaldev.design.model.PC;
public class PCFactory implements ComputerAbstractFactory {
    private String ram;
    private String hdd;
    private String cpu;
    public PCFactory(String ram, String hdd, String cpu) {
        this.ram = ram;
        this.hdd = hdd;
        this.cpu = cpu;
    }
    @Override
    public Computer createComputer() {
        return new PC(ram, hdd, cpu);
    }
}
- Tương tự chúng ta sẽ có factory class cho Server sub-class:
package com.journaldev.design.abstractfactory;
import com.journaldev.design.model.Computer;
import com.journaldev.design.model.Server;
public class ServerFactory implements ComputerAbstractFactory {
    private String ram;
    private String hdd;
    private String cpu;
    public ServerFactory(String ram, String hdd, String cpu) {
        this.ram = ram;
        this.hdd = hdd;
        this.cpu = cpu;
    }
    @Override
    public Computer createComputer() {
        return new Server(ram, hdd, cpu);
    }
}
- Bây giờ chúng ta sẽ tạo ra consumer class, chúng sẽ cung cấp các entry point cho các client classes để create sub-class.
package com.journaldev.design.abstractfactory;
import com.journaldev.design.model.Computer;
public class ComputerFactory {
    public static Computer getComputer(ComputerAbstractFactory factory) {
        return factory.createComputer();
    }
}
- Chú ý rằng đây là các simple class và getComputer method chấp nhận đối số ComputerAbstractFactory và trả về Computer object.
- Dưới đây là simple test và các mà abstract factory get instance của sub-class:
package com.journaldev.design.test;
import com.journaldev.design.abstractfactory.PCFactory;
import com.journaldev.design.abstractfactory.ServerFactory;
import com.journaldev.design.factory.ComputerFactory;
import com.journaldev.design.model.Computer;
public class TestDesignPatterns {
    public static void main(String[] args) {
        testAbstractFactory();
    }
    private static void testAbstractFactory() {
        Computer pc =
            com.journaldev.design.abstractfactory.ComputerFactory.getComputer(new PCFactory("2 GB", "500 GB", "2.4 GHz"));
        Computer server =
            com.journaldev.design.abstractfactory.ComputerFactory.getComputer(new ServerFactory("16 GB", "1 TB", "2.9 GHz"));
        System.out.println("AbstractFactory PC Config::" + pc);
        System.out.println("AbstractFactory Server Config::" + server);
    }
}
=>> Output:
AbstractFactory PC Config::RAM= 2 GB, HDD=500 GB, CPU=2.4 GHz
AbstractFactory Server Config::RAM= 16 GB, HDD=1 TB, CPU=2.9 GHz
B. Lợi ích của việc sử dụng Factory Pattern:
- Abstract Factory pattern cung cấp các tiếp cận cho việc code interface hơn là vào việc implement.
- Abstract Factory pattern là "factory của factories " và nó có thể dễ dàng cho việc extended để phù hợp trong việc phát triển phần mềm.
- Abstract Factory pattern rất robust và tránh sử dụng các conditional logic của Factory pattern.
C. Abstract Factory Pattern Example in JDK
- javax.xml.parsers.DocumentBuilderFactory#newInstance()
- javax.xml.transform.TransformerFactory#newInstance()
- javax.xml.xpath.XPathFactory#newInstance()
4. Builder Pattern
Builder Pattern được giới thiệu để giải quyết các vấn đề của Factory và Abstract Factory khi Object chứa nhiều nhiều attributes. Có 3 issues chính với Factory và Abstract factory design batton khi Object chưa nhiều attributes:
- Quá nhiều đối số được pass từ client program tới Factory class, khi đó chúng có thể error , vì hầu hết các type của arguments là giống nhau và khi đó việc pass vào theo đúng thực trình tự là một điều rất khó.
- Một vài params có thể là optional, nhưn đối với Factory pattern chúng ta phải pass tất cả các params.
- Nếu object nhiều attributes và việc creation là complex, thì sẽ rất compexity cho việc các Factory classes. Chúng ta có thể giải quyết các vấn đề trên bằng cách sử dụng Builder pattern với số lượng lớn các optional params bằng cách xây dựng các method setter, chúng thực chất trả về final Object.
A. Cài đặt Builder Pattern
- Đầu tiên chúng ta cần 1 static mested class và sau đó copy toàn bộ các arguments từ outer class vào class Builder. Chúng nên theo naming convention theo kiểu nếu class name là Computer thì builder class nên là ComputerBuilder.
- Builder class nến có public constructor với tất cả các required attributes.
- Builder class nên có các method setter với các params và nó trả về Builder Object sau khi setter các attribute cần thiết.
- Cuối cùng thì nó cần cung cấp build() method trong builder class, chúng sẽ return Object mà client cần sử dụng. Dưới đây là sample code cho việc xây dựng Builder cho 1 class:
package com.journaldev.design.builder;
public class Computer {
   //required parameters
   private String HDD;
   private String RAM;
   //optional parameters
   private boolean isGraphicsCardEnabled;
   private boolean isBluetoothEnabled;
   public String getHDD() {
       return HDD;
   }
   public String getRAM() {
       return RAM;
   }
   public boolean isGraphicsCardEnabled() {
       return isGraphicsCardEnabled;
   }
   public boolean isBluetoothEnabled() {
       return isBluetoothEnabled;
   }
   private Computer(ComputerBuilder builder) {
           this.HDD = builder.HDD;
           this.RAM = builder.RAM;
           this.isGraphicsCardEnabled = builder.isGraphicsCardEnabled;
           this.isBluetoothEnabled = builder.isBluetoothEnabled;
       }
       //Builder Class
   public static class ComputerBuilder {
       // required parameters
       private String HDD;
       private String RAM;
       // optional parameters
       private boolean isGraphicsCardEnabled;
       private boolean isBluetoothEnabled;
       public ComputerBuilder(String hdd, String ram) {
           this.HDD = hdd;
           this.RAM = ram;
       }
       public ComputerBuilder setGraphicsCardEnabled(boolean isGraphicsCardEnabled) {
           this.isGraphicsCardEnabled = isGraphicsCardEnabled;
           return this;
       }
       public ComputerBuilder setBluetoothEnabled(boolean isBluetoothEnabled) {
           this.isBluetoothEnabled = isBluetoothEnabled;
           return this;
       }
       public Computer build() {
           return new Computer(this);
       }
   }
}
Chú ý rằng Computer class chỉ getter methods và không public constructor, vì vậy chỉ có 1 cách là get Computer object thông qua ComputerBuilder class. Test Builder class:
import com.journaldev.design.builder.Computer;
public class TestBuilderPattern {
    public static void main(String[] args) {
        //Using builder to get the object in a single line of code and
        //without any inconsistent state or arguments
        management issues
        Computer comp = new Computer.ComputerBuilder(
                "500 GB", "2 GB").setBluetoothEnabled(true)
            .setGraphicsCardEnabled(true).build();
    }
}
B. Builder Design Pattern Example in JDK
- java.lang.StringBuilder#append() (unsynchronized)
- java.lang.StringBuffer#append() (synchronized)
5. Prototype Pattern
Prototype pattern là 1 Creational Design pattern, nó cung cấp cơ chế tạo ra đối tượng. Nó được sử dụng khi Object được tạo ra tiêu tốn nhiều chi phí, time và resouces và bạn có 1 similar object đã tồn tại. Khi đó pattern cung cấp cơ chế copy original object để tạo ra new object và modify tùy theo ý yêu cầu cụ thể. Giả thiết rằng chúng ta có Object load dữ liệu từ database. Bây giờ, chúng ta cần modify dữ liệu này trong nhiều trường hợp, sẽ không phải là 1 good idea khi tạo tạo mới Object đó và load lại toàn bộ dữ liệu từ db. Vì vậy cách tiếp cận tốt hơn là clone object đó ra 1 object mới và thao tác với database. Sample code:
package com.journaldev.design.prototype;
import java.util.ArrayList;
import java.util.List;
public class Employees implements Cloneable {
    private List < String > empList;
    public Employees() {
        empList = new ArrayList < String > ();
    }
    public Employees(List < String > list) {
        this.empList = list;
    }
    public void loadData() {
        //read all employees from database and put into the list
        empList.add("Pankaj");
        empList.add("Raj");
        empList.add("David");
        empList.add("Lisa");
    }
    public List < String > getEmpList() {
        return empList;
    }
    @Override
    public Object clone() throws CloneNotSupportedException {
        List < String > temp = new ArrayList < String > ();
        for (String s: this.getEmpList()) {
            temp.add(s);
        }
        return new Employees(temp);
    }
}
Chú ý rằng: clone method được override để cung cấp deep copy employee list. Code Test:
package com.journaldev.design.test;
import java.util.List;
import com.journaldev.design.prototype.Employees;
public class PrototypePatternTest {
    public static void main(String[] args) throws
    CloneNotSupportedException {
        Employees emps = new Employees();
        emps.loadData();
        //Use the clone method to get the Employee object
        Employees empsNew = (Employees) emps.clone();
        Employees empsNew1 = (Employees) emps.clone();
        List < String > list = empsNew.getEmpList();
        list.add("John");
        package com.journaldev.design.test;
        import java.util.List;
        import com.journaldev.design.prototype.Employees;
        public class PrototypePatternTest {
            public static void main(String[] args) throws
            CloneNotSupportedException {
                Employees emps = new Employees();
                emps.loadData();
                //Use the clone method to get the Employee object
                Employees empsNew = (Employees) emps.clone();
                Employees empsNew1 = (Employees) emps.clone();
                List < String > list = empsNew.getEmpList();
                list.add("John");
            }
        }
Out put:
emps HashMap: [ Pankaj , Raj , David, Lisa]
empsNew HashMap: [ Pankaj , Raj , David, Lisa, John]
empsNew1 HashMap: [ Raj , David, Lisa]
Trên đây là bài mở đầu về Design Pattern, mong rằng các bạn hiểu được tổng quan, và lợi ích của việc sử dụng các pattern trong việc phát triển phần mềm. Thanks for reading!
