Mô hình MVVM trong Android
MVVM là gì? Model-View-ViewModel là một cách tiếp cận architecural sử dụng để tóm tắt các trạng thái và hành vi của một view, trong đó cho phép chúng tách biệt sự phát triển của giao diện người dùng từ logic kinh doanh. Điều này được thực hiện bằng việc giới thiệu một ViewModel, có trách nhiệm ...
MVVM là gì?
Model-View-ViewModel là một cách tiếp cận architecural sử dụng để tóm tắt các trạng thái và hành vi của một view, trong đó cho phép chúng tách biệt sự phát triển của giao diện người dùng từ logic kinh doanh. Điều này được thực hiện bằng việc giới thiệu một ViewModel, có trách nhiệm là để lộ các đối tượng dữ liệu của một model và xử lý bất kỳ của logic ứng dụng liên quan đến màn hình hiển thị của một view.
Cách tiếp cận này MVVM được tạo thành từ ba thành phần cốt lõi, mỗi vai trò riêng biệt và riêng của nó:
- Model - mô hình dữ liệu có chứa logic kinh doanh và xác nhận
- View - Xác định cấu trúc, bố trí và sự xuất hiện của một view trên màn hình
- ViewModel - liên kết giữa View và Model, đối phó với bất kỳ view logic
Vậy làm thế nào thực hiện điều này khác với cách tiếp cận MVC mà chúng ta đang sử dụng? Các kiến trúc MVC thường như sau:
- Các View nằm ở phía trên cùng của architure với Controller bên dưới nó, tiếp theo là Model
- Các Controller điều khiểncả View và Model
- Các View là nhận thức chỉ là Model và được thông báo bất cứ khi nào có sự thay đổi nó
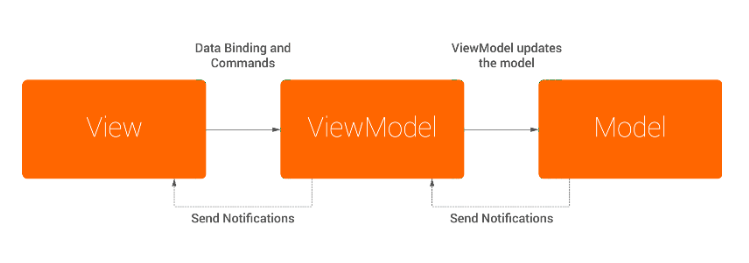
Trong MVVM kiến trúc tương tự, nhưng có một vài sự khác biệt rõ rệt:
- Các Controller được thay thế bởi một View Model , nằm bên dưới lớp giao diện người dùng
- View Model cho nhiều đối tượng dữ liệu và lệnh mà View yêu cầu
- Các View Model nhận dữ liệu từ Model
Bạn có thể thấy ở đây hai phương pháp sử dụng kiến trúc tương tự, với việc bổ sung một View Model và cách mà nó giới thiệu một cách tiếp cận khác nhau để giao tiếp giữa các thành phần. Các kiến trúc giới thiệu thông tin hai chiều giữa các thành phần của nó, trong khi MVC là chỉ có khả năng giao tiếp một chiều.
Tóm lại, MVVM là một sự phát triển của kiến trúc MVC - sử dụng một lớp additonal của các thành phần phi thị giác trên đầu trang của các Model(nhưng thấp hơn View) để ánh xạ dữ liệu gần gũi hơn với các View các thành phần trong kiến trúc. Chúng tôi sẽ đưa thêm một cái nhìn về bản chất của MVVM trong các phần tiếp theo.
The Hacker News reader
Các tính năng của ứng dụng mẫu bao gồm:
- Retrieval of Posts
- Viewing a single Post
- Viewing comments for a Post
- Viewing a selected authors Posts
Điều này đã được thực hiện với hy vọng rằng nó sẽ làm giảm codebase, do đó làm cho nó dễ dàng hơn một chút để làm theo và hiểu cách thực hiện hoạt động. Các màn hình của ứng dụng mà chúng tôi đang làm việc với được như hình dưới đây:
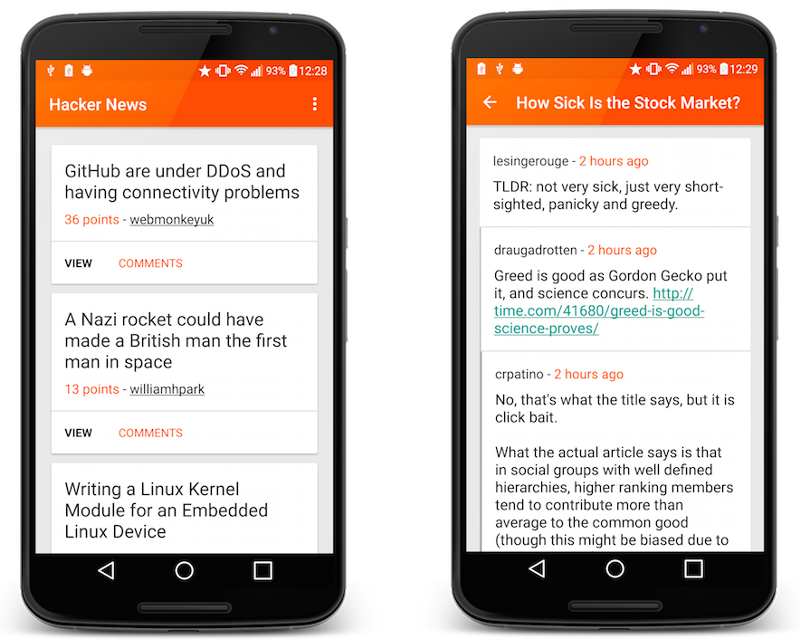
Phần chính của ứng dụng đó tôi sẽ được xem xét là việc niêm yết của bài viết. Màn hình cảm nhận làm việc ở khá nhiều theo cùng một cách, với một vài khác biệt nhỏ (mà chúng ta sẽ xem xét đến).
Displaying Posts
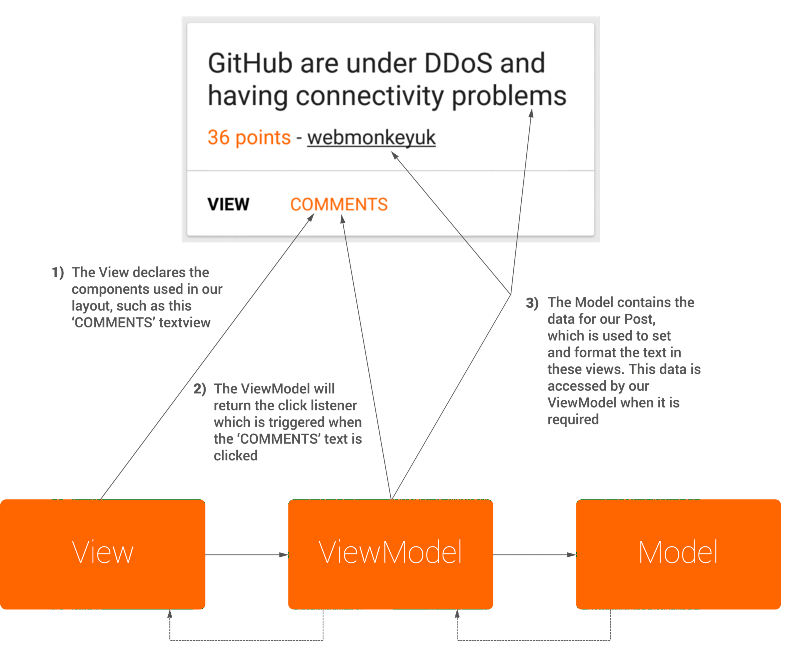
Mỗi trường hợp bài viết được hiển thị trên một recycler view cùng một card view, như hình:

Sử dụng MVVM chúng tôi sẽ có thể tóm tắt các lớp khác nhau tạo nên thẻ này, có nghĩa là mỗi thành phần MVVM sẽ chỉ được hoạt động với trách nhiệm được giao. Sử dụng các thành phần khác nhau được giới thiệu với MVVM, làm việc cùng nhau có thể xây dựng các ví dụ. Vậy làm thế nào chúng ta có thể chia nhỏ ra?
Mode
Rất đơn giản đặt, các Model bao gồm logic kinh doanh thuộc một Post. Điều này bao gồm các thuộc tính khác nhau như: id, tên, chữ vv code dưới đây cho thấy một phiên bản thu gọn của lớp này:
public class Post {

    public Long id;
    public String by;
    public Long time;
    public ArrayList<Long> kids;
    public String url;
    public Long score;
    public String title;
    public String text;
    @SerializedName("type")
    public PostType postType;

    public enum PostType {
        @SerializedName("story")
        STORY("story"),
        @SerializedName("ask")
        ASK("ask"),
        @SerializedName("job")
        JOB("job");

        private String string;

        PostType(String string) {
            this.string = string;
        }

        public static PostType fromString(String string) {
            if (string != null) {
                for (PostType postType : PostType.values()) {
                    if (string.equalsIgnoreCase(postType.string)) return postType;
                }
            }
            return null;
        }
    }

    public Post() { }

}
Ở đây bạn có thể thấy rằng Post Model của chúng tôi có là nó thuộc tính, không có logic khác đã được đặt trong lớp này - mà sẽ được xử lý bởi các thành phần khác.
View
View có trách nhiệm xác định bố cục, hình thức và cấu trúc của các thành phần của nó. Các View chính nó sẽ được (lý tưởng) được xây dựng hoàn toàn bằng XML, tuy nhiên nếu bất kỳ mã java được sử dụng sau đó nó nên không bao gồm bất cứ logic kinh doanh. Các View lấy dữ liệu từ một View Model thông qua việc sử dụng các ràng buộc. Sau đó, tại thời gian chạy, nội dung giao diện người dùng được thiết lập và có thể được cập nhật khi View Model tính được bất cứ sự kiện thông báo thay đổi.
Để bắt đầu, chúng tôi đã tạo ra một custom adapter để sử dụng với RecyclerView. Đối với điều này, chúng tôi cần phải làm một tạo ra một BindingHolder để giữ một tham chiếu đến Binding.
public static class BindingHolder extends RecyclerView.ViewHolder {
    private ItemPostBinding binding;

    public BindingHolder(ItemPostBinding binding) {
        super(binding.cardView);
        this.binding = binding;
    }
}
Phương thức onBindViewHolder() là nơi mà các ràng buộc thực tế của ViewModel và View diễn ra. Chúng tôi tạo ra một ItemPostBinding mới(tạo ra từ bố trí item_post) và thiết lập các View Model để khởi tạo mới lớp PostViewModel.
ItemPostBinding postBinding = holder.binding;
postBinding.setViewModel (mới PostViewModel (mContext,
                             mPosts.get (vị trí), mIsUserPosts));
Khác với standard adapter views, đó là khá nhiều đó! Lớp PostAdapter:
public class PostAdapter extends RecyclerView.Adapter<PostAdapter.BindingHolder> {
    private List<Post> mPosts;
    private Context mContext;
    private boolean mIsUserPosts;

    public PostAdapter(Context context, boolean isUserPosts) {
        mContext = context;
        mIsUserPosts = isUserPosts;
        mPosts = new ArrayList<>();
    }

    @Override
    public BindingHolder onCreateViewHolder(ViewGroup parent, int viewType) {
        ItemPostBinding postBinding = DataBindingUtil.inflate(
                LayoutInflater.from(parent.getContext()),
                R.layout.item_post,
                parent,
                false);
        return new BindingHolder(postBinding);
    }

    @Override
    public void onBindViewHolder(BindingHolder holder, int position) {
        ItemPostBinding postBinding = holder.binding;
        postBinding.setViewModel(new PostViewModel(mContext, mPosts.get(position), mIsUserPosts));
    }

    @Override
    public int getItemCount() {
        return mPosts.size();
    }

    public void setItems(List<Post> posts) {
        mPosts = posts;
        notifyDataSetChanged();
    }

    public void addItem(Post post) {
        mPosts.add(post);
        notifyDataSetChanged();
    }

    public static class BindingHolder extends RecyclerView.ViewHolder {
        private ItemPostBinding binding;

        public BindingHolder(ItemPostBinding binding) {
            super(binding.cardView);
            this.binding = binding;
        }
    }

}
Chuyển sang bố trí tập tin XML của chúng tôi, đầu tiên chúng ta bắt đầu bằng cách gói toàn bộ bố trí trong một thẻ <layout> và khai báo ViewModel bằng cách sử dụng thẻ <data>:
<layout xmlns:android="http://schemas.android.com/apk/res/android">
<data>
<variable name="viewModel" type="com.hitherejoe.mvvm_hackernews.viewModel.PostViewModel" /></data>

</layout>
Thực hiện sử dụng các ViewModel ở một vài nơi trong item_post:
- androidText - Có thể thiết lập các nội dung của một TextView bằng cách tham chiếu các phương thức tương ứng trong ViewModel. Sử dụng @{viewModel.postTitle}, tham chiếu phương thức getPostTitle() trong ViewModel - trả về tiêu đề của bài dụ tương ứng.
- onClick - tham chiếu vào các sự kiện từ file layout. Như thể hiện trong file layout, @{viewModel.onClickPost} được sử dụng để tham chiếu phương thức onClickPost() trong ViewModel, mà trả về một OnClickListener chứa các sự kiện click.
- visibility - Khả năng để mở hoạt động nhận cho một bài tùy thuộc vào việc các bài có bất kỳ ý kiến hay không. Điều này được thực hiện bằng cách kiểm tra kích thước của danh sách bình luận và thiết lập khả năng hiển thị dựa trên kết quả, mà nên diễn ra trong ViewModel. Ở đây, sử dụng phương thức getCommentsVisiblity() để trả về khả năng hiển thị có tính toán.
<?xml version="1.0" encoding="utf-8"?>
<layout xmlns:android="http://schemas.android.com/apk/res/android">

    <data>
        <variable name="viewModel" type="com.hitherejoe.mvvm_hackernews.viewModel.PostViewModel" />
    </data>

    <android.support.v7.widget.CardView
        xmlns:card_view="http://schemas.android.com/apk/res-auto"
        android:id="@+id/card_view"
        android:layout_awidth="match_parent"
        android:layout_height="wrap_content"
        android:layout_marginTop="2dp"
        android:layout_marginBottom="2dp"
        card_view:cardCornerRadius="2dp"
        card_view:cardUseCompatPadding="true">

        <LinearLayout
            android:id="@+id/container_post"
            android:layout_awidth="match_parent"
            android:layout_height="wrap_content"
            android:clickable="true"
            android:orientation="vertical"
            android:onClick="@{viewModel.onClickPost}">

            <LinearLayout
                android:layout_awidth="match_parent"
                android:layout_height="wrap_content"
                android:orientation="vertical"
                android:padding="16dp"
                android:background="@drawable/touchable_background_white">

                <TextView
                    android:id="@+id/text_post_title"
                    android:layout_awidth="match_parent"
                    android:layout_height="wrap_content"
                    android:layout_marginBottom="8dp"
                    android:text="@{viewModel.postTitle}"
                    android:textColor="@color/black_87pc"
                    android:textSize="@dimen/text_large_title"
                    android:onClick="@{viewModel.onClickPost}"/>

                <RelativeLayout
                    android:layout_awidth="match_parent"
                    android:layout_height="wrap_content">

                    <TextView
                        android:id="@+id/text_post_points"
                        android:layout_awidth="wrap_content"
                        android:layout_height="wrap_content"
                        android:layout_alignParentLeft="true"
                        android:text="@{viewModel.postScore}"
                        android:textSize="@dimen/text_body"
                        android:textColor="@color/hn_orange" />

                    <TextView
                        android:id="@+id/text_post_author"
                        android:layout_awidth="wrap_content"
                        android:layout_height="wrap_content"
                        android:layout_toRightOf="@+id/text_post_points"
                        android:text="@{viewModel.postAuthor}"
                        android:textColor="@color/black_87pc"
                        android:textSize="@dimen/text_body"
                        android:bufferType="spannable"
                        android:onClick="@{viewModel.onClickAuthor}"/>

                </RelativeLayout>

            </LinearLayout>

            <View
                android:layout_awidth="match_parent"
                android:layout_height="1dp"
                android:background="@color/light_grey" />

            <LinearLayout
                android:layout_awidth="match_parent"
                android:layout_height="wrap_content"
                android:orientation="horizontal"
                android:background="@color/white">

                <TextView
                    android:id="@+id/text_view_post"
                    android:layout_awidth="wrap_content"
                    android:layout_height="wrap_content"
                    android:padding="16dp"
                    android:background="@drawable/touchable_background_white"
                    android:clickable="true"
                    android:textColor="@color/black"
                    android:textSize="@dimen/text_small_body"
                    android:textStyle="bold"
                    android:text="@string/view_button"
                    android:onClick="@{viewModel.onClickPost}"/>

                <TextView
                    android:id="@+id/text_view_comments"
                    android:layout_awidth="wrap_content"
                    android:layout_height="wrap_content"
                    android:padding="16dp"
                    android:background="@drawable/touchable_background_white"
                    android:clickable="true"
                    android:textColor="@color/hn_orange"
                    android:textSize="@dimen/text_small_body"
                    android:text="@string/comments_button"
                    android:onClick="@{viewModel.onClickComments}"
                    android:visibility="@{viewModel.commentsVisibility}"/>

            </LinearLayout>

        </LinearLayout>

    </android.support.v7.widget.CardView>

</layout>
ViewModel
ViewModel là thành phần đóng vai trò là cầu nối giữa View và Model, thực hiện các logic liên quan đến View. ViewModel có trách nhiệm cho việc truy cập các phương thức và các thuộc tính của Model, sau đó hiển thị trên View. Trong ViewModel, dữ liệu này có thể được trả lại như là hoặc định dạng để một lần nữa loại bỏ trách nhiệm này từ các thành phần khác.
PostViewModel sử dụng các đối tượng Post để xử lý hiển thị nội dung trên CardView của một trường hợp bài viết. Trong lớp này (bên dưới), bạn có thể nhìn thấy một bó toàn bộ các phương pháp, mỗi tương ứng với một thuộc tính khác nhau của Post View.
- getPostTitle() - trả về tiêu đề bài viết
- getPostAuthor() - trả về giá trị Author
- getCommentsVisibility() - trả về giá trị int để xem View có nên đc hiển thị hay không
- onClickPost() - trả về ClickListener của View
Các logic khác nhau đc thực hiện và sử lý bởi ViewModel. Xem lớp PostViewModel để biết các giá trị đc trả lại cho view item_post
public class PostViewModel extends BaseObservable {

    private Context context;
    private Post post;
    private Boolean isUserPosts;

    public PostViewModel(Context context, Post post, boolean isUserPosts) {
        this.context = context;
        this.post = post;
        this.isUserPosts = isUserPosts;
    }

    public String getPostScore() {
        return String.valueOf(post.score) + context.getString(R.string.story_points);
    }

    public String getPostTitle() {
        return post.title;
    }

    public Spannable getPostAuthor() {
        String author = context.getString(R.string.text_post_author, post.by);
        SpannableString content = new SpannableString(author);
        int index = author.indexOf(post.by);
        if (!isUserPosts) content.setSpan(new UnderlineSpan(), index, post.by.length() + index, 0);
        return content;
    }

    public int getCommentsVisibility() {
        return  post.postType == Post.PostType.STORY && post.kids == null ? View.GONE : View.VISIBLE;
    }

    public View.OnClickListener onClickPost() {
        return new View.OnClickListener() {
            @Override
            public void onClick(View v) {
                Post.PostType postType = post.postType;
                if (postType == Post.PostType.JOB || postType == Post.PostType.STORY) {
                    launchStoryActivity();
                } else if (postType == Post.PostType.ASK) {
                    launchCommentsActivity();
                }
            }
        };
    }

    public View.OnClickListener onClickAuthor() {
        return new View.OnClickListener() {
            @Override
            public void onClick(View v) {
                context.startActivity(UserActivity.getStartIntent(context, post.by));
            }
        };
    }

    public View.OnClickListener onClickComments() {
        return new View.OnClickListener() {
            @Override
            public void onClick(View v) {
                launchCommentsActivity();
            }
        };
    }

    private void launchStoryActivity() {
        context.startActivity(ViewStoryActivity.getStartIntent(context, post));
    }

    private void launchCommentsActivity() {
        context.startActivity(CommentsActivity.getStartIntent(context, post));
    }
}
Tuyệt vời, huh? Như bạn có thể thấy, PostViewModel có trách nhiệm:
- Cung cấp các thuộc tính của đối tượng Post
- Thực hiện định dạng dữ liệu cho View
- Trả về event Click
- Xử lý việc hiển thị thuộc tính
Testing the ViewModel
Một trong nhữn
