Xây dựng app chat đơn giản với Firebase(Phần 1)
1.Xây dựng tính năng (Bài viết này mình viết dựa theo tài liệu tham khảo trên trang firebase https://firebase.google.com/docs/auth/) 1.1.Cài đặt. -Trước tiên bạn phải add firebase vào project , trên trang chủ cũng đã khá rõ ràng rồi nên mình cũng sẽ không nhắc lại vấn đề này nữa .Các bạn ...
1.Xây dựng tính năng
(Bài viết này mình viết dựa theo tài liệu tham khảo trên trang firebase https://firebase.google.com/docs/auth/)
1.1.Cài đặt.
-Trước tiên bạn phải add firebase vào project , trên trang chủ cũng đã khá rõ ràng rồi nên mình cũng sẽ không nhắc lại vấn đề này nữa .Các bạn cũng có thể tham khảo ở đây : https://firebase.google.com/docs/android/setup
-Tiếp theo là add dependency trong file gradle (dĩ nhiên rồi ) :
compile 'com.google.firebase:firebase-auth:10.0.1'
-Và nếu bạn chưa tạo project trên firebase console , hãy vào đây tạo ngay : https://console.firebase.google.com/?pli=1
Mình sẽ xây dựng tính năng theo từng màn hình , trước hết là màn hình Login. Màn hình này sẽ có các tính năng sau :
- Create account (Tạo tài khoản )
- Login (Đăng nhập)
- Logout(Thoát tài khoản)
1.2.Các tính năng màn hình Login
1.2.1 Create account :
mAuth.createUserWithEmailAndPassword(email, password)
        .addOnCompleteListener(this, new OnCompleteListener<AuthResult>() {
            @Override
            public void onComplete(@NonNull Task<AuthResult> task) {
                Log.d(TAG, "createUserWithEmail:onComplete:" + task.isSuccessful());

                // If sign in fails, display a message to the user. If sign in succeeds
                // the auth state listener will be notified and logic to handle the
                // signed in user can be handled in the listener.
                if (!task.isSuccessful()) {
                    Toast.makeText(EmailPasswordActivity.this, R.string.auth_failed,
                            Toast.LENGTH_SHORT).show();
                }

                // ...
            }
        });
Nếu tài khoản được tạo ,thì AuthStateListener sẽ chạy hàm onAuthStateChanged và tại đây bạn có thể gọi hàm getCurrentUser để lấy dữ liệu user. Ví dụ :
private FirebaseAuth.AuthStateListener mAuthListener;

// ...

@Override
protected void onCreate(Bundle savedInstanceState) {
    // ...
    mAuthListener = new FirebaseAuth.AuthStateListener() {
        @Override
        public void onAuthStateChanged(@NonNull FirebaseAuth firebaseAuth) {
            FirebaseUser user = firebaseAuth.getCurrentUser();
            if (user != null) {
                // User is signed in
                Log.d(TAG, "onAuthStateChanged:signed_in:" + user.getUid());
            } else {
                // User is signed out
                Log.d(TAG, "onAuthStateChanged:signed_out");
            }
            // ...
        }
    };
    // ...
}

@Override
public void onStart() {
    super.onStart();
    mAuth.addAuthStateListener(mAuthListener);
}

@Override
public void onStop() {
    super.onStop();
    if (mAuthListener != null) {
        mAuth.removeAuthStateListener(mAuthListener);
    }
}
1.2.2 Sign in :
Khi user sign in vào app , truyền email với password vào hàm signInWithEmailAndPassword
mAuth.signInWithEmailAndPassword(email, password)
        .addOnCompleteListener(this, new OnCompleteListener<AuthResult>() {
            @Override
            public void onComplete(@NonNull Task<AuthResult> task) {
                Log.d(TAG, "signInWithEmail:onComplete:" + task.isSuccessful());

                // If sign in fails, display a message to the user. If sign in succeeds
                // the auth state listener will be notified and logic to handle the
                // signed in user can be handled in the listener.
                if (!task.isSuccessful()) {
                    Log.w(TAG, "signInWithEmail:failed", task.getException());
                    Toast.makeText(EmailPasswordActivity.this, R.string.auth_failed,
                            Toast.LENGTH_SHORT).show();
                }

                // ...
            }
        });
Nếu sign-in thành công thì AuthStateListener sẽ chạy hàm onAuthStateChanged và tại đây bạn có thể gọi hàm getCurrentUser để lấy dữ liệu user( như phần 2.1 bên trên).
1.2.3 Sign out :
Sau khi sign in thành công , ta sign out bằng dòng code dưới đây :
FirebaseAuth.getInstance().signOut();
Cuối cùng , bạn lên Firebase console để xem phần lưu trữ tài khoản .
https://console.firebase.google.com/?authuser=0
Sau khi click vào project thì bạn click vào mục Authentication như hình dưới :
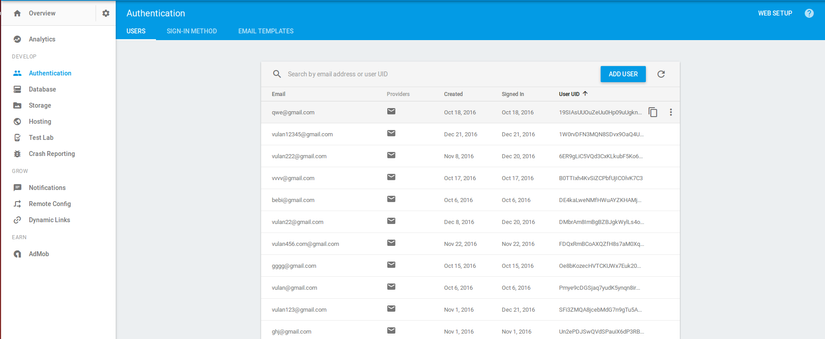 Bạn cũng có thể tùy chọn disable , delete account hay reset password khi click vaò các nút cuối

