Creating a Custom Dialpad Soft Keyboard in Android
Android devices generally keep soft keyboard as input method editor (IME) to accept user input. Customizing soft keyboard is a common trend in many Android hardware devices as well as applications. There is a detail tutorial given in the official site about how to create your own soft keyboard. ...
Android devices generally keep soft keyboard as input method editor (IME) to accept user input. Customizing soft keyboard is a common trend in many Android hardware devices as well as applications. There is a detail tutorial given in the official site about how to create your own soft keyboard.
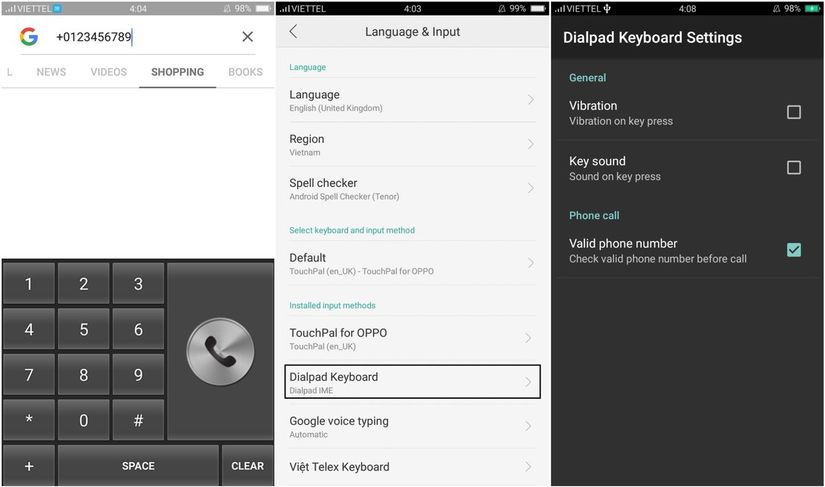
You are reading it to learn how to create a functional Dialpad-like soft keyboard (IME) as the following screenshot which can serve as a default keyboard in Android devices:
So, let's try it!
Step - 1 : Create a Keyboard layout
First of all, create a new Android blank project obviously! To create a soft keyboard, we need to define the keyboard layout in xml in the res/layout folder. This is the page which will be seen as the keyboard.
Example: res/layout/layout_keyboard_view.xml
<?xml version="1.0" encoding="UTF-8"?>
<android.inputmethodservice.KeyboardView
    xmlns:android="http://schemas.android.com/apk/res/android"
    android:layout_awidth="match_parent"
    android:layout_height="wrap_content"
    android:layout_alignParentBottom="true"
    android:keyPreviewLayout="@null"/>
Explanation:
- The layout is aligned at bottom so that the keyboard-view will be shown from bottom according to the default user experience (UX).
- The keyPreviewLayout attribute is null for not to show any dialog-like preview. Generally, you can set a TextView within xml layout to show the preview.
Step - 2 : Create an input-method for the keyboard
Now, you need to create a xml file into res/xml folder to define the input-method's attribute like subtype. This file will be set as resource of meta-data inside the keyboard's service tag in the manifest file.
Example: res/xml/method.xml
<?xml version="1.0" encoding="utf-8"?>
<input-method xmlns:android="http://schemas.android.com/apk/res/android"
              android:settingsActivity="@null">
    <subtype
        android:label="Dialpad IME"
        android:imeSubtypeLocale="en_US"
        android:imeSubtypeMode="keyboard" />
</input-method>
Explanation:
- The settingsActivity attribute is used to put a preference screen in the default settings page.
- The subtype tag is responsible to identfy the keyboards in the Android devices. You can add multiple subtypes in a single input-method.
Step - 3 : Design your keys in the board (Dialpad design)
Well, this is an interesting part of the article about how to design your keys as your own style. The position of the keys are defined in an XML file where every key has some attributes like -
- keyLabel : Defines the text that is displayed on the key.
- codes : Defines the unicode values of the characters that the key operate. To define a key for the number 1, the codes attribute should have the value 49 and the keyLabel attribute should be set to 1. Besides, you can set your own defined code for customization e.g. I will set custom code for the "CALL" key.
- keyEdgeFlags : Defines the edge of the key is left or right.
- keyIcon : Sets the drawable icon instead of label.
- keyWidth : This attribute defines the awidth of a key. It's usually defined as a percentage value.
- isRepeatable : If isRepeatable == TRUE , then the key will repeat the action after long-press. It is usually set to true for the delete and spacebar keys.
Anyway, my plan is to create a dialpad-like keyboard where the users can type phone-number & call directly from the keyboard as the following design:
Example: res/xml/qwerty.xml
<Keyboard xmlns:android="http://schemas.android.com/apk/res/android"
          android:horizontalGap="0px"
          android:keyHeight="@dimen/key_height_general"
          android:keyWidth="20%p"
          android:verticalGap="0px">

    <Row android:rowEdgeFlags="top">
        <Key android:codes="49" android:keyEdgeFlags="left" android:keyLabel="1"/>
        <Key android:codes="50" android:keyLabel="2"/>
        <Key android:codes="51" android:keyLabel="3"/>
        <Key android:codes="-999" android:keyEdgeFlags="right" android:keyHeight="@dimen/key_height_call" android:keyIcon="@drawable/ic_call" android:keyWidth="40%p"/>
    </Row>

    <Row>
        <Key android:codes="52" android:keyEdgeFlags="left" android:keyLabel="4"/>
        <Key android:codes="53" android:keyLabel="5"/>
        <Key android:codes="54" android:keyLabel="6"/>
    </Row>

    <Row>
        <Key android:codes="55" android:keyEdgeFlags="left" android:keyLabel="7"/>
        <Key android:codes="56" android:keyLabel="8"/>
        <Key android:codes="57" android:keyLabel="9"/>
    </Row>

    <Row>
        <Key android:codes="42" android:keyEdgeFlags="left" android:keyLabel="*"/>
        <Key android:codes="48" android:keyLabel="0"/>
        <Key android:codes="35" android:keyLabel="#"/>
    </Row>

    <Row android:rowEdgeFlags="bottom">
        <Key android:codes="-998" android:keyEdgeFlags="left" android:keyLabel="+" android:keyWidth="20%p"/>
        <Key android:codes="32" android:isRepeatable="true" android:keyLabel="SPACE" android:keyWidth="60%p"/>
        <Key android:codes="-5" android:keyEdgeFlags="right" android:isRepeatable="true" android:keyLabel="CLEAR" android:keyWidth="20%p"/>
    </Row>

</Keyboard>
We will set the layout using Java in the step-4 with the following code-snap:
Keyboard keyboard = new Keyboard(context, R.xml.qwerty);
keyboardView.setKeyboard(keyboard);
Step - 4 : Create an input-method service class
After basic setup of keyboard design, it's time to write few Java code to make it functional. Android soft keyboard is written using InputMethodService class.
Example: DialpadKeyboard.java
package your_package_name;
.......
public class DialpadKeyboard extends InputMethodService implements KeyboardView.OnKeyboardActionListener {
    private static final int KEYCODE_CALL = -999;  // randomly defined code.
    private static final int KEYCODE_PLUS = -998;  // randomly defined code.
    private KeyboardView mKeyboardView;
    private Keyboard mKeyboard;

    @Override
    public View onCreateInputView() {
        mKeyboardView = (KeyboardView) getLayoutInflater().inflate(R.layout.layout_keyboard_view, null);
        mKeyboard = new Keyboard(this, R.xml.qwerty);
        mKeyboardView.setKeyboard(mKeyboard);
        mKeyboardView.setOnKeyboardActionListener(this);
        return mKeyboardView;
    }

    @Override
    public void onKey(int primaryCode, int[] keyCodes) {
        InputConnection inputConnection = getCurrentInputConnection();
        switch (primaryCode) {
            case Keyboard.KEYCODE_DELETE:
                inputConnection.deleteSurroundingText(1, 0);
                break;
            case KEYCODE_CALL:
                if ((ActivityCompat.checkSelfPermission(this, Manifest.permission.CALL_PHONE) != PackageManager.PERMISSION_GRANTED)
                    || (TextUtils.isEmpty(inputConnection.getTextBeforeCursor(20, 0).toString()))) return;
                Intent intentCall = new Intent(Intent.ACTION_CALL);
                intentCall.setFlags(Intent.FLAG_ACTIVITY_NEW_TASK);
                String number = "tel:" + inputConnection.getTextBeforeCursor(20, 0).toString();
                intentCall.setData(Uri.parse(number));
                startActivity(intentCall);
                break;
            case KEYCODE_PLUS:
                inputConnection.commitText("+", 1);
                break;
            default:
                char code = (char) primaryCode;
                inputConnection.commitText(String.valueOf(code), 1);
        }
    }
}
Step - 5 : Edit Manifest file
After making all the things, you just need to add the service class in the manifest file.
Example: AndroidManifest.xml
<?xml version="1.0" encoding="utf-8"?>
<manifest ...>

    <uses-permission android:name="android.permission.CALL_PHONE"/>

    <application>
        <service
            android:name="com.licon.androiddialpadkeyboard.DialpadKeyboard"
            android:label="@string/ime_title_keyboard"
            android:permission="android.permission.BIND_INPUT_METHOD">
            <meta-data
                android:name="android.view.im"
                android:resource="@xml/method"/>
            <intent-filter>
                <action android:name="android.view.InputMethod"/>
            </intent-filter>
        </service>
    </application>

</manifest>
P/S : I have just written the basic optimized steps to make a dialpad-like custom soft keyboard. You can see the full source code here: https://github.com/liconrepo/AndroidDialpadKeyboard
Step - 6 : Build & run the keyboard
- After completing all the above steps, build & run the project. In Andorid studio, you can edit configuration to run/debug the keyboard.
- This is a keyboard working as a service, so you don't need any specific activity to test it. After installing the apk, you can find the keyboard to activate in the Language & Input option in the device's settings page.
- After activating the keyboard, you can test it in any input field like the default keyboard as you have already seen the keyboard in the top of this article.
You can create your custom soft keyboard like the above. Happy coding