Google place API (Phần 2) Current Place
Phần trước mình đã hướng dẫn mọi người sử dụng Google Place API Place Autocomplete. Trong phần này chúng ta sẽ tìm hiểu về Google Place API Current Place. Google Place API Current Place được sử dụng để lấy dữ liệu các địa điểm gần với một vị trí xác định. Mình sẽ sử dụng Google place API ...
Phần trước mình đã hướng dẫn mọi người sử dụng Google Place API Place Autocomplete. Trong phần này chúng ta sẽ tìm hiểu về Google Place API Current Place.
Google Place API Current Place được sử dụng để lấy dữ liệu các địa điểm gần với một vị trí xác định.
Mình sẽ sử dụng Google place API Current Place kết hợp Google Map API để tạo một ứng dụng nhỏ hiển thị các địa điểm gần vị trí của thiết bị, khi người dùng click vào sẽ hiển thị vị trí và thông tin địa điểm đó trên bản đồ.
Màn hình ban đầu của ứng dụng:

Khi click vào Get Place ứng dụng sẽ hiển thị ra 5 địa điểm gần với vị trí của thiết bị:

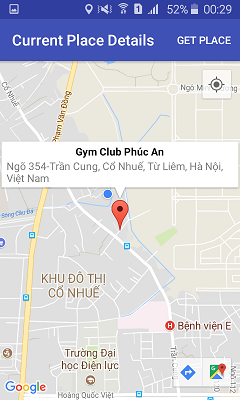
Khi click vào một địa điểm, địa điểm đó sẽ được đánh dấu trên bản đồ bởi một marker, khi click vào marker sẽ hiển thị thông tin chi tiết của địa điểm đó:
Lấy API key
Trong phần trước mình đã hướng dẫn rất chi tiết cách lấy API key. Mọi người có thể xem lại tại đây. Ta chỉ cần lấy 1 api key để dùng cho cả Google Map API và Google Place .
Khởi tạo Places API clients
Ta sẽ sử dụng 2 Interface:
- GeoDataClient cung cấp truy cập vào cơ sở dữ liệu của Google về địa điểm địa phương và thông tin business .
- PlaceDetectionClient cung cấp truy cập nhanh đến vị trí hiện tại của thiết bị và cung cấp cơ hội để báo cáo vị trí của thiết bị ở một nơi cụ thể. Trong hàm onCreate() của activity hoặc fragment ta khởi tạo GeoDataClient, PlaceDetectionClient, và FusedLocationProviderClient :
protected void onCreate(Bundle savedInstanceState) {
    super.onCreate(savedInstanceState);
    setContentView(R.layout.activity_main);

    // Construct a GeoDataClient.
    mGeoDataClient = Places.getGeoDataClient(this, null);

    // Construct a PlaceDetectionClient.
    mPlaceDetectionClient = Places.getPlaceDetectionClient(this, null);

    // Construct a FusedLocationProviderClient.
    mFusedLocationProviderClient = LocationServices.getFusedLocationProviderClient(this);
}
Yêu cầu quyền vị trí
Để có thể xác định vị trí của thiết bị và để nút vị trí trên bản đồ hoạt động khi người dùng chạm vào, ta cần yêu cầu location permission:
- Khai báo trong file Manifest:
<manifest xmlns:android="http://schemas.android.com/apk/res/android"
    package="com.example.currentplacedetailsonmap">
    <uses-permission android:name="android.permission.ACCESS_FINE_LOCATION" />
</manifest>
2.Yêu cầu runtime permission trong ứng dụng, cho phép người dùng chấp nhận hoặc từ chối cấp quyên vị trí. Đoạn code dưới đây kiểm tra người dùng đã cấp quyền fine location hay chưa. Nếu chưa yêu cầu người dùng cấp quyền:
> private void getLocationPermission() {
    /*
     * Request location permission, so that we can get the location of the
     * device. The result of the permission request is handled by a callback,
     * onRequestPermissionsResult.
     */
    if (ContextCompat.checkSelfPermission(this.getApplicationContext(),
            android.Manifest.permission.ACCESS_FINE_LOCATION)
            == PackageManager.PERMISSION_GRANTED) {
        mLocationPermissionGranted = true;
    } else {
        ActivityCompat.requestPermissions(this,
                new String[]{android.Manifest.permission.ACCESS_FINE_LOCATION},
                PERMISSIONS_REQUEST_ACCESS_FINE_LOCATION);
    }
}
- Override hàm callback onRequestPermissionsResult() để xử lý kết quả xin cấp quyền vị trí:
@Override
public void onRequestPermissionsResult(int requestCode,
                                       @NonNull String permissions[],
                                       @NonNull int[] grantResults) {
    mLocationPermissionGranted = false;
    switch (requestCode) {
        case PERMISSIONS_REQUEST_ACCESS_FINE_LOCATION: {
            // If request is cancelled, the result arrays are empty.
            if (grantResults.length > 0
                    && grantResults[0] == PackageManager.PERMISSION_GRANTED) {
                mLocationPermissionGranted = true;
            }
        }
    }
    updateLocationUI();
}
Thêm bản đồ
Để hiển thị bản đồ, ta sử dụng Google Map API
- Thêm code xml <fragment> vào file layout của activity. Đoạn code này định nghĩa một supportMapFragment có nhiệm vụ chứa bản đồ và cung cấp sự truy cập tới đối tượng GoogleMap:
<fragment xmlns:android="http://schemas.android.com/apk/res/android"
    xmlns:tools="http://schemas.android.com/tools"
    android:id="@+id/map"
    android:name="com.google.android.gms.maps.SupportMapFragment"
    android:layout_awidth="match_parent"
    android:layout_height="match_parent"
    tools:context="com.example.currentplacedetailsonmap.MapsActivityCurrentPlace" />
- Trong hàm onCreate() của activity, ta sử dụng phương thức getMapAsync() để đăng ký cho map callback:
@Override
protected void onCreate(Bundle savedInstanceState) {
    super.onCreate(savedInstanceState);
    setContentView(R.layout.activity_maps);
    SupportMapFragment mapFragment = (SupportMapFragment) getSupportFragmentManager()
        .findFragmentById(R.id.map);
mapFragment.getMapAsync(this);
}
- Implement interface** OnMapReadyCallBack** và override phương thức onMapReady() để cài đặt map khi đối tượng GoogleMap đã sẵn sàng:
public void onMapReady(GoogleMap map) {
    mMap = map;

    // Do other setup activities here too, as described elsewhere in this tutorial.

    // Turn on the My Location layer and the related control on the map.
    updateLocationUI();

    // Get the current location of the device and set the position of the map.
    getDeviceLocation();
}
- Hàm updateLocationUI(): nếu người dùng đồng ý cấp quyền vị trí, ta sẽ enable MyLocation layer ngược lại disable MyLocation layer và đặt vị trí hiện tại là null:
private void updateLocationUI() {
    if (mMap == null) {
        return;
    }
    try {
        if (mLocationPermissionGranted) {
            mMap.setMyLocationEnabled(true);
            mMap.getUiSettings().setMyLocationButtonEnabled(true);
        } else {
            mMap.setMyLocationEnabled(false);
            mMap.getUiSettings().setMyLocationButtonEnabled(false);
            mLastKnownLocation = null;
            getLocationPermission();
        }
    } catch (SecurityException e)  {
        Log.e("Exception: %s", e.getMessage());
    }
}
Lấy vị trí từ thiết bị và xác định vị trí trên bản đồ
Sử dụng Fused Location Provider để xác định last-know location của thiết bị, sau đó sử dụng vị trí đó để định vị trên bản đồ:
private void getDeviceLocation() {
    /*
     * Get the best and most recent location of the device, which may be null in rare
     * cases when a location is not available.
     */
    try {
        if (mLocationPermissionGranted) {
            Task locationResult = mFusedLocationProviderClient.getLastLocation();
            locationResult.addOnCompleteListener(this, new OnCompleteListener() {
                @Override
                public void onComplete(@NonNull Task task) {
                    if (task.isSuccessful()) {
                        // Set the map's camera position to the current location of the device.
                        mLastKnownLocation = task.getResult();
                        mMap.moveCamera(CameraUpdateFactory.newLatLngZoom(
                                new LatLng(mLastKnownLocation.getLatitude(),
                                        mLastKnownLocation.getLongitude()), DEFAULT_ZOOM));
                    } else {
                        Log.d(TAG, "Current location is null. Using defaults.");
                        Log.e(TAG, "Exception: %s", task.getException());
                        mMap.moveCamera(CameraUpdateFactory.newLatLngZoom(mDefaultLocation, DEFAULT_ZOOM));
                        mMap.getUiSettings().setMyLocationButtonEnabled(false);
                    }
                }
            });
        }
    } catch(SecurityException e)  {
        Log.e("Exception: %s", e.getMessage());
    }
}
Lấy địa điểm hiện tại
Sau khi thêm và cài đặt bản đồ xong, ta sẽ sử dụng Google Place APi để lấy về danh sách các địa điểm gần với vị trí của thiết bị.
- Tạo một menu, khi người dùng click chọn, ứng dụng sẽ show ra các địa điểm.
@Override
public boolean onOptionsItemSelected(MenuItem item) {
    if (item.getItemId() == R.id.option_get_place) {
        showCurrentPlace();
    }
    return true;
}
- Viết hàm showCurrentPlace() để lấy danh sách các địa điểm gần với vị trí hiện tại: Để tìm kiếm các địa điểm local business hoặc các địa điểm khác gần với vị trí hiện tại của thiết bị, ta gọi PlaceDetectionClient.getCurrentPlace(). Ta có thể tùy ý chỉ định một PlaceFilter để hạn chế các kết quả cho một hoặc nhiều ID vị trí (tối đa là 10), hoặc để chỉ chọn các địa điểm hiện đang mở. Nếu không có bộ lọc được chỉ định, kết quả sẽ không bị lọc.
API trả về một PlaceLikelihoodBufferResponse trong một tác vụ. Các PlaceLikelihoodBufferResponse chứa một danh sách các đối tượng PlaceLikelihood đại diện cho các địa điểm có khả năng. Đối với mỗi nơi, kết quả bao gồm một dấu hiệu cho thấy địa điểm đó là đúng. Bộ đệm có thể rỗng, nếu không có vị trí nào tương ứng với tiêu chí lọc. Ta có thể gọi PlaceLikelihood.getPlace () để lấy về một đối tượng Place, và PlaceLikelihood.getLikelihood () để lấy rating sự phù hợp của địa điểm đó. Giá trị cao hơn có nghĩa là xác suất lớn hơn là địa điểm phù hợp nhất.
private void showCurrentPlace() {
    if (mMap == null) {
        return;
    }

    if (mLocationPermissionGranted) {
        // Get the likely places - that is, the businesses and other points of interest that
        // are the best match for the device's current location.
        @SuppressWarnings("MissingPermission") final
        Task<PlaceLikelihoodBufferResponse> placeResult =
                mPlaceDetectionClient.getCurrentPlace(null);
        placeResult.addOnCompleteListener
                (new OnCompleteListener<PlaceLikelihoodBufferResponse>() {
                    @Override
                    public void onComplete(@NonNull Task<PlaceLikelihoodBufferResponse> task) {
                        if (task.isSuccessful() && task.getResult() != null) {
                            PlaceLikelihoodBufferResponse likelyPlaces = task.getResult();

                            // Set the count, handling cases where less than 5 entries are returned.
                            int count;
                            if (likelyPlaces.getCount() < M_MAX_ENTRIES) {
                                count = likelyPlaces.getCount();
                            } else {
                                count = M_MAX_ENTRIES;
                            }

                            int i = 0;
                            mLikelyPlaceNames = new String[count];
                            mLikelyPlaceAddresses = new String[count];
                            mLikelyPlaceAttributions = new String[count];
                            mLikelyPlaceLatLngs = new LatLng[count];

                            for (PlaceLikelihood placeLikelihood : likelyPlaces) {
                                // Build a list of likely places to show the user.
                                mLikelyPlaceNames[i] = (String) placeLikelihood.getPlace().getName();
                                mLikelyPlaceAddresses[i] = (String) placeLikelihood.getPlace()
                                        .getAddress();
                                mLikelyPlaceAttributions[i] = (String) placeLikelihood.getPlace()
                                        .getAttributions();
                                mLikelyPlaceLatLngs[i] = placeLikelihood.getPlace().getLatLng();

                                i++;
                                if (i > (count - 1)) {
                                    break;
                                }
                            }

                            // Release the place likelihood buffer, to avoid memory leaks.
                            likelyPlaces.release();

                            // Show a dialog offering the user the list of likely places, and add a
                            // marker at the selected place.
                            openPlacesDialog();

                        } else {
                            Log.e(TAG, "Exception: %s", task.getException());
                        }
                    }
                });
    } else {
        // The user has not granted permission.
        Log.i(TAG, "The user did not grant location permission.");

        // Add a default marker, because the user hasn't selected a place.
        mMap.addMarker(new MarkerOptions()
                .title(getString(R.string.default_info_title))
                .position(mDefaultLocation)
                .snippet(getString(R.string.default_info_snippet)));

        // Prompt the user for permission.
        getLocationPermission();
    }
}
- Viết hàm openPlacesDialog() để hiển thị form cho phép người dùng chọn địa điểm sau đó hiển thị marker lên bản đồ , marker content bao gồm tên và địa chỉ của địa điểm đó
private void openPlacesDialog() {
    // Ask the user to choose the place where they are now.
    DialogInterface.OnClickListener listener = new DialogInterface.OnClickListener() {
        @Override
        public void onClick(DialogInterface dialog, int which) {
            // The "which" argument contains the position of the selected item.
            LatLng markerLatLng = mLikelyPlaceLatLngs[which];
            String markerSnippet = mLikelyPlaceAddresses[which];
            if (mLikelyPlaceAttributions[which] != null) {
                markerSnippet = markerSnippet + "
" + mLikelyPlaceAttributions[which];
            }

            // Add a marker for the selected place, with an info window
            // showing information about that place.
            mMap.addMarker(new MarkerOptions()
                    .title(mLikelyPlaceNames[which])
                    .position(markerLatLng)
                    .snippet(markerSnippet));

            // Position the map's camera at the location of the marker.
            mMap.moveCamera(CameraUpdateFactory.newLatLngZoom(markerLatLng,
                    DEFAULT_ZOOM));
        }
    };

    // Display the dialog.
    AlertDialog dialog = new AlertDialog.Builder(this)
            .setTitle(R.string.pick_place)
            .setItems(mLikelyPlaceNames, listener)
            .show();
}
- Custom layout info window giúp hiển thị content của marker trên nhiều dòng. Đầu tiên tạo file layout custom_info_contents.xml chứa 2 textview một để hiển thị info window title, một để hiển thị snippet (nội dung của info window) :
<?xml version="1.0" encoding="utf-8"?>
<LinearLayout xmlns:android="http://schemas.android.com/apk/res/android"
    android:layout_awidth="wrap_content"
    android:layout_height="wrap_content"
    android:layoutDirection="locale"
    android:orientation="vertical">
    <TextView
        android:id="@+id/title"
        android:layout_awidth="wrap_content"
        android:layout_height="wrap_content"
        android:layout_gravity="center_horizontal"
        android:textColor="#ff000000"
        android:textStyle="bold" />

    <TextView
        android:id="@+id/snippet"
        android:layout_awidth="wrap_content"
        android:layout_height="wrap_content"
        android:textColor="#ff7f7f7f" />
</LinearLayout>
- Implement interface InfoWindowAdapter để inflate layout và load nội dung của info window.
@Override
public void onMapReady(GoogleMap map) {
    // Do other setup activities here too, as described elsewhere in this tutorial.
    mMap.setInfoWindowAdapter(new GoogleMap.InfoWindowAdapter() {

    @Override
    // Return null here, so that getInfoContents() is called next.
    public View getInfoWindow(Marker arg0) {
        return null;
    }

    @Override
    public View getInfoContents(Marker marker) {
        // Inflate the layouts for the info window, title and snippet.
        View infoWindow = getLayoutInflater().inflate(R.layout.custom_info_contents, null);

        TextView title = ((TextView) infoWindow.findViewById(R.id.title));
        title.setText(marker.getTitle());

        TextView snippet = ((TextView) infoWindow.findViewById(R.id.snippet));
        snippet.setText(marker.getSnippet());

        return infoWindow;
      }
    });
}
Mọi người có thể tham khảo thêm về Marker, Infowindow và các thành phần khác của Google Map API tại đây
Lưu lại trạng thái bản đồ
Khi người dùng xoay màn hình hoặc thay đổi cấu hình, map activity sẽ bị hủy và tạo lại. Để đảm bảo trải nghiệm người dùng suôn sẻ, nên lưu trữ trạng thái ứng dụng liên quan và khôi phục lại nó khi cần thiết.Ta sẽ lưu lại vị trí của camera và vị trí của thiết bị vào saveInstanceState Bundle.
- Trong activity, định nghĩa các key value:
private static final String KEY_CAMERA_POSITION = "camera_position";
private static final String KEY_LOCATION = "location";
- implement onSaveInstanceState() callback để lưu lại trạng thái khi activity tạm dừng
@Override
protected void onSaveInstanceState(Bundle outState) {
    if (mMap != null) {
        outState.putParcelable(KEY_CAMERA_POSITION, mMap.getCameraPosition());
        outState.putParcelable(KEY_LOCATION, mLastKnownLocation);
        super.onSaveInstanceState(outState);
    }
}
- Trong hàm onCreate() của activity, lấy lại vị trí của camera và thiết bị nếu chúng đã được lưu trước đó:
@Override
protected void onCreate(Bundle savedInstanceState) {
    super.onCreate(savedInstanceState);
    if (savedInstanceState != null) {
        mCurrentLocation = savedInstanceState.getParcelable(KEY_LOCATION);
        mCameraPosition = savedInstanceState.getParcelable(KEY_CAMERA_POSITION);
    }
    ...
}
Nguồn
- https://developers.google.com/places/android-api/current-place-tutorial
- Mọi người có thể tham khảo code đầy đủ tại đây
