Làm ứng dụng AR Location-based trên Android không dùng SDK
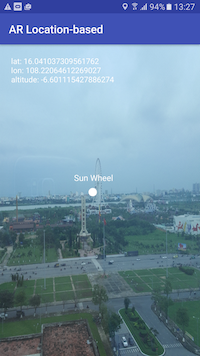
Ý tưởng của app này rất đơn giản, bật camera lên, khi bạn xoay camera về hướng nào thì các địa điểm trong thế giới thực sẽ hiện thông tin lên. Lý thuyết Augmented Reality sẽ chuyển đổi toạ độ thực tế thành toạ độ điểm x,y hiển thị trên camera. Trong AR Location-based, toạ độ thực tế chính ...
Ý tưởng của app này rất đơn giản, bật camera lên, khi bạn xoay camera về hướng nào thì các địa điểm trong thế giới thực sẽ hiện thông tin lên.
Lý thuyết
Augmented Reality sẽ chuyển đổi toạ độ thực tế thành toạ độ điểm x,y hiển thị trên camera. Trong AR Location-based, toạ độ thực tế chính là toạ độ địa lý mà chúng ta hay dùng dựa trên trên kinh độ và vĩ độ (longtitude, latitude). Chúng ta sẽ chuyển đổi toạ độ GPS (Latitude, Longitude, Altitude) thành toạ độ ENU (East, North, Up), rồi sau đó chuyển đổi ENU thành toạ độ trên Camera và hiển thị ra.
Chuyển toạ độ GPS to toạ độ ENU
Chúng ta phải thực hiện 2 bước:
- Chuyển GPS qua toạ độ ECEF (Earth-centered Earth-fixed coordinate):
- Chuyển ECEF qua ENU
Giảng giải mấy vấn đề hàn lâm mệt quá, chắc chắn bạn sẽ đặt ra câu hỏi vì sao làm như vậy thì đọc cái này để có câu trả lời.
Chuyển ENU thành toạ độ trên Camera
Sau khi bạn có được ENU, bạn sẽ có một vector [n -e u 1]
Tiếp theo, bạn sẽ phải lấy được camera projection matrix gốc, rồi nhân cho rotation matrix để cho ra một matrix, mình tạm gọi là rotated projection matrix
- Công thức để lấy projection matrix:
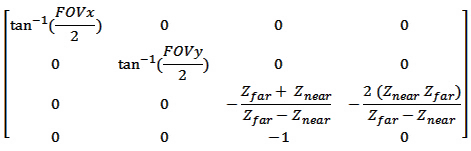
Bạn không cần quan tâm đến công thức lắm, OpenGL có hàm trả về cho bạn
- Rotation Matrix thì Android sensor sẽ trả về
Để chuyển đổi ENU thành toạ độ trên Camera, chúng ta sẽ nhân rotated projection matrix với ENU để lấy được 1 một vector [v0, v1, v2, v3].
Sau đó tính toạ độ x, y theo công thức sau:
x = (0.5 + v0 / v3) * awidthOfCameraView
y = (0.5 - v1 / v3) * heightOfCameraView
Lưu ý: Nếu bạn muốn hiển thị đúng thì phải kiểm tra điều kiện v2 < 0, tức là sẽ hiển thị ở hướng mà bạn hướng camera tới, nếu ko kiểm tra điều kiện này thì app của bạn sẽ hiển thị điểm trên camera ở hướng ngược nữa
Project setup
Bây giờ chúng ta bắt đầu tạo dự án Android trên Android Studio. Thiết lập một số thông tin như sau:
- Project Name: AR Location-based
- API Level Min/Target: 21/25
- Launch Activity Class: ARActivity
Định nghĩa layout cho màn hình AR
Chúng ta sẽ tạo ra 1 Framelayout chứa camera và view vẽ các điểm thông tin vị trí lên đó
 <FrameLayout
        android:id="@+id/camera_container_layout"
        android:layout_awidth="match_parent"
        android:layout_height="match_parent">
        <SurfaceView
            android:id="@+id/surface_view"
            android:layout_awidth="match_parent"
            android:layout_height="match_parent" />
    </FrameLayout>
Cấu hình Manifest
Vì ứng dụng sẽ sử dụng camera và lấy vị trí hiện tại của bạn, nên chúng ta sẽ đưa vào một số thông tin trong Manifes để yêu cầu permission:
<uses-permission android:name="android.permission.ACCESS_FINE_LOCATION"/>
<uses-permission android:name="android.permission.CAMERA"/>
<uses-feature android:name="android.hardware.camera"/>
Lấy location hiện tại
Đối với Android version 23 trở lên, bạn phải request permission runtime
public void requestLocationPermission() {
    if (Build.VERSION.SDK_INT >= Build.VERSION_CODES.M &&
        this.checkSelfPermission(Manifest.permission.ACCESS_FINE_LOCATION) != PackageManager.PERMISSION_GRANTED) {
        this.requestPermissions(new String[]{Manifest.permission.ACCESS_FINE_LOCATION}, REQUEST_LOCATION_PERMISSIONS_CODE);
    } else {
        initLocationService();
    }
}
Để lấy được location hiện tại, chúng ta sẽ implement LocationListener
public class ARActivity extends AppCompatActivity implements LocationListener {
    // …
}
Tiếp theo, chúng ta sẽ override các method từ LocationListener
@Override
public void onLocationChanged(Location location) {
    latestLocation = location;
    updateLatestLocation();
}

@Override
public void onStatusChanged(String s, int i, Bundle bundle) {

}

@Override
public void onProviderEnabled(String s) {

}

@Override
public void onProviderDisabled(String s) {

}
Để lấy được location khi thay đổi, thì chúng ta sẽ register nó
this.locationManager = (LocationManager) this.getSystemService(this.LOCATION_SERVICE);

// Get GPS and network status
this.isGPSEnabled = locationManager.isProviderEnabled(LocationManager.GPS_PROVIDER);
this.isNetworkEnabled = locationManager.isProviderEnabled(LocationManager.NETWORK_PROVIDER);

if (!isNetworkEnabled && !isGPSEnabled)    {
    // cannot get location
    this.locationServiceAvailable = false;
}

this.locationServiceAvailable = true;

if (isNetworkEnabled) {
    locationManager.requestLocationUpdates(LocationManager.NETWORK_PROVIDER,
        MIN_TIME_BW_UPDATES,
        MIN_DISTANCE_CHANGE_FOR_UPDATES, this);
    if (locationManager != null)   {
        latestLocation = locationManager.getLastKnownLocation(LocationManager.NETWORK_PROVIDER);
        updateLatestLocation();
    }
}

 if (isGPSEnabled)  {
     locationManager.requestLocationUpdates(LocationManager.GPS_PROVIDER,
        MIN_TIME_BW_UPDATES,
        MIN_DISTANCE_CHANGE_FOR_UPDATES, this);

     if (locationManager != null)  {
         latestLocation = locationManager.getLastKnownLocation(LocationManager.GPS_PROVIDER);
         updateLatestLocation();
     }
}
Tạo một Custom View chứa Camera
View này dùng để vẽ hình ảnh từ camera lên
public class ARCamera extends ViewGroup implements SurfaceHolder.Callback {

    SurfaceView surfaceView;
    SurfaceHolder surfaceHolder;
    Camera camera;
    Camera.Parameters parameters;
    Activity activity;

    public ARCamera(Context context, SurfaceView surfaceView) {
        super(context);

        this.surfaceView = surfaceView;
        this.activity = (Activity) context;
        surfaceHolder = this.surfaceView.getHolder();
        surfaceHolder.addCallback(this);
        surfaceHolder.setType(SurfaceHolder.SURFACE_TYPE_PUSH_BUFFERS);
    }
}
Class ARCamera bắt đầu với một constructor. chúng ta sẽ đưa Activity vào thông qua parameter . Ngoài ra, trong constructor chúng ta sẽ khởi tạo luôn đối tượng SurfaceHolder, đối tượng này sẽ làm nhiệm vụ vẽ hình ảnh từ camera lên view.
Viết code cho surfaceCreated() Callback
Chỗ này khá quan trọng, vì có thể camera orientation khác với device orientation nên chúng ta phải làm cho nó khớp với nhau, mình cảm thấy rất là chán khi code chỗ này, nói trắng ra là mấy thằng nhà sản xuất dở hơi, để anh em mình code khổ
public void surfaceCreated(SurfaceHolder holder) {
        try {
            if (camera != null) {

                parameters = camera.getParameters();

                int orientation = getCameraOrientation();

                camera.setDisplayOrientation(orientation);
                camera.getParameters().setRotation(orientation);

                camera.setPreviewDisplay(holder);
            }
        } catch (IOException exception) {
            Log.e(TAG, "IOException caused by setPreviewDisplay()", exception);
        }
    }

    private int getCameraOrientation() {
        Camera.CameraInfo info = new Camera.CameraInfo();
        Camera.getCameraInfo(Camera.CameraInfo.CAMERA_FACING_BACK, info);

        int rotation = activity.getWindowManager().getDefaultDisplay().getRotation();

        int degrees = 0;
        switch (rotation) {
            case Surface.ROTATION_0:
                degrees = 0;
                break;
            case Surface.ROTATION_90:
                degrees = 90;
                break;
            case Surface.ROTATION_180:
                degrees = 180;
                break;
            case Surface.ROTATION_270:
                degrees = 270;
                break;
        }

        int orientation;
        if(info.facing==Camera.CameraInfo.CAMERA_FACING_FRONT){
            orientation = (info.orientation + degrees) % 360;
            orientation =  (360 - orientation) % 360;
        } else {
            orientation = (info.orientation -degrees + 360) % 360;
        }

        return orientation;
    }
Viết code cho surfaceChanged() Callback
Đây cũng là một phần khá quan trọng, vì bạn sẽ chọn preview size cho hình ảnh hiển thị. Sau khi chọn được preview size phù hợp, chúng ta sẽ set vào camera parameter, rồi gọi startPreview() để bắt đầu hiển thị hình ảnh từ camera lên
    public void surfaceChanged(SurfaceHolder holder, int format, int awidth, int height) {
        if(camera != null) {
            this.cameraWidth = awidth;
            this.cameraHeight = height;

            Camera.Parameters params = camera.getParameters();
            params.setPreviewSize(previewSize.awidth, previewSize.height);
            requestLayout();

            camera.setParameters(params);
            camera.startPreview();
        }
    }
Lấy camera projection matrix
Như đã đề cập trong phần lý thuyết, camera projection matrix là một phần giúp chúng ta tính toán toạ độ hiển thị của các điểm trên màn hình
Để lấy được projection matrix, chúng ta sẽ sử dụng thư viện openGL của android
import android.opengl.Matrix;
private final static float Z_NEAR = 0.5f;
private final static float Z_FAR = 2000;

...

private void generateProjectionMatrix() {
        float ratio = (float)this.cameraWidth / (float)this.cameraHeight;
        final int OFFSET = 0;
        final float LEFT =  -ratio;
        final float RIGHT = ratio;
        final float BOTTOM = -1;
        final float TOP = 1;
        Matrix.frustumM(projectionMatrix, OFFSET, LEFT, RIGHT, BOTTOM, TOP, Z_NEAR, Z_FAR);
    }
Z_NEAR, Z_FAR là thông số trường hiển thị của camera, khoảng cách gần nhất và xa nhất
Lấy rotation matrix từ sensor
Trong ARActivity, chúng ta sẽ implement SensorEventListener để nhận các callback từ sensor
public class ARActivity extends AppCompatActivity implements SensorEventListener, LocationListener {

}
Sau đó chúng ta sẽ register sensor để lấy Rotation matrix, ở đây tôi chọn sensor TYPE_ROTATION_VECTOR. Một số ví dụ trên mạng lấy kết hợp Accerometer và Gravity, nhưng sau nhiều thử nghiệm thấy chỉ cần lấy cái này là có kết quả rotation ổn nhất
private void registerSensors() {
        sensorManager.registerListener(this,
                sensorManager.getDefaultSensor(Sensor.TYPE_ROTATION_VECTOR),
                SensorManager.SENSOR_STATUS_ACCURACY_HIGH);
    }
Sau đó chúng ta sẽ tính rotated projection matrix bên trong onSensorChanged()
    @Override
    public void onSensorChanged(SensorEvent sensorEvent) {
        if (sensorEvent.sensor.getType() == Sensor.TYPE_ROTATION_VECTOR) {
            float[] rotationMatrixFromVector = new float[16];
            float[] projectionMatrix = new float[16];
            float[] rotatedProjectionMatrix = new float[16];

            SensorManager.getRotationMatrixFromVector(rotationMatrixFromVector, sensorEvent.values);

            if (arCamera != null) {
                projectionMatrix = arCamera.getProjectionMatrix();
            }

            Matrix.multiplyMM(rotatedProjectionMatrix, 0, projectionMatrix, 0, rotationMatrixFromVector, 0);
        }
    }
Viết hàm chuyển đổi từ Location qua ECEF, và ECEF qua ENU
Như đã trình bày phần lý thuyết, chúng ta sẽ chuyển đổi toạ độ của 1 điểm thành ENU. ENU sẽ cần cả tham số của location hiện của device và location của điểm cần hiển thị
    private final static double WGS84_A = 6378137.0;                  // WGS 84 semi-major axis constant in meters
    private final static double WGS84_E2 = 0.00669437999014;          // square of WGS 84 eccentricity

    public static float[] WSG84toECEF(Location location) {
        double radLat = Math.toRadians(location.getLatitude());
        double radLon = Math.toRadians(location.getLongitude());

        float clat = (float) Math.cos(radLat);
        float slat = (float) Math.sin(radLat);
        float clon = (float) Math.cos(radLon);
        float slon = (float) Math.sin(radLon);

        float N = (float) (WGS84_A / Math.sqrt(1.0 - WGS84_E2 * slat * slat));

        float x = (float) ((N + location.getAltitude()) * clat * clon);
        float y = (float) ((N + location.getAltitude()) * clat * slon);
        float z = (float) ((N * (1.0 - WGS84_E2) + location.getAltitude()) * slat);

        return new float[] {x , y, z};
    }

    public static float[] ECEFtoENU(Location currentLocation, float[] ecefCurrentLocation, float[] ecefPOI) {
        double radLat = Math.toRadians(currentLocation.getLatitude());
        double radLon = Math.toRadians(currentLocation.getLongitude());

        float clat = (float)Math.cos(radLat);
        float slat = (float)Math.sin(radLat);
        float clon = (float)Math.cos(radLon);
        float slon = (float)Math.sin(radLon);

        float dx = ecefCurrentLocation[0] - ecefPOI[0];
        float dy = ecefCurrentLocation[1] - ecefPOI[1];
        float dz = ecefCurrentLocation[2] - ecefPOI[2];

        float east = -slon*dx + clon*dy;

        float north = -slat*clon*dx - slat*slon*dy + clat*dz;

        float up = clat*clon*dx + clat*slon*dy + slat*dz;

        return new float[] {east , north, up, 1};
    }
Tạo AROverlayView
AROverlayView dùng để hiển thị các điểm lên màn hình.
public class AROverlayView extends View {
}
Mỗi lần thay đổi location hoặc thông số sensor thay đổi, chúng ta sẽ vẽ lại các điểm trong method onDraw()
@Override
    protected void onDraw(Canvas canvas) {
        super.onDraw(canvas);

        if (currentLocation == null) {
            return;
        }

        final int radius = 30;
        Paint paint = new Paint(Paint.ANTI_ALIAS_FLAG);
        paint.setStyle(Paint.Style.FILL);
        paint.setColor(Color.WHITE);
        paint.setTypeface(Typeface.create(Typeface.DEFAULT, Typeface.NORMAL));
        paint.setTextSize(60);

        for (int i = 0; i < arPoints.size(); i ++) {
            float[] currentLocationInECEF = LocationHelper.WSG84toECEF(currentLocation);
            float[] pointInECEF = LocationHelper.WSG84toECEF(arPoints.get(i).getLocation());
            float[] pointInENU = LocationHelper.ECEFtoENU(currentLocation, currentLocationInECEF, pointInECEF);

            float[] cameraCoordinateVector = new float[4];
            Matrix.multiplyMV(cameraCoordinateVector, 0, rotatedProjectionMatrix, 0, pointInENU, 0);

            // cameraCoordinateVector[2] is z, that always less than 0 to display on right position
            // if z > 0, the point will display on the opposite
            if (cameraCoordinateVector[2] < 0) {
                float x  = (0.5f + cameraCoordinateVector[0]/cameraCoordinateVector[3]) * canvas.getWidth();
                float y = (0.5f - cameraCoordinateVector[1]/cameraCoordinateVector[3]) * canvas.getHeight();

                canvas.drawCircle(x, y, radius, paint);
                canvas.drawText(arPoints.get(i).getName(), x - (30 * arPoints.get(i).getName().length() / 2), y - 80, paint);
            }
        }
    }
Cuối cùng, trênn ARActivity, chúng ta chỉ việc đưa ARCamera và AROverlayView vào.
Lời kết
Hiện nay có rất nhiều SDK hỗ trợ làm AR Location-based cũng như là opensource. Tuy nhiên, SDK thì bạn phải trả tiền, còn mình chẳng hiểu sao opensource chẳng hạn như mixare lại code nhiều đến như vậy, trong khi Android đã hỗ trợ cho chúng ta tính toán matrix, vector, projection matrix rất đơn giản. Để hiểu rõ hơn các bạn có thể tham khảo Github và build chạy thử
P/s: Trong ví dụ này, mình chỉ focus vô hướng dẫn ý tưởng làm AR, nên mình chỉ sử dụng camera1 của Android, có thể còn nhiều hạn chế, một số dòng máy bạn chạy sẽ bị méo hình trên camera. Để phát triển hoàn chỉnh, bạn có thể làm với camera2 để chạy trên các dòng máy hỗ trợ nó. Có điều xử lý camera chắc chắn sẽ khiến bạn bực mình nhiều lắm ^_^