[Android/2D Graphics] Phân tích và mô phỏng nút cảm xúc của Android Facebook Application
Video demo: Tình hình là đợt vừa rồi mình có ngó Kiaplog profile của anh Huy Trần, lướt lướt thấy có chủ đề Phức tạp hoá vấn đề: Phân tích và mô phỏng nút cảm xúc của Facebook có lượng kipalog khiếp quá nên nhảy vào xem luôn. Đọc xong mà thấy mở mang đầu óc, nhưng tiếc là lâu chưa xem ...

Video demo:
Tình hình là đợt vừa rồi mình có ngó Kiaplog profile của anh Huy Trần, lướt lướt thấy có chủ đề Phức tạp hoá vấn đề: Phân tích và mô phỏng nút cảm xúc của Facebook có lượng kipalog khiếp quá nên nhảy vào xem luôn. Đọc xong mà thấy mở mang đầu óc, nhưng tiếc là lâu chưa xem lại web + cũng gà nữa nên chắc chả code theo được ![]() , đành ngậm ngùi hấp thu phân tích của anh + phân tích thêm để giống với app Facebook và nung nấu chuyển hóa nó sang Android
, đành ngậm ngùi hấp thu phân tích của anh + phân tích thêm để giống với app Facebook và nung nấu chuyển hóa nó sang Android ![]()
Biểu tượng cảm xúc mới của Facebook trên Android
Đầu tiên khi mình nhìn vào reaction box (hộp biểu tượng) trên web và tư duy theo cách thiết kế trên Android thì tặc lưỡi "không khó lắm nhỉ, chắc dùng mấy view con trong layout rồi mông má thêm tí animation là oke". Nói thế chứ cũng phải kiểm chứng lại trong app, không lại "treo đầu dê bán thịt chó".
Đầu tiên là install app ![]() (mình gỡ khá lâu rồi vì nó nofity liên tọi). Long click thử vào nút Like nào... Má ơi!
(mình gỡ khá lâu rồi vì nó nofity liên tọi). Long click thử vào nút Like nào... Má ơi! ![]() Các chuyển động + kích thước khá là khác với web, bỗng nhiên nghi ngờ xem thằng facebook nó làm gì với view đó nên liền bật ngay bounds lên để xem (Settings > Developer options > Show layout bounds) thì thôi xong, đây là kết quả:
Các chuyển động + kích thước khá là khác với web, bỗng nhiên nghi ngờ xem thằng facebook nó làm gì với view đó nên liền bật ngay bounds lên để xem (Settings > Developer options > Show layout bounds) thì thôi xong, đây là kết quả: ![]()
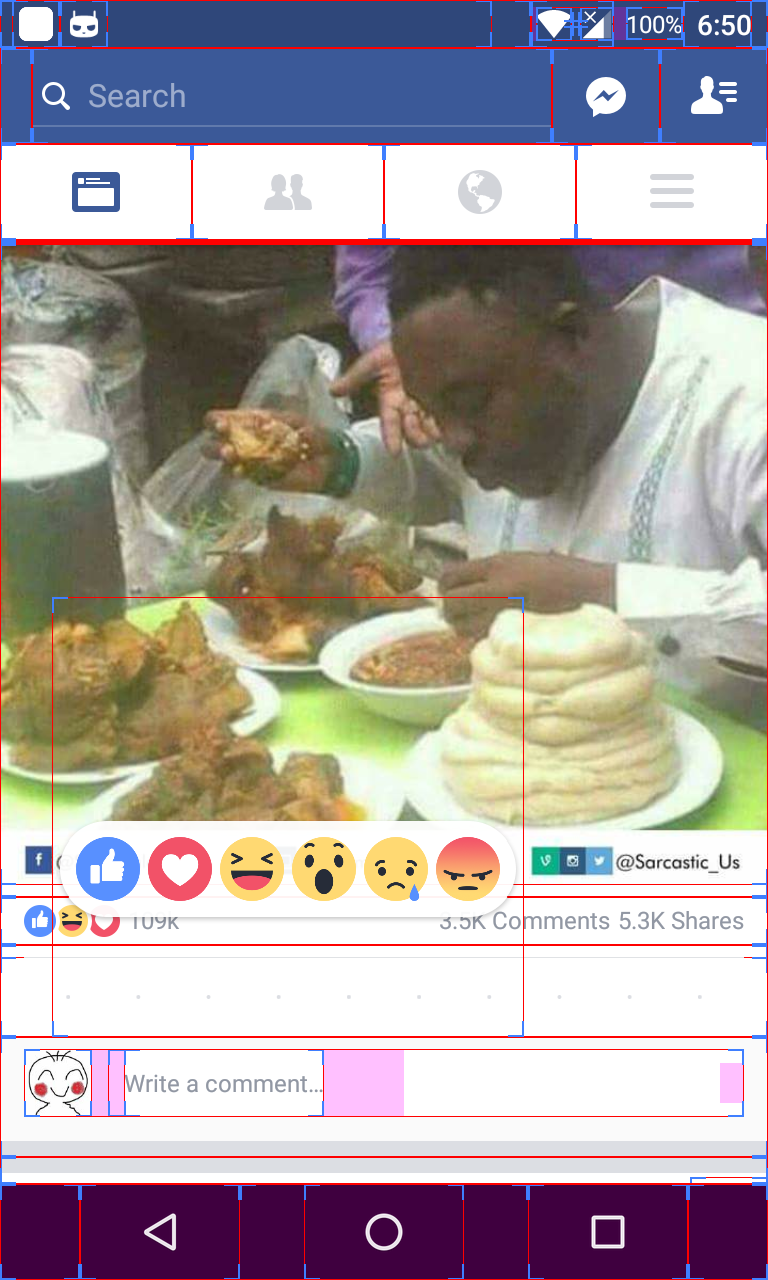
Không có 1 cái viền nào xung quanh cái reaction box > Nó vẽ lên view chứ mếu phải dùng layout (Đường viền ngoài là viền của cả cái view reaction) ![]() . Rồi luôn, vẽ thì vẽ, hồi bé thích vẽ lắm, cứ tưởng là lớn lên làm kiến trúc sư cơ đấy
. Rồi luôn, vẽ thì vẽ, hồi bé thích vẽ lắm, cứ tưởng là lớn lên làm kiến trúc sư cơ đấy ![]()
Phân tích hiệu ứng Reaction
(Phần này sẽ có những phần lấy từ bài anh Huy Trần, chỉ nhằm mục đích tiện cho mọi người theo dõi)
Những phần dưới đây là thiết kế cho web, những phần khác so với mobile mình sẽ chỉ rõ sau. Đầu tiên là một bản tin trên newfeed mà chúng ta thường thấy:

Tiếp theo là khi chúng ta nhấn lâu (long click) vào nút like, reactions box sẽ xuất hiện theo hướng từ dưới lên + từ mờ thành rõ dần:

Tiếp theo ngay sau đó là các emotion xuất hiện, chúng liên tiếp xuất hiện theo hướng từ dưới lên + từ mờ thành rõ dần (alpha tăng) + từ bé thành lớn dần (size tăng):

Chúng ta có thể giả sử rằng tất cả các thành phần như reactions box + emotion đều thực hiện chuyển động của chúng trong 0.3s, nhưng thời điểm bắt đầu của chúng sẽ khác nhau như: reactions box (xuất phát lúc 0.0s), emotion 1 (xuất phát lúc 0.1s), emotion 2 (xuất phát lúc 0.2s), ...tương tự với các emotion tiếp theo.
Nếu phân tích kĩ hơn hiệu ứng di chuyển từ dưới lên trên của các emotion thì các emotion sẽ di chuyển như sau:

Chú ý: Hình vẽ trên chỉ thể hiện trạng thái di chuyển theo chiều dọc (tức trục Oy) và trục Ox chính là thời gian thực hiện.
Ở vị trí đầu tiên xuất hiện, emotion sẽ mờ + cách xa reactions box, chúng di chuyển dần dần đến vị trí của chúng ở reactions box, nhưng chúng sẽ đi quá thêm 1 đoạn nhỏ sau đó quay trở lại vị trí của chúng ở reactions box (đừng quá lo lắng về cách xử lý, nó đơn giản chỉ là 1 phương trình xy thui ![]() )
)
Sau khi hoàn thành hiệu ứng, chúng ở trạng thái "bình thường" như hình dưới đây:

Đến đây có lẽ chúng ta cần dừng lại một chút để phân tích thêm việc khi di chuyển các thành phần đối với ứng dụng Facebook trên Android. Khi ta di tay vào emotion:


- Chiều cao của reactions box nhỏ lại, tuy nhiên độ rộng vẫn giữ nguyên.
- Các emotion không được select sẽ nhỏ lại.
- Emotion được select sẽ to ra (gấp khoảng 2.5 đến 3 lần gì đó).
- Title của emotion xuất hiện phía trên emotion + hiệu ứng bé thành lớn dần + mờ thành rõ dần.
- Khi ngón tay di chuyển ra khỏi cả view reaction thì các thành phần trở lại trạng thái "bình thường".
Móe, cứ tưởng được làm như web ==' ai ngờ lại thêm mấy thứ này, khó nhằn phết nhưng thui cứ chiến nhỉ?
À một tí quan điểm trước khi code :D :
- Những ý tưởng + logic dưới đây hoàn toàn là ý kiến cá nhân của mình, có thể chưa hợp lý > mong mọi người đóng góp.
- Code nhắm đến mục đích mô phỏng chứ không nhắm đến viết thư viện > Đừng quở trách "thằng này code đụt, chả flexible gì cả" tội em :'(
- Mình đã cố gắng để cho em nó "mượt" đến mức có thể, do thời gian có hạn và chắc hẳn là cũng khó để mượt như Facebook

Trạng thái
Theo mình phân tích thì để diễn tả tất cả các hành động của reaction thì gồm có 4 trạng thái:
- Trạng thái "BEGIN" - là trạng thái các thành phần lúc bắt xuất hiện.
- Trạng thái "NORMAL" - là trạng thái các emotion kích thước như nhau, nằm ngay ngắn trong box.
- Trạng thái "CHOOSING" - là trạng thái emotion được chọn phóng to, emotion còn lại + box thu nhỏ lại.
- Trạng thái "CHOOSED" (từ này không có trong TA thì phải
 ) - là trạng thái emotion đc chọn sẽ bắn vút lên, các emotion còn lại sẽ sụp xuống và biến mất hoàn toàn.
Trong phạm vi bài viết này mình sẽ trình bày 3 trạng thái đầu, trạng thái thứ 4 anh em tự chém thêm nhé ![]()
Hiển thị trạng thái "NORMAL"
Trạng thái này gồm có Board (Reaction Box) và 6 Emotion (Emotion Images Download)
Reaction View
Tạo một class ReactionView và extends từ View:
public class ReactionView extends View {

  enum StateDraw {
      BEGIN,
      CHOOSING,
      END
  }

  public static final long DURATION_ANIMATION = 200;

  public static final long DURATION_BEGINNING_EACH_ITEM = 300;

  public static final long DURATION_BEGINNING_ANIMATION = 900;

  private Board board;

  private Emotion[] emotions = new Emotion[6];

  private StateDraw state = StateDraw.BEGIN;

  private int currentPosition = 0;

  public ReactionView(Context context) {
      super(context);
      init();
  }

  public ReactionView(Context context, AttributeSet attrs) {
      super(context, attrs);
      init();
  }

  public ReactionView(Context context, AttributeSet attrs, int defStyleAttr) {
      super(context, attrs, defStyleAttr);
      init();
  }

  private void init() {

  }

  private void initElement() {

  }

  @Override
  protected void onDraw(Canvas canvas) {

  }

  private void beforeAnimateBeginning() {

  }

  private void beforeAnimateChoosing() {

  }

  private void beforeAnimateNormalBack() {

  }

  private void calculateInSessionChoosingAndEnding(float interpolatedTime) {

  }

  private void calculateInSessionBeginning(float interpolatedTime) {

  }

  private int calculateSize(int position, float interpolatedTime) {
      return 0;
  }

  private void calculateCoordinateX() {

  }

  public void show() {

  }

  private void selected(int position) {

  }

  public void backToNormal() {

  }

  @Override
  public boolean onTouchEvent(MotionEvent event) {

      return true;
  }

  class ChooseEmotionAnimation extends Animation {
      public ChooseEmotionAnimation() {

      }

      @Override
      protected void applyTransformation(float interpolatedTime, Transformation t) {

      }
  }

  class BeginningAnimation extends Animation {

      public BeginningAnimation() {

      }

      @Override
      protected void applyTransformation(float interpolatedTime, Transformation t) {

      }
  }
}
Giờ thì thêm view này vào 1 activity để chúng ta cùng vẽ "tha thu" lên nha ![]() , mình thêm luôn vào activity_main.xml đi:
, mình thêm luôn vào activity_main.xml đi:
    <?xml version="1.0" encoding="utf-8"?>
    <RelativeLayout xmlns:android="http://schemas.android.com/apk/res/android"
        xmlns:tools="http://schemas.android.com/tools"
        android:id="@+id/activity_main"
        android:layout_awidth="match_parent"
        android:layout_height="match_parent"
        tools:context="com.hado.facebookemotion.MainActivity">

        <com.hado.facebookemotion.ReactionView
            android:id="@+id/view_reaction"
            android:layout_marginLeft="20dp"
            android:layout_awidth="@dimen/awidth_view_reaction"
            android:layout_height="@dimen/height_view_reaction" />

        <Button
            android:id="@+id/btn_like"
            android:layout_awidth="100dp"
            android:layout_height="50dp"
            android:layout_below="@+id/view_reaction"
            android:text="Like" />
    </RelativeLayout>
- Dimen awidth_view_reaction = 300dp
- Dimen height_view_reaction = 250dp
Board & Emotion
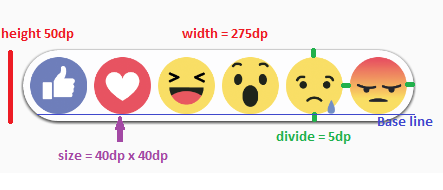
- Độ cao (height): 50dp
- Độ rộng (awidth): 275dp (6 emotion 40dp + khoảng cách giữa emotion vs nhau và với cạnh trái phải board là 5dp => 7*5 = 35dp)
- Baseline là đường thẳng cố định, không thay đổi để giúp các emotion được thẳng hàng. Công thức: tọa độ BASE_LINE = BOARD_Y + Emotion.NORMAL_SIZE + DIVIDE
Đầu tiên ta tạo vài lớp dùng chung đã nhé:
Lớp Util:
public class Util {
    public static int dpToPx(int dp) {
        return (int) (dp * Resources.getSystem().getDisplayMetrics().density);
    }
}
Lớp CommonDimen:
public class CommonDimen {
    public static int DIVIDE = Util.dpToPx(5);

    public static int HEIGHT_VIEW_REACTION = Util.dpToPx(250);

    public static int WIDHT_VIEW_REACTION = Util.dpToPx(300);

    public static final int MAX_ALPHA = 255;

    public static final int MIN_ALPHA = 150;
}
Oke, bây giờ ta tạo lớp cho các đối tượng ta cần vẽ. Class Emotion:
public class Emotion {
    private Context context;

    public static final int MINIMAL_SIZE = Util.dpToPx(28);

    public static final int NORMAL_SIZE = Util.dpToPx(40);

    public static final int CHOOSE_SIZE = Util.dpToPx(100);

    public static final int DISTANCE = Util.dpToPx(15);

    public static final int MAX_WIDTH_TITLE = Util.dpToPx(70);

    public int currentSize = NORMAL_SIZE;

    public int beginSize;

    public int endSize;

    public float currentX;

    public float currentY;

    public float beginY;

    public float endY;

    public Bitmap imageOrigin;

    public Bitmap imageTitle;

    public Paint emotionPaint;

    public Paint titlePaint;

    private float ratioWH;


    public Emotion(Context context, String title, int imageResource) {
        this.context = context;

        imageOrigin = BitmapFactory.decodeResource(context.getResources(), imageResource);

        emotionPaint = new Paint(Paint.FILTER_BITMAP_FLAG);
        emotionPaint.setAntiAlias(true);

        titlePaint = new Paint(Paint.FILTER_BITMAP_FLAG);
        titlePaint.setAntiAlias(true);

        generateTitleView(title);
    }

    private void generateTitleView(String title) {

    }

    public void setAlphaTitle(int alpha) {
        titlePaint.setAlpha(alpha);
    }

    public void drawEmotion(Canvas canvas) {
        canvas.drawBitmap(imageOrigin, null, new RectF(currentX, currentY, currentX + currentSize, currentY + currentSize), emotionPaint);
        drawTitle(canvas);
    }

    public void drawTitle(Canvas canvas) {

    }
}
Class Board:
public class Board {

    public static final int BOARD_WIDTH = 6 * Emotion.NORMAL_SIZE + 7 * CommonDimen.DIVIDE; //DIVIDE = 5dp, Emotion.NORMAL_SIZE = 40dp

    public static final int BOARD_HEIGHT_NORMAL = Util.dpToPx(50);

    public static final int BOARD_HEIGHT_MINIMAL = Util.dpToPx(38);

    public static final float BOARD_X = 10;

    public static final float BOARD_BOTTOM = CommonDimen.HEIGHT_VIEW_REACTION - 200;

    public static final float BOARD_Y = BOARD_BOTTOM - BOARD_HEIGHT_NORMAL;

    public static final float BASE_LINE = BOARD_Y + Emotion.NORMAL_SIZE + CommonDimen.DIVIDE;

    public Paint boardPaint;

    public float currentHeight = BOARD_HEIGHT_NORMAL;

    public float currentY = BOARD_Y;

    public float beginHeight;

    public float endHeight;

    public float beginY;

    public float endY;


    public Board(Context context) {
        initPaint(context);
    }

    private void initPaint(Context context) {
        boardPaint = new Paint();
        boardPaint.setAntiAlias(true);
        boardPaint.setStyle(Paint.Style.FILL);
        boardPaint.setColor(context.getResources().getColor(R.color.board));
        boardPaint.setShadowLayer(5.0f, 0.0f, 2.0f, 0xFF000000);
    }

    public void setCurrentHeight(float newHeight) {
        currentHeight = newHeight;
        currentY = BOARD_BOTTOM - currentHeight;
    }

    public float getCurrentHeight() {
        return currentHeight;
    }

    public void drawBoard(Canvas canvas) {
        float radius = currentHeight / 2;
        RectF board = new RectF(BOARD_X, currentY, BOARD_X + BOARD_WIDTH, currentY + currentHeight);
        canvas.drawRoundRect(board, radius, radius, boardPaint);
    }
}
Giờ thì quay lại ReactionView để vẽ thử board và các emotion lên xem thế nào nhé. Trước tiên ta khởi tạo đối tượng cho các thành phần:
Method init():
private void init() {
    board = new Board(getContext());
    setLayerType(LAYER_TYPE_SOFTWARE, board.boardPaint);

    emotions[0] = new Emotion(getContext(), "Like", R.drawable.like);
    emotions[1] = new Emotion(getContext(), "Love", R.drawable.love);
    emotions[2] = new Emotion(getContext(), "Haha", R.drawable.haha);
    emotions[3] = new Emotion(getContext(), "Wow", R.drawable.wow);
    emotions[4] = new Emotion(getContext(), "Cry", R.drawable.cry);
    emotions[5] = new Emotion(getContext(), "Angry", R.drawable.angry);

    //BEGIN: Đoạn này để đặt các thành phần vào vị trí ban đầu để xem kết quả thui,
    //chứ các thành phần ban đầu sẽ bị ẩn đi, vì chưa click like mà :D
    for (int i = 0; i < emotions.length; i++) {
        emotions[i].currentY = Board.BASE_LINE - Emotion.NORMAL_SIZE;
        emotions[i].currentX = i == 0 ? Board.BOARD_X + DIVIDE : emotions[i - 1].currentX + emotions[i - 1].currentSize + DIVIDE;
    }
    //END

    initElement();
}
Cùng xem lại hình này nhé:

- Trường hợp này tọa độ Y của tất cả các emotion sẽ bằng nhau, tọa độ Y sẽ nằm ở góc trái phía trên các emotion => currentY = Board.BASE_LINE - Emotion.NORMAL_SIZE
- Còn tọa độ X của các emotion sẽ được tính dựa trên 2 trường hợp: Nếu nó là emotion đầu tiên, thì nó luôn bằng tọa độ X của bảng + thêm khoảng cách nhỏ. Còn các emotion còn lại sẽ bằng tọa độ X thằng đứng trước + kích thước hiện tại của thằng đứng trước (size) + thêm khoảng cách nhỏ.
Method onDraw:
@Override
protected void onDraw(Canvas canvas) {
    board.drawBoard(canvas);
    for (Emotion emotion : emotions) {
        emotion.drawEmotion(canvas);
    }
}
Ở method onDraw này sẽ thực hiện vẽ các đối tượng đã được tính sẵn kích thước và tọa độ ở hàm bên trên lên view. Oke, run cái nào ![]()
Đây là kết quả hiện tại của chúng ta:

![]() Vậy là đã vẽ thành công các thành phần lên view, bây giờ để thực hiện các chuyển động khác thì ta chỉ cần tính toán lại kích thước + tọa độ rồi gọi method onDraw qua method invalidate() là các thành phần sẽ được cập nhật theo kích thước + tọa độ mới.
Vậy là đã vẽ thành công các thành phần lên view, bây giờ để thực hiện các chuyển động khác thì ta chỉ cần tính toán lại kích thước + tọa độ rồi gọi method onDraw qua method invalidate() là các thành phần sẽ được cập nhật theo kích thước + tọa độ mới.
Trạng thái "CHOOSING"
Ở trạng thái này chúng ta phải thực hiện 3 công việc sau:
- Xử lý độ cao của reaction box giảm dần.
- Xử lý kích thước + tọa độ của các emotion.
- Xử lý kích thước + tọa độ của title emotion được chọn.
Ta Override lại phương thức onTouchEvent để xác định được emotion nào đang được chọn:
@Override
public boolean onTouchEvent(MotionEvent event) {
    boolean handled = false;
    switch (event.getAction()) {
        case MotionEvent.ACTION_DOWN:
            handled = true;
            break;
        case MotionEvent.ACTION_MOVE:
            for (int i = 0; i < emotions.length; i++) {
                if (event.getX() > emotions[i].currentX && event.getX() < emotions[i].currentX + emotions[i].currentSize) {
                    selected(i);
                    break;
                }
            }
            handled = true;
            break;
        case MotionEvent.ACTION_UP:
            backToNormal();
            handled = true;
            break;
    }
    return handled;
}
- Khi ngón tay di chuyển trên màn hình, thì sẽ xác định xem tọa độ X của ngón tay đang nằm trong khoảng giá trị tọa độ X của emotion nào thì gọi method selected để thực hiện chuyển động phóng to emotion đó.
- Khi ngon tay nhấc lên thì gọi method backToNormal để trở về trạng thái NORMAL.
Method selected:
private void selected(int position) {
    if (currentPosition == position && state == StateDraw.CHOOSING) return;

    state = StateDraw.CHOOSING;
    currentPosition = position;

    startAnimation(new ChooseEmotionAnimation());
}
Method backToNormal:
public void backToNormal() {
    state = StateDraw.NORMAL;
    startAnimation(new ChooseEmotionAnimation());
}
Ta cần một chút animation để cho các chuyển động "nuột" hơn. Ở class ReactionView có khởi tạo class ChooseEmotionAnimation:
class ChooseEmotionAnimation extends Animation {
    public ChooseEmotionAnimation() {
        if (state == StateDraw.CHOOSING) {
            beforeAnimateChoosing();
        } else if (state == StateDraw.NORMAL) {
            beforeAnimateNormalBack();
        }
        setDuration(DURATION_ANIMATION);
    }

    @Override
    protected void applyTransformation(float interpolatedTime, Transformation t) {
        calculateInSessionChoosingAndEnding(interpolatedTime);
    }
}
Vì ở trạng thái được chọn CHOOSING và trạng thái NORMAL (chuyển về từ trạng thái CHOOSING) có chung một cách xử lý nên sẽ dùng chung Animation và phương thức tính toán.
Method beforeAnimateChoosing:
private void beforeAnimateChoosing() {
    board.beginHeight = board.getCurrentHeight();
    board.endHeight = Board.BOARD_HEIGHT_MINIMAL;

    for (int i = 0; i < emotions.length; i++) {
        emotions[i].beginSize = emotions[i].currentSize;

        if (i == currentPosition) {
            emotions[i].endSize = Emotion.CHOOSE_SIZE;
        } else {
            emotions[i].endSize = Emotion.MINIMAL_SIZE;
        }
    }
}
Method beforeAnimateNormalBack:
private void beforeAnimateNormalBack() {
    board.beginHeight = board.getCurrentHeight();
    board.endHeight = Board.BOARD_HEIGHT_NORMAL;

    for (int i = 0; i < emotions.length; i++) {
        emotions[i].beginSize = emotions[i].currentSize;
        emotions[i].endSize = Emotion.NORMAL_SIZE;
    }
}
Phương thức này dùng để xác định trạng thái hiện tại trước khi bắt đầu di chuyển như board.beginHeight và board.endHeight sẽ là di chuyển độ cao của bảng từ beginHeight đến endHeight trong khoảng thời gian DURATION_ANIMATION. Tương tự với các emotion cũng vậy.
Method calculateInSessionChoosingAndEnding:
private void calculateInSessionChoosingAndEnding(float interpolatedTime) {
    board.setCurrentHeight(board.beginHeight + (int) (interpolatedTime * (board.endHeight - board.beginHeight)));

    for (int i = 0; i < emotions.length; i++) {
        emotions[i].currentSize = calculateSize(i, interpolatedTime);
        emotions[i].currentY = Board.BASE_LINE - emotions[i].currentSize;
    }
    calculateCoordinateX();
    invalidate();
}
Phương thức này sẽ được gọi liên tục trong lúc thực hiện animation để cập nhật view. Thường thì Animation sẽ thực hiện 60fms(frame/s), mỗi lần gọi đến phương thức này sẽ coi là 1 frame, việc của chúng ta là phải tính toán xem các thành phần đó đang ở kích thước + tọa độ nào trong thời điểm interpolatedTime đó (giá trị interpolatedTime là [0, 1] trong khoảng DURATION_ANIMATION).
Method calculateSize:
private int calculateSize(int position, float interpolatedTime) {
    int changeSize = emotions[position].endSize - emotions[position].beginSize;
    return emotions[position].beginSize + (int) (interpolatedTime * changeSize);
}
Phương thức này trả về size hiện tại của các emotion được tính theo interpolatedTime.
Method calculateCoordinateX:
private void calculateCoordinateX() {
    emotions[0].currentX = Board.BOARD_X + DIVIDE;
    emotions[emotions.length - 1].currentX = Board.BOARD_X + Board.BOARD_WIDTH - DIVIDE - emotions[emotions.length - 1].currentSize;

    for (int i = 1; i < currentPosition; i++) {
        emotions[i].currentX = emotions[i - 1].currentX + emotions[i - 1].currentSize + DIVIDE;
    }

    for (int i = emotions.length - 2; i > currentPosition; i--) {
        emotions[i].currentX = emotions[i + 1].currentX - emotions[i].currentSize - DIVIDE;
    }

    if (currentPosition != 0 && currentPosition != emotions.length - 1) {
        if (currentPosition <= (emotions.length / 2 - 1)) {
            emotions[currentPosition].currentX = emotions[currentPosition - 1].currentX + emotions[currentPosition - 1].currentSize + DIVIDE;
        } else {
            emotions[currentPosition].currentX = emotions[currentPosition + 1].currentX - emotions[currentPosition].currentSize - DIVIDE;
        }
    }
}
Method này thực hiện tính tọa độ X cho các emotion, tọa độ Y ở phương thức calculateInSessionChoosingAndEnding đã tính rùi. Như mình demo khi vẽ các emotion ở trạng thái ban đầu. Mình để sự rằng buộc tọa độ X như sau:
Ví dụ: Ta có 6 emotions 1 2 3 4 5 6. Tọa độ X1 luôn luôn cố định, vì nó nằm bên cạnh của bảng. Tọa độ X2 phụ thuộc vào Tọa độ X1 + Size 1, Tọa độ X3 phụ thuộc vào Tọa độ X2 + Size 2, ...Như vậy nếu vẽ tĩnh như lúc khởi tạo thì không vấn đề gì, nhưng khi di chuyển cùng với Animation, mọi thứ cập nhật liên tục khiến cho sự phụ thuộc về Tọa độ X + Size của các emotion cuối như 4 5 6 tăng lên làm các emotion di chuyển sai số + không mượt.
=> Giải pháp của mình được thể hiện ở đoạn code trên, nhằm giảm bớt sự phụ thuộc. Mình nhận thấy emotion 1 và 6 có tọa độ ổn định và không bị phụ thuộc nên mình sẽ lấy 2 emotion này làm chốt, từ đó emotion 2 3 sẽ phụ thuộc và 1, emotion 4 5 sẽ phụ thuộc vào 6. Kết quả là các emotion di chuyển khá mượt + chính xác.
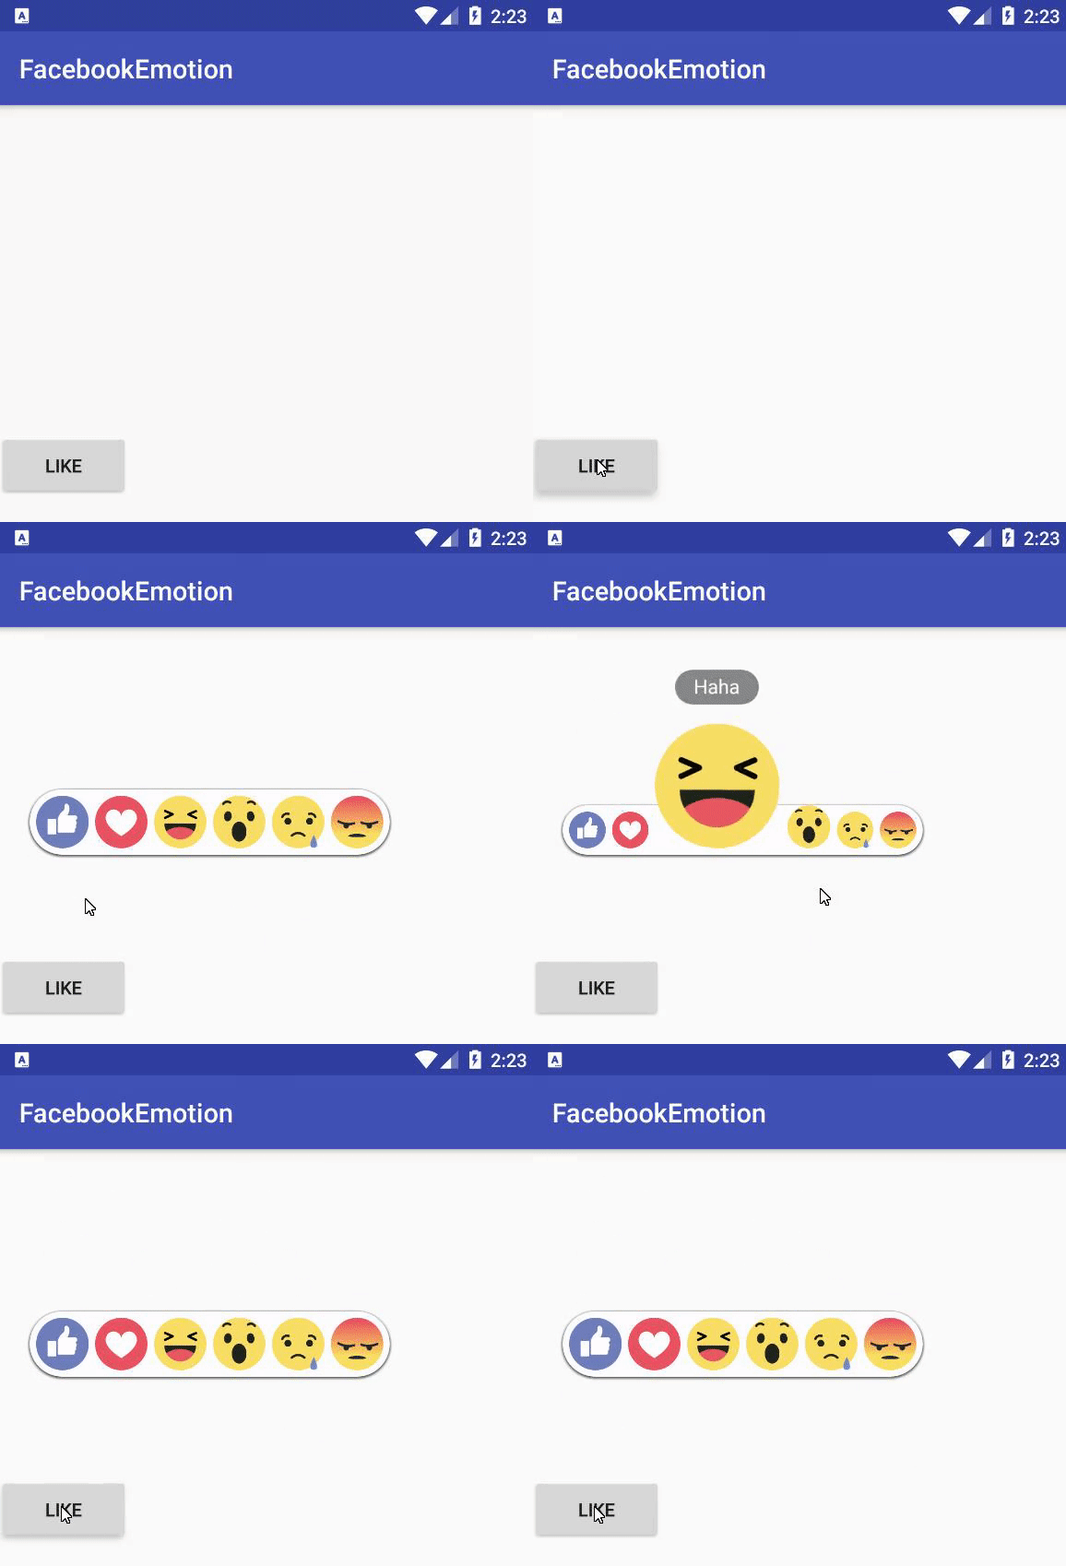
Oki, nói nhiều quá, nếu anh em đã implement xong các đoạn code bên trên thì run nào, đây là kết quả sẽ đạt được:

Hề hế, gần xong phase này rùi đó, còn mỗi đồng chí title nữa thui. Giờ thì quay lại class Emotion một chút nào. Đầu tiên mình lại định dùng canvas vẽ tiếp text vs background của nó, nhưng thui thấy nhọc quá. Thế là làm 1 cái layout xong decode nó sang bitmap vẽ cho lẹ:
Background XML background_tv_reaction:
<?xml version="1.0" encoding="utf-8"?>
<shape xmlns:android="http://schemas.android.com/apk/res/android"
    android:shape="rectangle">
    <solid android:color="#80000000" />
    <corners android:radius="12.5dp" />
    <padding
        android:bottom="2dp"
        android:top="2dp" />
</shape>
Layout XML title_view:
<?xml version="1.0" encoding="utf-8"?>
<TextView xmlns:android="http://schemas.android.com/apk/res/android"
    android:layout_awidth="@dimen/awidth_title"
    android:layout_height="@dimen/height_title"
    android:background="@drawable/background_tv_reaction"
    android:gravity="center"
    android:paddingLeft="10dp"
    android:paddingRight="10dp"
    android:textColor="@android:color/white"></TextView>
Class Emotion, Method generateTitleView:
private void generateTitleView(String title) {
    LayoutInflater inflater = LayoutInflater.from(context);
    View titleView = inflater.inflate(R.layout.title_view, null);
    ((TextView) titleView).setText(title);

    int w = (int) context.getResources().getDimension(R.dimen.awidth_title);
    int h = (int) context.getResources().getDimension(R.dimen.height_title);
    ratioWH = (w * 1.0f) / (h * 1.0f);
    imageTitle = Bitmap.createBitmap(w, h, Bitmap.Config.ARGB_8888);
    Canvas c = new Canvas(imageTitle);
    titleView.layout(0, 0, w, h);
    ((TextView) titleView).getPaint().setAntiAlias(true);
    titleView.draw(c);
}
- Dimen awidth_title : 60dp
- Dimen height_title : 25dp
Method này mình tạo bitmap của titleView với string title tương ứng.
Method drawTitle:
public void drawTitle(Canvas canvas) {
    int awidth = (currentSize - NORMAL_SIZE) * 7 / 6;
    int height = (int) (awidth / ratioWH);

    setAlphaTitle(Math.min(CommonDimen.MAX_ALPHA * awidth / MAX_WIDTH_TITLE, CommonDimen.MAX_ALPHA));

    if (awidth <= 0 || height <= 0) return;

    float x = currentX + (currentSize - awidth) / 2;
    float y = currentY - DISTANCE - height;

    canvas.drawBitmap(imageTitle, null, new RectF(x, y, x + awidth, y + height), titlePaint);
}
Method này tính kích thước của titleView tương ứng với size của emotion, anh em thấy chỉ là một số phép toán tỷ lệ thui, đặt giấy bút ra là hiểu ngay ý mà.
Hì hí, run nào:

Trạng thái "BEGIN"
Ngược đời vỡi, cuối bài rùi mới đến BEGIN. Chúng ta cùng xem lại quá trình chuyển động của các emotion nhé:

Đồ thị biểu diễn chuyển động của emotion như sau:

Hình bên trái là đồ thị minh hoạ đường đi của emo icon, và hình bên phải là mô phỏng chi tiết vị trí ứng với từng mốc thời gian của emo icon. Vậy việc chúng ta cần làm là điều khiển cho các emo icon di chuyển theo đồ thị trên.
Đồ thị này được thể hiện bằng một phương trình có tên là EaseOutBack, có khá nhiều đồ thị hay ho mà mình quên xừ mất link rùi, bao giờ mình tìm lại được mình sẽ update lại cho mọi người nhé.
Giờ ta tạo một class EaseOutBack:
public class EaseOutBack {

    private final float s = 1.70158f;
    private final long duration;
    private final float begin;
    private final float change;

    public EaseOutBack(long duration, float begin, float end) {
        this.duration = duration;
        this.begin = begin;
        this.change = end - begin;
    }

    public static EaseOutBack newInstance(long duration, float beginValue, float endValue) {
        return new EaseOutBack(duration, beginValue, endValue);
    }

    public float getCoordinateYFromTime(float currentTime) {
        return change * ((currentTime = currentTime / duration - 1) * currentTime * ((s + 1) * currentTime + s) + 1) + begin;
    }
}
Ta thêm một đối tượng EaseOutBack vào trong class ReactionView để nó thực hiện tính toán Y cho các emotion:
public class ReactionView extends View {

    ...

    private EaseOutBack easeOutBack;

    ...

}
Giờ thì ta xóa đoạn code tạm để xác định tọa độ ban đầu các thành phần đi nhé:
XÓA ở method init:
//BEGIN: Đoạn này để đặt các thành phần vào vị trí ban đầu để xem kết quả thui,
//chứ các thành phần ban đầu sẽ bị ẩn đi, vì chưa click like mà :D
for (int i = 0; i < emotions.length; i++) {
    emotions[i].currentY = Board.BASE_LINE - Emotion.NORMAL_SIZE;
    emotions[i].currentX = i == 0 ? Board.BOARD_X + DIVIDE : emotions[i - 1].currentX + emotions[i - 1].currentSize + DIVIDE;
}
//END
Mục đích bây giờ là khi ta ấn nút like, các thành phần di chuyển lên, nên suy ra đầu tiên ta phải gán tọa độ cho các thành phần ở vị trí không nhìn thấy bằng cách là cho nó ở ngoài khoảng cách của view cha:
Method initElement:
private void initElement() {
    board.currentY = CommonDimen.HEIGHT_VIEW_REACTION + 10;
    for (Emotion e : emotions) {
        e.currentY = board.currentY + CommonDimen.DIVIDE;
    }
}
Giờ bắt đầu thực hiện show view nào, hì hí. Cần tí Animation mới nữa nhỉ, ta đã khai báo Animation BeginningAnimation để thực hiện điều này:
class BeginningAnimation extends Animation {

    public BeginningAnimation() {
        beforeAnimateBeginning();
        setDuration(DURATION_BEGINNING_ANIMATION);
    }

    @Override
    protected void applyTransformation(float interpolatedTime, Transformation t) {
        calculateInSessionBeginning(interpolatedTime);
    }
}
Method show:
public void show() {
    state = StateDraw.BEGIN;
    setVisibility(VISIBLE);
    beforeAnimateBeginning();
    startAnimation(new BeginningAnimation());
}
Method beforeAnimateBeginning:
private void beforeAnimateBeginning() {
    board.beginHeight = Board.BOARD_HEIGHT_NORMAL;
    board.endHeight = Board.BOARD_HEIGHT_NORMAL;

    board.beginY = Board.BOARD_BOTTOM + 150;
    board.endY = Board.BOARD_Y;

    easeOutBack = EaseOutBack.newInstance(DURATION_BEGINNING_EACH_ITEM, Math.abs(board.beginY - board.endY), 0);

    for (int i = 0; i < emotions.length; i++) {
        emotions[i].endY = Board.BASE_LINE - Emotion.NORMAL_SIZE;
        emotions[i].beginY = Board.BOARD_BOTTOM + 150;
        emotions[i].currentX = i == 0 ? Board.BOARD_X + DIVIDE : emotions[i - 1].currentX + emotions[i - 1].currentSize + DIVIDE;
    }
}
Method calculateInSessionBeginning:
private void calculateInSessionBeginning(float interpolatedTime) {
    float currentTime = interpolatedTime * DURATION_BEGINNING_ANIMATION;

    if (currentTime > 0) {
        board.currentY = board.endY + easeOutBack.getCoordinateYFromTime(Math.min(currentTime, DURATION_BEGINNING_EACH_ITEM));
    }

    if (currentTime >= 100) {
        emotions[0].currentY = emotions[0].endY + easeOutBack.getCoordinateYFromTime(Math.min(currentTime - 100, DURATION_BEGINNING_EACH_ITEM));
    }

    if (currentTime >= 200) {
        emotions[1].currentY = emotions[1].endY + easeOutBack.getCoordinateYFromTime(Math.min(currentTime - 200, DURATION_BEGINNING_EACH_ITEM));
    }

    if (currentTime >= 300) {
        emotions[2].currentY = emotions[2].endY + easeOutBack.getCoordinateYFromTime(Math.min(currentTime - 300, DURATION_BEGINNING_EACH_ITEM));
    }

    if (currentTime >= 400) {
        emotions[3].currentY = emotions[3].endY + easeOutBack.getCoordinateYFromTime(Math.min(currentTime - 400, DURATION_BEGINNING_EACH_ITEM));
    }

    if (currentTime >= 500) {
        emotions[4].currentY = emotions[4].endY + easeOutBack.getCoordinateYFromTime(Math.min(currentTime - 500, DURATION_BEGINNING_EACH_ITEM));
    }

    if (currentTime >= 600) {
        emotions[5].currentY = emotions[5].endY + easeOutBack.getCoordinateYFromTime(Math.min(currentTime - 600, DURATION_BEGINNING_EACH_ITEM));
    }

    invalidate();
}
Ở đây anh em sẽ thấy DURATION_BEGINNING_ANIMATION = 900 của Animation BeginningAnimation có tí lạ. Mình sẽ giải thích thế này, view của ta có 7 thành phần là 1 board + 6 emotion. Mình muốn các thành phần lần lượt thực hiện di chuyển chứ không muốn cả lũ xuất phát cùng lúc nên mình đặt thế này, board xuất phát đầu tiên, emotion 1 xuất phát lúc 100, emotion 2 xuất phát lúc 200, ...và thằng cuối cùng xuất phát lúc 600. Các ông thần này đều thực hiện quãng đường của mình trong 0.3s => Tổng thời gian 7 ông thần kia thực hiện mất 600 (0.6s) + 0.3s cho ông cuối thực hiện nốt là 0.9s như ta thấy.
Quay lại với thím MainActivity nào:
public class MainActivity extends AppCompatActivity {

    Button btnLike;
    ReactionView reactionView;

    @Override
    protected void onCreate(Bundle savedInstanceState) {
        super.onCreate(savedInstanceState);
        setContentView(R.layout.activity_main);
        initView();
    }

    private void initView() {
        btnLike = (Button) findViewById(R.id.btn_like);
        reactionView = (ReactionView) findViewById(R.id.view_reaction);
        reactionView.setVisibility(View.INVISIBLE);
        btnLike.setOnClickListener(view -> reactionView.show());
    }
}
Hết hơi!!! Run thui rùi té đi ngủ nào, giờ là 2h30AM đó ~~
Xin giới thiệu với anh em đồng chí Thành Văn Quả:
Bài hơi dài nhỉ, vất vả cho anh em rùi ![]() .Link full source code
.Link full source code
Hết bài rùi, sắp tới nếu có thời gian mình sẽ build một thư viện cho thằng này để mọi người dễ sử dụng và customize hơn ![]() .
.
Chúc anh em cuối tuần vui vẻ ![]()
![]()
![]()
