Cách tạo pull-to-refresh control
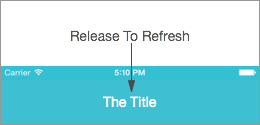
Trong bài viết này tôi muốn hướng dẫn cách sử dụng "Pull to refresh" control khi làm iPhone App. control mới này làm tôi rất chú ý và rất muốn custom nó. Hãy cùng xem cách hoạt động của nó nhé. Tiêu đề Label hiển thị khi kéo xuống(pull down) Hình nên hiệu ứng khi bạn thả tay ra ...
Trong bài viết này tôi muốn hướng dẫn cách sử dụng "Pull to refresh" control khi làm iPhone App. control mới này làm tôi rất chú ý và rất muốn custom nó.
Hãy cùng xem cách hoạt động của nó nhé.
- Tiêu đề

- Label hiển thị khi kéo xuống(pull down)

- Hình nên hiệu ứng khi bạn thả tay ra

Logic rất đơn giản phải không. Giờ ta sẽ chuyển đổi thuộc tính Scrollview content offset và khi người dùng thả tay khỏi scrollview ta cho hiển thị ảnh nền hiệu ứng.
Tùy biến navigator title
Hãy mở file: CustomNavigationBar.swift, trong này chúng ta sẽ tùy biến UINavigationBar.
Hãy cùng xem hàm: updateTitleView, chúng ta sẽ thay đổi thuộc tính titleView của UINavigationBar để tùy biến nội dung. Trong view này ta thêm vào 2 label sử dụng 2 UIView, đặt tên thành Container và Mask.

Làm hiệu ứng cho label
Hãy mở file CustomNavigationController.swift và gõ vào đoạn code sau:
// MARK: CustomNavigationBar Extension

extension UINavigationController{

    // Return the customNavigationBar object, if it exists.
    func customNavigationBar()->CustomNavigationBar?{
        if let navbar = self.navigationBar as? CustomNavigationBar{
            return navbar
        }
        else{
            return nil
        }
    }

    // Set the CustomNavigationBar as delegate for a UIScrollView
    func setupPulltoRefresh(scrollView:UIScrollView){
        if let navbar = self.customNavigationBar(){
            scrollView.delegate = navbar
        }
    }

}
Về cơ bản đoạn code này thêm 2 hàm vào UINavigationController, cái thứ nhất là CustomNavigationBar() chỉ là 1 helper trả về thực thể CustomNavigationBar nếu có thể. Cái thứ 2 setupPullToRefresh đặt CustomNavigationBar thành delegate cho cái ScrollView
Mở file TableViewController thêm vào hàm sau để liên kết CustomNavigationBar tới Scrollview.
override func viewDidLoad() {
    super.viewDidLoad()
    self.navigationController?.setupPulltoRefresh(self.tableView)
}
Tiếp đó ta implement sự kiện scrollViewDidScroll để tùy chỉnh label
func scrollViewDidScroll(scrollView: UIScrollView){

    var scrollviewOffset = -(scrollView.contentOffset.y + 64)
    if scrollviewOffset >=  0 {
        var translationOffset = min(scrollviewOffset, stepOffset)
        var alpha =  min (scrollviewOffset / stepOffset, 1.0)

        self.refreshLabel?.layer.transform = CATransform3DMakeTranslation(0, translationOffset , 0)
        self.titleLabel?.layer.transform = CATransform3DMakeTranslation(0, translationOffset , 0)
        self.refreshLabel?.alpha = alpha
    }else{
        self.titleLabel?.layer.transform = CATransform3DIdentity
        self.refreshLabel?.layer.transform = CATransform3DIdentity
        self.refreshLabel?.alpha = 0.0
    }
}
Đoạn code trên rất đơn giản, ta dùng thuộc tính transform để thay đổi chiều Y của label và cập nhật lại thuộc tính alpha of ReleaseLabel.
Tùy biến ảnh nền hiệu ứng
Ở cuối hàm updateTitleView ta thêm vào:
// Setup the Loading-image view ————

var rect = bounds
rect.size.awidth = rect.size.awidth * 2
loadingBg = UIView(frame: rect)
loadingBg?.alpha = 0.0
loadingBg?.backgroundColor = UIColor(patternImage: UIImage(named: “Loading”)!)
loadingBg?.center.x = bounds.size.awidth
insertSubview(loadingBg!, atIndex: 1)
Đoạn code này đặt 1 view với ảnh nền vào trong NavigationBar. View nền này có chiều rộng lớn hơn chiều rộng màn hình.
hiệu ứng bắt đầu khi người dùng thả ScrollView, do đó chúng ta có thể dùng hàm delegate của ScrollView: scrollViewDidEndDraggingđể gọi hàm khác chịu trách nhiệm xử lý hiệu ứng: startLoaderAnimation
func scrollViewDidEndDragging(scrollView: UIScrollView, willDecelerate decelerate: Bool){
    var scrollviewOffset = -(scrollView.contentOffset.y + 64)

    if scrollviewOffset >= stepOffset{
        self.startLoaderAnimation()
    }
}
Hàm startLoaderAnimation tạo 1 hiệu ứng lặp đi lặp lại cho ảnh nền.
func startLoaderAnimation(){
    loadingBg?.layer.removeAllAnimations()

    UIView.animateWithDuration(0.5, animations: { () -> Void in
        self.loadingBg?.alpha = 1.0
    })

    var animation = CABasicAnimation(keyPath: “position.x”)
    animation.duration = 3
    animation.fromValue = loadingBg!.layer.position.x
    animation.toValue = loadingBg!.layer.position.x - 100
    animation.repeatCount = HUGE
    loadingBg?.layer.addAnimation(animation, forKey: “pos”)
}
Như vậy chúng ta đã hoàn thành việc implement "pull down refresh control".
Kết luận
Các bạn sẽ cần chỉnh sửa code nhiều nếu muốn áp dụng vào thực tế, nhưng đây có thể là ý tưởng khởi đầu để các bạn tiếp tục, chúc các bạn thành công
