Custom UILabel Effects
Khi làm dự án nhiều khi khách hàng muốn hiển thị UILabel 1 cách sặc sỡ, nhiều màu, nhiều font ... thì các bạn sẽ làm thế nào? Trong bài viết này mình sẽ giới thiệu 2 cách chính để có thể custom hiển thị Label Tạo label với custom effects theo cách này không hề khó, bạn hoàn toàn có thể tự làm nó ...
Khi làm dự án nhiều khi khách hàng muốn hiển thị UILabel 1 cách sặc sỡ, nhiều màu, nhiều font ... thì các bạn sẽ làm thế nào? Trong bài viết này mình sẽ giới thiệu 2 cách chính để có thể custom hiển thị Label
Tạo label với custom effects theo cách này không hề khó, bạn hoàn toàn có thể tự làm nó 1 các dễ dàng bằng cách tạo extension cho UILabel
iOS cung cấp cho chúng ta rất nhiều Attributes để dùng cho việc custom label
extension NSAttributedStringKey {


    /************************ Attributes ************************/
    @available(iOS 6.0, *)
    public static let font: NSAttributedStringKey

    @available(iOS 6.0, *)
    public static let paragraphStyle: NSAttributedStringKey // NSParagraphStyle, default defaultParagraphStyle

    @available(iOS 6.0, *)
    public static let foregroundColor: NSAttributedStringKey // UIColor, default blackColor

    @available(iOS 6.0, *)
    public static let backgroundColor: NSAttributedStringKey // UIColor, default nil: no background

    @available(iOS 6.0, *)
    public static let ligature: NSAttributedStringKey // NSNumber containing integer, default 1: default ligatures, 0: no ligatures

    @available(iOS 6.0, *)
    public static let kern: NSAttributedStringKey // NSNumber containing floating point value, in points; amount to modify default kerning. 0 means kerning is disabled.

    @available(iOS 6.0, *)
    public static let strikethroughStyle: NSAttributedStringKey // NSNumber containing integer, default 0: no strikethrough

    @available(iOS 6.0, *)
    public static let underlineStyle: NSAttributedStringKey // NSNumber containing integer, default 0: no underline

    @available(iOS 6.0, *)
    public static let strokeColor: NSAttributedStringKey // UIColor, default nil: same as foreground color

    @available(iOS 6.0, *)
    public static let strokeWidth: NSAttributedStringKey // NSNumber containing floating point value, in percent of font point size, default 0: no stroke; positive for stroke alone, negative for stroke and fill (a typical value for outlined text would be 3.0)

    @available(iOS 6.0, *)
    public static let shadow: NSAttributedStringKey // NSShadow, default nil: no shadow

    @available(iOS 7.0, *)
    public static let textEffect: NSAttributedStringKey // NSString, default nil: no text effect


    @available(iOS 7.0, *)
    public static let attachment: NSAttributedStringKey // NSTextAttachment, default nil

    @available(iOS 7.0, *)
    public static let link: NSAttributedStringKey // NSURL (preferred) or NSString

    @available(iOS 7.0, *)
    public static let baselineOffset: NSAttributedStringKey // NSNumber containing floating point value, in points; offset from baseline, default 0

    @available(iOS 7.0, *)
    public static let underlineColor: NSAttributedStringKey // UIColor, default nil: same as foreground color

    @available(iOS 7.0, *)
    public static let strikethroughColor: NSAttributedStringKey // UIColor, default nil: same as foreground color

    @available(iOS 7.0, *)
    public static let obliqueness: NSAttributedStringKey // NSNumber containing floating point value; skew to be applied to glyphs, default 0: no skew

    @available(iOS 7.0, *)
    public static let expansion: NSAttributedStringKey // NSNumber containing floating point value; log of expansion factor to be applied to glyphs, default 0: no expansion


    @available(iOS 7.0, *)
    public static let writingDirection: NSAttributedStringKey // NSArray of NSNumbers representing the nested levels of writing direction overrides as defined by Unicode LRE, RLE, LRO, and RLO characters.  The control characters can be obtained by masking NSWritingDirection and NSWritingDirectionFormatType values.  LRE: NSWritingDirectionLeftToRight|NSWritingDirectionEmbedding, RLE: NSWritingDirectionRightToLeft|NSWritingDirectionEmbedding, LRO: NSWritingDirectionLeftToRight|NSWritingDirectionOverride, RLO: NSWritingDirectionRightToLeft|NSWritingDirectionOverride,


    @available(iOS 6.0, *)
    public static let verticalGlyphForm: NSAttributedStringKey // An NSNumber containing an integer value.  0 means horizontal text.  1 indicates vertical text.  If not specified, it could follow higher-level vertical orientation settings.  Currently on iOS, it's always horizontal.  The behavior for any other value is undefined.
}
Các bạn hoàn toàn có thể tạo được các label đẹp lung linh theo cách làm của example dưới đây nhé
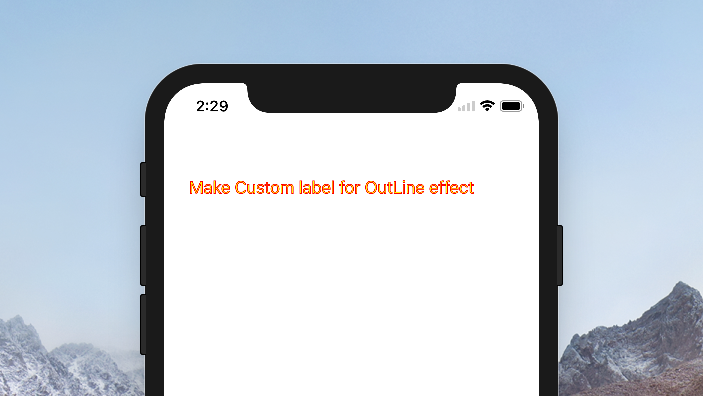
1.1. Example tạo label có viền của text
extension UILabel {

    func makeOutLine(oulineColor: UIColor, foregroundColor: UIColor) {
        let strokeTextAttributes = [
        NSAttributedStringKey.strokeColor : oulineColor,
        NSAttributedStringKey.foregroundColor : foregroundColor,
        NSAttributedStringKey.strokeWidth : -4.0,
        NSAttributedStringKey.font : self.font
        ] as [NSAttributedStringKey : Any]
        self.attributedText = NSMutableAttributedString(string: self.text ?? "", attributes: strokeTextAttributes)
    }

}
Bạn có thể sử dụng extension này như sau:
class ViewController: UIViewController {

    @IBOutlet weak var myLabel: UILabel!

    override func viewDidLoad() {
        super.viewDidLoad()
        myLabel.text = "Make Custom label for OutLine effect"
        myLabel.makeOutLine(oulineColor: UIColor.red, foregroundColor: UIColor.yellow)
    }

}
Và đây là kểt quả thu được:

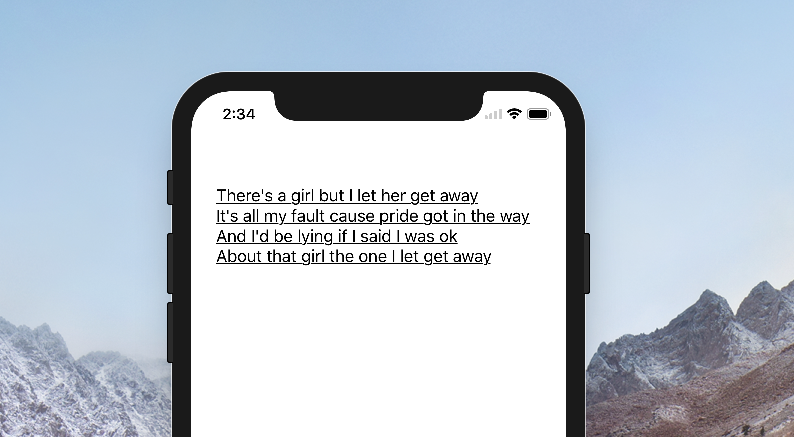
1.2. Example tạo gạch chân cho label
extension UILabel {

    func underline() {
        if let textString = self.text {
            let attributedString = NSMutableAttributedString(string: textString)
            attributedString.addAttribute(NSAttributedStringKey.underlineStyle, value: NSUnderlineStyle.styleSingle.rawValue, range: NSRange(location: 0, length: attributedString.length))
            attributedText = attributedString
        }
    }
}
Cách dùng extension trên:
class ViewController: UIViewController {

    @IBOutlet weak var myLabel: UILabel!

    override func viewDidLoad() {
        super.viewDidLoad()
        myLabel.text = """
        There's a girl but I let her get away
        It's all my fault cause pride got in the way
        And I'd be lying if I said I was ok
        About that girl the one I let get away
        """
        myLabel.underline()
    }

}
Kết quả thu được:

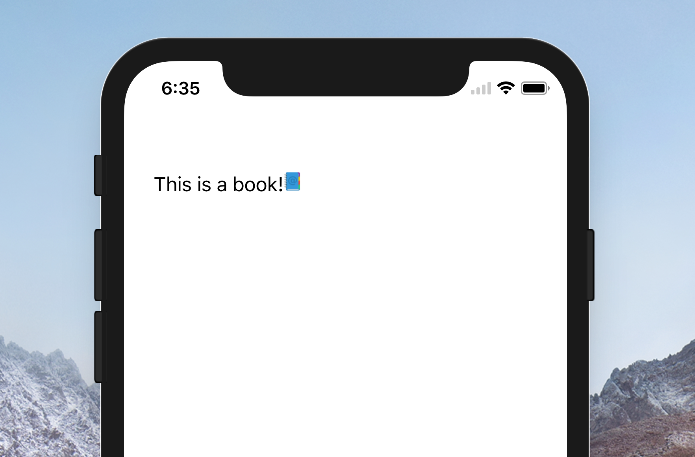
1.3. Chèn ảnh vào label
Bạn hoàn toàn có thể sử dụng attributedText để chèn 1 ảnh vào label Ví dụ
class ViewController: UIViewController {

    @IBOutlet weak var myLabel: UILabel!

    override func viewDidLoad() {
        super.viewDidLoad()
        let attachment = NSTextAttachment()
        attachment.image = UIImage(named: "book")
        let attachmentString = NSAttributedString(attachment: attachment)
        let myString = NSMutableAttributedString(string: "This is a book!")
        myString.append(attachmentString)
        myLabel.attributedText = myString
    }

}
Kết quả thu được:

Notes: ảnh sẽ hiển thị theo kích thước của nó chứ không chỉnh theo font size, nên bạn cần resize image trước nếu nó có kích thước không phù hợp
Cách này thì khá là ma giáo
