OpenCV: It''s about face
In my last article, we had used OpenCV to solve the puzzle and I also mention that we do many using computer Vision. For example, currently there is a popular face app that allow us to take photo and play around with it. However, this could cause the security breach to the user since they need to ...
In my last article, we had used OpenCV to solve the puzzle and I also mention that we do many using computer Vision. For example, currently there is a popular face app that allow us to take photo and play around with it. However, this could cause the security breach to the user since they need to send their face image to the app server for processing which somehow the information could leak. This information is very important because nowadays people using their face login to the system(Face ID) and payment as well. So should not use it? But it is so much fun. What if I could know how they did it then I implement it again from scratch?
Plan of attack
In this post, we are going to talk about how steps that they implement the face app, and we also code along some part of this process. However, we will only talk about the technique that they could use to manipulate the user face. We will not cover the hold code of face app but I believe that will give you the idea if you want to implement the application similar to that. So what will we do here? I will cover on some basic method for face detection and face landmark detection where it's very important to every face application. Once we can identify the user face and landmark(eyes, node, mouse) the next step is up to u to build your dream projects. So Let's get faces.
Face Code
In OpenCV there are many options which we could use to get the face from the image. However, I am going to use dlib to this face detection task since the code for getting face is quite simple. First, we need to have dlib package in our system vai.
pip install dlib
We also use imutils for image processing operations such as as translation, rotation, resizing, skeletonization .etc.
pip install imutils
Once dlib installed, we can detect the face with just two line of code
detector = dlib.get_frontal_face_detector()
rects = detector(img, 0)
To improve the performance of our system we might need to convert the RGB image gray scale for speed up the detection. After we detect the face, we need to know the face landmark such as eyes, noise, and mouse. So that we could do various things with those such as add glasses, mustache, put makeup, and make user look old... To get the face landmark using dlib it's easy as lines of code.
predictor = dlib.shape_predictor("shape_predictor_68_face_landmarks.dat")

shape = predictor(frame, rect)
        shape = face_utils.shape_to_np(shape)
        for (i, (x, y)) in enumerate(shape):
            cv2.circle(frame, (x, y), 1, (0, 255, 0), -1)
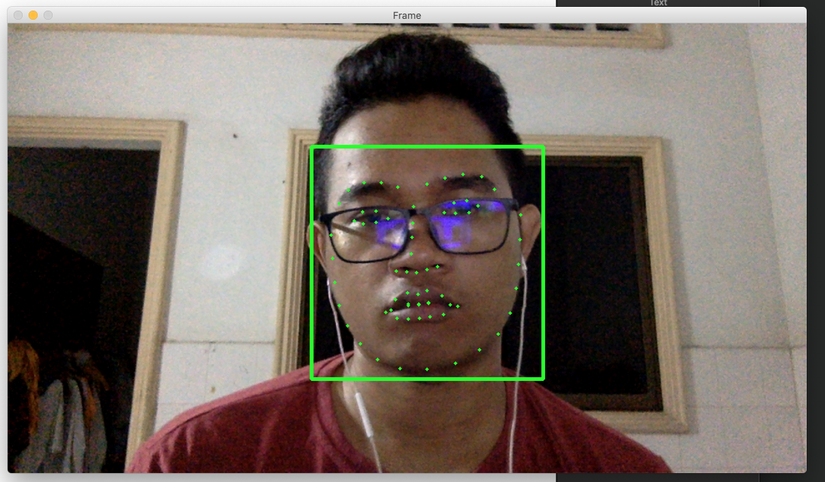
The code above will able to detect landmark of face that we just detected before. Now everything is done. Let's put it all together.
from imutils.video import VideoStream
from imutils import face_utils
import imutils
import time
import cv2
import dlib

print("[INFO] loading facial landmark predictor...")
detector = dlib.get_frontal_face_detector()
predictor = dlib.shape_predictor("shape_predictor_68_face_landmarks.dat")

print("[INFO] camera sensor warming up...")
vs = VideoStream(0).start()
time.sleep(2.0)


    # dets = detector(img, 1)
    # print("Number of faces detected: {}".format(len(dets)))
    # for k, d in enumerate(dets):
    #     print("Detection {}: Left: {} Top: {} Right: {} Bottom: {}".format(
    #         k, d.left(), d.top(), d.right(), d.bottom()))
    #     # Get the landmarks/parts for the face in box d.
    #     shape = predictor(img, d)
    #     print("Part 0: {}, Part 1: {} ...".format(shape.part(0),
    #                                               shape.part(1)))
    #     # Draw the face landmarks on the screen.
    #     # win.add_overlay(shape)

# loop over the frames from the video stream
while True:
    # grab the frame from the threaded video stream, resize it to
    # have a maximum awidth of 400 pixels, and convert it to
    # grayscale
    frame = vs.read()
    frame = imutils.resize(frame, height=600)
    gray = cv2.cvtColor(frame, cv2.COLOR_BGR2GRAY)
     # detect faces in the grayayscale frame
    rects = detector(gray, 0)

    # loopop over the face detections
    for rect in rects:
        (x,y,w,h) = face_utils.rect_to_bb(rect)
        cv2.rectangle(frame, (x, y), (x+w, y+h), (0,0,255), 1)

        shape = predictor(frame, rect)
        shape = face_utils.shape_to_np(shape)
        # Draw the face landmarks on the screen.
        # loop over the (x, y)-coordinates for the facial landmarks
        # and draw each of them
        for (i, (x, y)) in enumerate(shape):
            cv2.circle(frame, (x, y), 1, (0, 255, 0), -1)
            # cv2.putText(frame, str(i + 1), (x - 10, y - 10),
            #     cv2.FONT_HERSHEY_SIMPLEX, 0.35, (0, 255, 0), 1)

    # show the frame
    cv2.imshow("Frame", frame)
    key = cv2.waitKey(1) & 0xFF

     # if the `q` key was pressed, break from the loop
    if key == ord("q"):
        break


# do a bit of cleanup
cv2.destroyAllWindows()
vs.stop()
Let's run it
python face_landmark_detection.py

From now, you can use this information to your own face app and more.
Resources
- source code
- https://github.com/jrosebr1/imutils
- https://www.learnopencv.com/tag/virtual-makeup/
- https://www.pyimagesearch.com/?s=face&submit=Search
What next
We have just implement our foundation of face app where give you the information needed for further development. Therefore, you could extend this application and use it to build and solve your own projects as you wish and I am happy to help if you have any question related to this.
After these two months break, in the next article we are going to talk about our NLP again. Stay turn.
