Quản lý View Controller bằng Container View Controllers
Bạn đã bao giờ suy nghĩa rằng TabbarController và NavigationController đã làm việc như thế nào chưa? => cả hai cũng chỉ là subclass của UIViewController . Vậy điểm chung của các class đó là gì? Tất cả đều cho phép hiển thị nội dung theo form từ một hoặc nhiều ViewController. Ví dụ như ...
Bạn đã bao giờ suy nghĩa rằng TabbarController và NavigationController đã làm việc như thế nào chưa? => cả hai cũng chỉ là subclass của UIViewController. Vậy điểm chung của các class đó là gì? Tất cả đều cho phép hiển thị nội dung theo form từ một hoặc nhiều ViewController. Ví dụ như Navigaion là quản lý stack các ViewController, bạn có thể push hoặc pop View Controller vào hoặc ra khỏi stack, Nó cũng như thế với Tabbar Controller. Nó quản lý list các ViewController và được điều khiển bởi UITabbar để show ViewController mong muốn lên.
Container View Controllers
Cả hai UINavigationController và UITabbarController đều là Container Controller, có nghĩa la nó quản lý view giống như các UIViewController khác nhưng có cái khác là, Container View Controller còn quản lý một hoặc nhiều Child View Controller, đóng vài trò là người cha (parent view controller) và quản lý một đàn con (View Controller) Parent View Controller có trách nhiệm điều chỉnh size và vị trí cho view của từng Child View Controller.
Lợi ích
Reusability
Lợi ích lớn nhất của Container View Controller là reusability (dùng lại). Tương tự các subclass của UIViewController như UINavigationController, UITabbarController, và UISplitViewController. Mỗi loại đều có cách chuyển View khác nhau nhưng được viết thành common của các ưng dụng iOS.
Lean View Controllers
Làm việc với Container View Controller giúp đơn giản hơn nhiều việc quản lý các View Controller, không còn việc 1 View Controller sử lý toàn bộ mọi hoạt động của app nửa, giao diện người dùng sẽ được chia nhỏ theo nhóm logic và các control liên quan, mỗi thứ được quản lý bởi View Controller con. Dễ dàng cho việc chỉnh sữa các thành phần nhỏ hoặc sử dụng lại các control có sẵn trong project.
An Example
Trong bài hướng dẫn này, mình sẽ hướng dẫn cách tạo một Container View Controller và lợi ích của nó. Bạn sẽ dễ dàng hiểu được mối quan hệ giữa Container View Controller và các child Controller của nó.
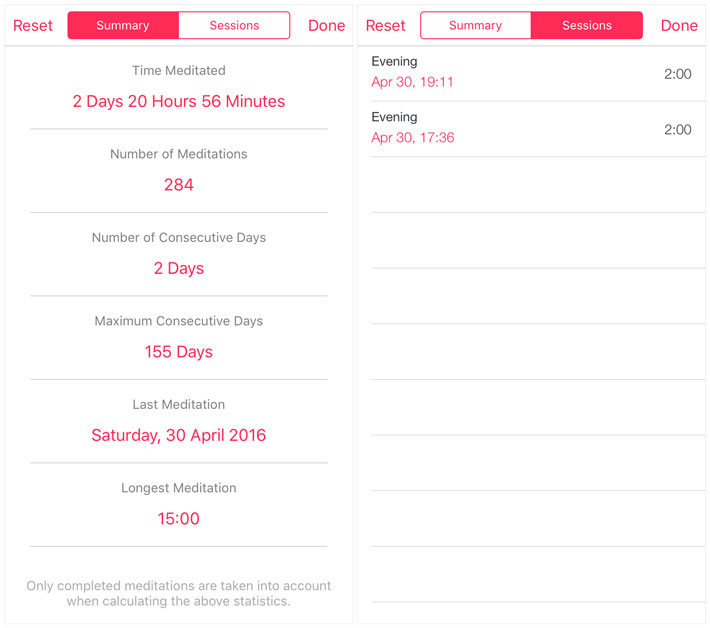
Lấy app Samsara, Người dùng sẽ dễ dàng nhìn thấy các thông tin được chia thành nhiều phần trên màng hình, phía trên Top, người dùng có thể chuyển đổi qua lại giữa Summary và Session. Nhưng qua, ta có thể thấy 2 View Controller khác nhau được quản lý bằng một Container View Controller.

Project Setup
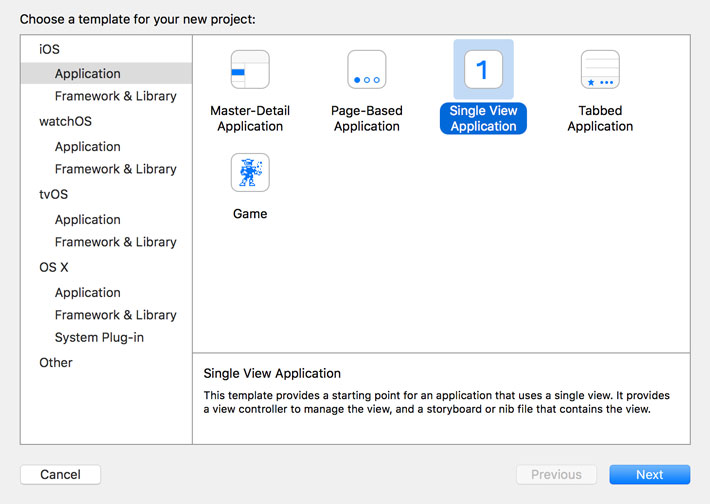
Việc đầu tiên, chung ta tiến hành tạo một project đơn giản Single View Application
 Đặt tên là ViewControllerContainment và set Device là Universal

Setting Up the User Interface
Bắt đầu bằng việc rename ViewController.swift bằng MasterViewController.swift.. Mở MasterViewController.swift và đổi tên class thành MasterViewController
import UIKit

final class MasterViewController: UIViewController {

    override func viewDidLoad() {
        super.viewDidLoad()
    }

}
Tiếp tục tạo 2 subclass của UIViewController là SummaryViewController và SessionsViewController, sử dụng Cocoa Touch Class. Các View Controller này sẽ là các View Controller con của MasterViewController.
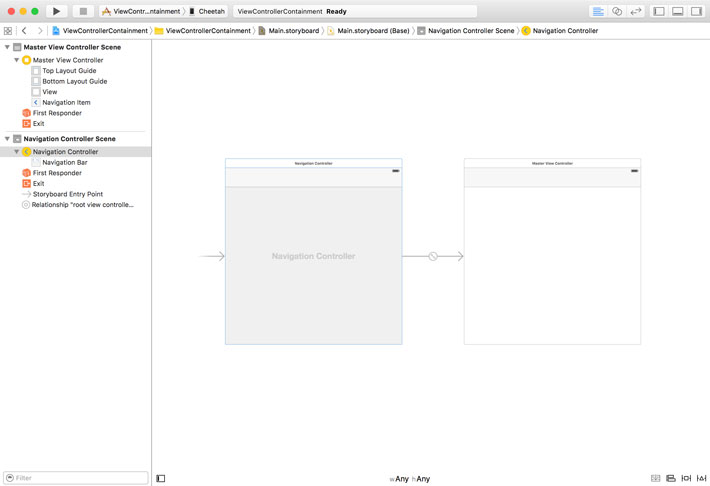
 Mở Main.storyboard và set Custom Class của ViewController (có sẵn) là MasterViewController
 Chọn Embed In > Navigation Controller từ Menu Editor. Mục đích chỉ để lấy thanh Navigation Bar cho tiện thôi.
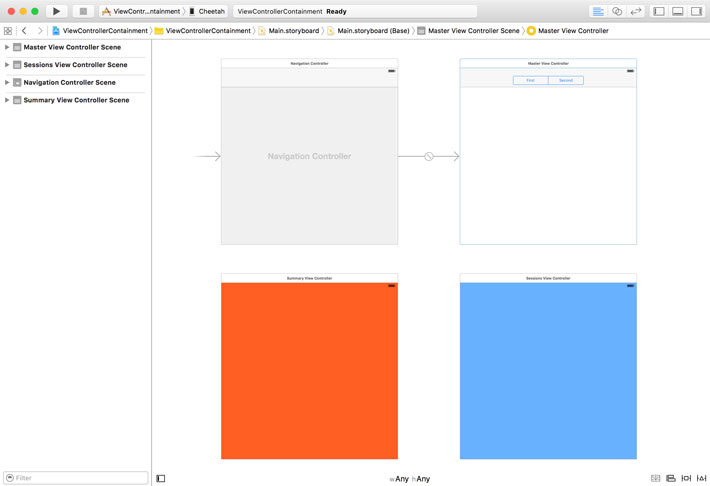
 Để chuyển đổi giữa 2 child view controller, chúng ta sử dụng segmented control. Mở Object Library ở bên phải vào add segmented control vào thanh navigatin bar.

Mở MasterViewController.swift và tạo outlet cho segmented control. Ở Main.storyboard, connect outlet với segmented control.
import UIKit

final class MasterViewController: UIViewController {

    @IBOutlet var segmentedControl: UISegmentedControl!

    override func viewDidLoad() {
        super.viewDidLoad()
    }

}
Chúng ta đã hoàn thành gần hết giao diện cho MasterViewController. tiếp tục tạo thêm 2 View Controller nửa cho SummaryViewController và SessionsViewController và nhớ đặt custom class cho cả hai.

Configuring the Segmented Control
Mở MasterViewController.swift và thêm function setupView()
override func viewDidLoad() {
    super.viewDidLoad()

    setupView()
}
Ở hàm setupView(), chúng ta thêm vào một function hỗ trợ việc set up segmente.
private func setupView() {
    setupSegmentedControl()
}
private func setupSegmentedControl() {
    // Configure Segmented Control
    segmentedControl.removeAllSegments()
    segmentedControl.insertSegment(withTitle: "Summary", at: 0, animated: false)
    segmentedControl.insertSegment(withTitle: "Sessions", at: 1, animated: false)
    segmentedControl.addTarget(self, action: #selector(selectionDidChange(_:)), for: .valueChanged)

    // Select First Segment
    segmentedControl.selectedSegmentIndex = 0
}
Tiếp theo là thêm hàm selectionDidChange(
