React Native
React native I/ Giới thiệu. Một vài tháng trước Facebook đã công bố React native, một framework mà bạn có thể build một iOS native aplication với javascript và đưa ra bản beta. Hiện tại Facebook chỉ support với iOS. React native cho phép bạn xây dựng ứng dụng tầm quốc tế dựa trên những trải ...
React native I/ Giới thiệu.
Một vài tháng trước Facebook đã công bố React native, một framework mà bạn có thể build một iOS native aplication với javascript và đưa ra bản beta. Hiện tại Facebook chỉ support với iOS. React native cho phép bạn xây dựng ứng dụng tầm quốc tế dựa trên những trải nghiệm của các nền tảng native và dựa trên javascript. React native đặt trọng tâm phát triển dựa trên tính hiệu quả thông qua các nền tảng mà bạn quan tâm – “learn once, write anywhere.”
II/ Thiết lập môi trường.
React native sử dụng Node.js, javascript runtime, để build javascript code do đó bạn phải cài đặt môi trường cho nó.
- Cài đặt Xcode trên OS-Mac.
- Đầu tiên cài đặt install Homebrew sử dụng các hướng dẫn trên trang web của Homebrew, sau đó cài đặt Node.js bằng cách thực hiện như sau trong cửa sổ Terminal: Và gõ lệnh: brew install node Tiếp theo sử dụng homebrew để cài đặt watchman, a file watcher from Facebook và gõ lệnh: brew install watchman Việc này dùng để config React native nó dùng để tìm ra các thay đổi trong code của bạn và rebuild lại code cho phù hợp, nó giống như xCode build lại mỗi khi bạn save một file. Tiếp theo sử dụng npm để cài đặt React Native CLI tool trong terminal gõ lệnh: `npm install -g react-native-cli' Cái này sử dụng Node Package Manager để fetch the CLI tool và install nó một cách toàn cục. Thiết lập thư mục và bạn muốn đặt project vào và sử dụng CLI tool để lên kiến trúc cho dự án và dùng lệnh trong terminal: react-native init HouseApp Đến đây bạn có thể vào thư mục “PropertyFinder” để mở project ra và làm việc trên nó tại đây bản thân React native đã cung cấp đầy đủ các thành phần để bạn tạo ra một ứng dụng của riêng mình. Nếu bạn nhìn vào các thư mục trong thư mục “HouseApp” bạn sẽ thấy:
- node_modules chứa React native framework.
- index.ios.js file đó là bộ khung của ứng dụng được tạo bởi CLI tool.
- iOS thư mục và HouseApp.xcodeproj file. Đây là file xCode project để mở project với xcode.
III/ Create HouseApp application:
Trong phần này mình sẽ giới thiệu cho các bạn biết về một số UI cơ bản trong react và cách apply style và control nó như thế nào. Ứng dụng cho phép tìm kiếm các ngôi nhà trong một thành phố hoặc theo vị trí location gần nhât
1/ create application: - Mở terminal và nhập: react-native init HouseApp. Đây là lệnh dùng để tạo ra một project mới với tên là HouseApp và nó đã chứa đựng tất cả các thành phần cần thiết để tạo và chạy ứng dụng React Native Application.
- Vào thư mục HouseApp trong thư mục User -> account hiện tại bạn sẽ thấy folder HouseApp sau đó mở file HouseApp.xcodeproj để mở xcode. Build app: Command +R.

Sau khi build xong terminal sẽ thông báo như sau:
=============================================================== | Running packager on port 8081. | Keep this packager running while developing on any JS | projects. Feel free to close this tab and run your own | packager instance if you prefer. | | https://github.com/facebook/react-native | =============================================================== Looking for JS files in /Users/colineberhardt/Temp/TestProject React packager ready.
2/ Coding: Trong phần này sẽ giới thiệu một vài thành phần và khái niệm trong React.js. Mở file index.ios.js bằng editext hoặc bạn có thể add nó vào project để code. B1: Các thành phần trong index.ios.js:
'use strict';
Đoạn code này cho phép khả năng Strict Mode, cải thiện việc sử lý lỗi và “disable some less-than-ideal JavaScript language features”, nó đảm bảo cho việc biên dịch là tốt nhất. var React = require('react-native'); Biến này cho phép load các module của react-native và được gán tới React.
var styles khởi tạo sheet css, tương đương với css trong html . React native sử dụng Cascading Style Sheets (CSS) để tạo style UI cho ứng dụng.
Tạo javascript class:
> classclass House extends React.Component {
  render() {
    return (
            <React.NavigatorIOS
            style={styles.container}
            initialRoute={{
            title: 'House App',
            component: SearchPage,
            }}/>
            );
  }
}
Đây là cấu trúc của một Navigation controller và được apply bởi style container và khởi tạo rounting đây là một dạng kiểu định nghĩa cấu trúc của navigation trong ứng dụng. Cuối cùng đăng ký root view: React.AppRegistry.registerComponent('PropertyFinder', function() { return House });
Tạo một “New Group” với tên là jsx và move file index.ios.js vào group để rễ quản lý. B2: Tạo file SearchPage.js file: Tạo mới một file với tên SearchPage.js trong group jsx. Click vào file và coding: Đầu tiên chúng ta cũng add code:
'use strict';   var React = require('react-native');
var {
  StyleSheet,
  Text,
  TextInput,
  View,
  TouchableHighlight,
  ActivityIndicatorIOS,
  Image,
  Component } = React;
Ở đây đăng ký stritc mode và import một số UI. Add style trong page:
var styles = StyleSheet.create({
                               description: {
                               marginBottom: 20,
                               fontSize: 18,
                               textAlign: 'center',
                               color: '#656565'
                               },
                               container: {
                               padding: 30,
                               marginTop: 65,
                               alignItems: 'center'
                               },
                               flowRight: {
                               flexDirection: 'row',
                               alignItems: 'center',
                               alignSelf: 'stretch'
                               },
                               buttonText: {
                               fontSize: 18,
                               color: 'white',
                               alignSelf: 'center'
                               },
                               button: {
                               height: 36,
                               flex: 1,
                               flexDirection: 'row',
                               backgroundColor: '#48BBEC',
                               borderColor: '#48BBEC',
                               borderWidth: 1,
                               borderRadius: 8,
                               marginBottom: 10,
                               alignSelf: 'stretch',
                               justifyContent: 'center'
                               },
                               searchInput: {
                               height: 36,
                               padding: 4,
                               marginRight: 5,
                               flex: 4,
                               fontSize: 18,
                               borderWidth: 1,
                               borderColor: '#48BBEC',
                               borderRadius: 8,
                               color: '#48BBEC'
                               },
                               image: {
                               awidth: 217,
                               height: 138
                               }
                               });
Tạo các component IU bằng class SearchPage:
class SearchPage extends Component {
   render() {
     return (
            <View style={styles.container}>
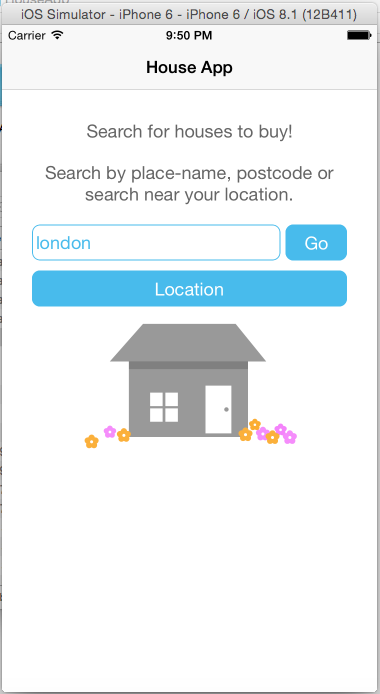
            <Text style={styles.description}>Search for houses to buy! </Text>
            <Text style={styles.description}>Search by place-name, postcode or search near your location.
           </Text>
           </View>
           );
   }
 }
Export và cấp quyền truy xuất của class trong các file khác: module.exports = SearchPage; Để sử dụng class SearchPage thì trong file index.ios.js thêm đoạn code sau: var SearchPage = require('./SearchPage'); Đặt ở ngay dưới var React đoạn code này giống như bạn impoort một class vào trong file vậy. Trong House class ở trên bên trong render bạn có thể thấy đoạn code: component: SearchPage đoạn code này cho phép bạn initialRoute tham chiếu đến một page mới. Cuối cùng bạn có thể chạy Command + R trên emulator như sau:

Component State và Event: Mỗi component của react thì có state của riêng nó, nó được sử lưu như dạng key-value. Trước khi các component rendered thì phải khởi tạo tập state. Trong class SearchPage add đoạn code, trước render();
constructor(props) {
    super(props);
    this.state = {
    searchString: 'london'
  };
 }
Với biến searchString chỉ cần add value vào TextInput tag value={this.state.searchString} Tạo mới một function để sử lý event text change của TextInput:
- Function:
onSearchTextChanged(event) {
    this.state = {
    searchString: 'london',
    isLoading: false,
    message: '
    };
  }
- Register listener:
<TextInput
  style={styles.searchInput}
  value={this.state.searchString}
  onChange={this.onSearchTextChanged.bind(this)}
  placeholder='Search via name or postcode'/>
- Searching: Tạo một progress add code bên trong render dòng đầu tiên:
var spinner = this.state.isLoading ?
  ( <ActivityIndicatorIOS
      hidden='true'
      size='large'/> ) :
  ( <View/>);
Tạo function sử lý onpress trên TouchableHighlight "Go" text
- onSearchPressed
onSearchPressed() {
    var query = urlForQueryAndPage('place_name', this.state.searchString, 1);
    this._executeQuery(query);
  }
- _executeQuery
_executeQuery(query) {
    console.log(query);
    this.setState({ isLoading: true });
    fetch(query)
    .then(response => response.json())
    .then(json => this._handleResponse(json.response))
    .catch(error =>
           this.setState({
                         isLoading: false,
                         message: 'Something bad happened ' + error
                         }));
  }
- _handleResponse
_handleResponse(response) {
    this.setState({ isLoading: false , message: ' });
    if (response.application_response_code.substr(0, 1) === '1') {
      console.log('Properties found: ' + response.listings.length);
      this.props.navigator.push({
                                title: 'Results',
                                component: SearchResults,
                                passProps: {listings: response.listings}
                                });
    } else {
      this.setState({ message: 'Location not recognized; please try again.'});
    }
  }
Trong function _handleResponse hàm fetch(query) đây là hàm thuộc trong Web API dùng để sử lý các request XMLHttpRequest. Cũng trong hàm này ta còn gặp đoạn code this.props.navigator.push cho phép push một page trong navigation là Results page sẽ được tạo ở phần sau đồng thời truyền dữ liệu với tuỳ chọn component.
Trong thẻ TouchableHighlight thêm đoạn code onPress={this.onSearchPressed.bind(this)}
đăng ký lắng nghe mỗi khi Go text được click. Kết thúc add function urlForQueryAndPage trước SearchPage class: function dùng để lấy dữ liệu thông qua http request với dữ liệu response là json.
 function urlForQueryAndPage(key, value, pageNumber) {
  var data = {
      country: 'uk',
      pretty: '1',
      encoding: 'json',
      listing_type: 'buy',
      action: 'search_listings',
      page: pageNumber
  };
  data[key] = value;
  var querystring = Object.keys(data)
    .map(key => key + '=' + encodeURIComponent(data[key]))
    .join('&');
  return 'http://api.nestoria.co.uk/api?' + querystring;
};
Hiển thị kết quả:
Tạo một file với tên SearchResults.js trong group jsx
'use strict';
var React = require('react-native');
var PropertyView = require('./Details');
var {
  StyleSheet,
  Image,
  View,
  TouchableHighlight,
  ListView,
  Text,
  Component
} = React;
class SearchResults extends Component {
  constructor(props) {
    super(props);
    var dataSource = new ListView.DataSource(
                                             {rowHasChanged: (r1, r2) => r1.guid !== r2.guid});
    this.state = {
    dataSource: dataSource.cloneWithRows(this.props.listings)
    };
  }
   renderRow(rowData, sectionID, rowID) {
    var price = rowData.price_formatted.split(' ')[0];
      return (
            <TouchableHighlight onPress={() => this.rowPressed(rowData.guid)}
            underlayColor='#dddddd'>
            <View>
            <View style={styles.rowContainer}>
            <Image style={styles.thumb} source={{ uri: rowData.img_url }} />
            <View  style={styles.textContainer}>
            <Text style={styles.price}>£{price}</Text>
            <Text style={styles.title}
            numberOfLines={1}>{rowData.title}</Text>
            </View>
            </View>
            <View style={styles.separator}/>
            </View>
            </TouchableHighlight>
            );
  }
  rowPressed(propertyGuid) {
    var property = this.props.listings.filter(prop => prop.guid === propertyGuid)[0];
    this.props.navigator.push({
                              title: "Details",
                              component: PropertyView,
                              passProps: {property: property}
                              });
  }
  render() {
    return (
            <ListView
            dataSource={this.state.dataSource}
            renderRow={this.renderRow.bind(this)}/>
            );
  }
}
var styles = StyleSheet.create({
                               thumb: {
                               awidth: 80,
                               height: 80,
                               marginRight: 10
                               },
                               textContainer: {
                               flex: 1
                               },
                               separator: {
                               height: 1,
                               backgroundColor: '#dddddd'
                               },
                               price: {
                               fontSize: 25,
                               fontWeight: 'bold',
                               color: '#48BBEC'
                               },
                               title: {
                               fontSize: 20,
                               color: '#656565'
                               },
                               rowContainer: {
                               flexDirection: 'row',
                               padding: 10
                               }
                               });
module.exports = SearchResults;
Trong class SearchResults:
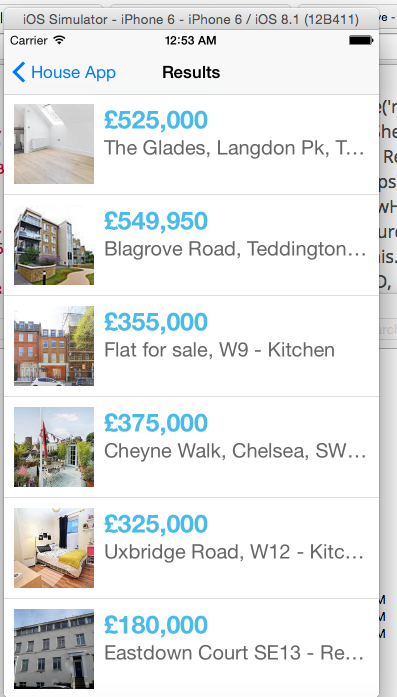
- ListView đây là IU thường được dùng trong native application dùng để hiển thị nhiều item có kiểu dữ liệu giống nhau và với react thì nó dùng cơ chế DataSource để binding dữ liệu trong nó.
- Với function renderRow: Hàm này dùng để tạo ra một row IU với style được định nghĩa và hiển thị như sau:

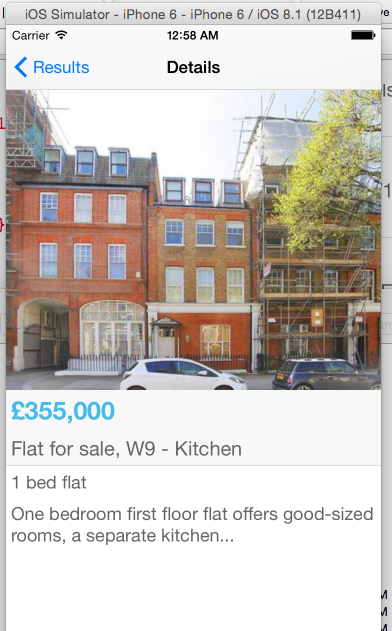
Hiển thị chi tiết.
Tạo mới một file với tên Details.js trong group jsx.
'use strict';
var React = require('react-native');
var {
  StyleSheet,
  Image,
  View,
  Text,
  Component
} = React;
var styles = StyleSheet.create({
                               container: {
                               marginTop: 65
                               },
                               heading: {
                               backgroundColor: '#F8F8F8',
                               },
                               separator: {
                               height: 1,
                               backgroundColor: '#DDDDDD'
                               },
                               image: {
                               awidth: 400,
                               height: 300
                               },
                               price: {
                               fontSize: 25,
                               fontWeight: 'bold',
                               margin: 5,
                               color: '#48BBEC'
                               },
                               title: {
                               fontSize: 20,
                               margin: 5,
                               color: '#656565'
                               },
                               description: {
                               fontSize: 18,
                               margin: 5,
                               color: '#656565'
                               }
                               });
class Details extends Component {
  render() {
    var property = this.props.property;
    var stats = property.bedroom_number + ' bed ' + property.property_type;
    if (property.bathroom_number) {
      stats += ', ' + property.bathroom_number + ' ' + (property.bathroom_number > 1
                                                        ? 'bathrooms' : 'bathroom');
    }
    var price = property.price_formatted.split(' ')[0];
    return (
            <View style={styles.container}>
            <Image style={styles.image}
            source={{uri: property.img_url}} />
            <View style={styles.heading}>
            <Text style={styles.price}>£{price}</Text>
            <Text style={styles.title}>{property.title}</Text>
            <View style={styles.separator}/>
            </View>
            <Text style={styles.description}>{stats}</Text>
            <Text style={styles.description}>{property.summary}</Text>
            </View>
            );
  }
}
module.exports = Details;

