Tìm hiểu về LayoutInflater trong Android
Mình chỉ có thói quen là video để chia sẻ kiến thức lập trình như tự dưng lại muốn viết để trải nghiệm nên mình sẽ thử viết 1 loạt bài để chia sẻ hiểu biết của mình về lập trình Android. Hy vọng các bạn ủng hộ và trong bài viết này mình muốn chia sẻ với các bạn về LayoutInflater. Định nghĩa: ...
Mình chỉ có thói quen là video để chia sẻ kiến thức lập trình như tự dưng lại muốn viết để trải nghiệm nên mình sẽ thử viết 1 loạt bài để chia sẻ hiểu biết của mình về lập trình Android. Hy vọng các bạn ủng hộ và trong bài viết này mình muốn chia sẻ với các bạn về LayoutInflater.
Định nghĩa:
- LayoutInflater là 1 component giúp bạn chuyển layout file(Xml) thành View(Java code) trong Android. Bạn thường sử dụng nó trong phương thức onCreateView của fragment hoặc phương thức getView khi custom adapter.
Cách tạo đối tượng LayoutInflater
Chúng ta có 2 cách để tạo ra đối tượng LayoutInflater:
1.LayoutInflater là 1 System Service của Android và cách sử dụng của nó giống như các System Service khác như khi bạn sử dụng WINDOW_SERVICE, ALARM_SERVICE hay LOCATION_SERVICE.
LayoutInflater layoutInflater = (LayoutInflater) context.getSystemService(Context.LAYOUT_INFLATER_SERVICE);
Đây là cách được khuyên dùng nhưng nó hơi dài dòng và tôi rất ít khi sử dụng cách này.
2. Sử dụng static method của LayoutInflater:
LayoutInflater layoutInflater = LayoutInflater.from(context);
Đây là cách tôi hay sử dụng nhất vì nó ngắn gọn ^_^
Phương thức Inflate
Công việc của LayoutInflater là đọc xml layout file và chuyển đổi các thuộc tính của nó thành 1 View trong Java code. Sau khi có đối tượng LayoutInflater, ta có thể dùng phương thức inflate để chuyển đổi 1 xml layout file thành 1 View trong java. Ta có 2 phương thức inflate với số lượng tham số khác nhau:
1. View view = layoutInflater.inflate(int resource, ViewGroup parent)
2. View view = layoutInflater.inflate(int resource, ViewGroup parent, boolean attachToRoot)
Các bạn sẽ thắc mắc các tham số của inflater có ý nghĩa gì? 2 Phương thức inflate trên chỉ khác nhau tham số attachToRoot vậy attachToRoot là gì? Cùng tìm hiểu thông qua 1 số ví dụ nhé.
Trước tiên chúng ta tìm hiểu 3 tham số của nó là gì đã nhé:
Như định nghĩa thì nhiệm vụ của LayoutInflater là chuyển đổi xml layout file thành đối tượng View trong java code, vậy thì:
- Tham số thứ nhất là: int resource, nó chính là xml layout file mà chúng ta muốn chuyển đổi thành View.
- Tham số thứ hai là: ViewGroup parent, nó là ViewGroup nơi mà xml layout file(tham số thứ nhất) có thể được nhúng vào, LayoutInflater sẽ chuyển đổi xml layout file thành View và sử dụng các thuộc tính phù hợp với ViewGroup parrent.
- Tham số thứ ba là: attachToRoot, khi mà attachToRoot=true thì ngay sau khi quá trình chuyển đổi xml file(resource) thành View hoàn thành thì nó sẽ nhúng View đó vào ViewGroup parent (RIGHT NOW) , khi attachToRoot = false thì nó chỉ chuyển đổi xml file(resource) thành View trong java mà không thêm ngay vào ViewGroup(NOT NOW)
Rồi cùng đi vào ví dụ cho dễ hiểu nào..
Tôi có xml layout file có tên là activity_main.xml với root là LinearLayout hướng vertical:
<LinearLayout xmlns:android="http://schemas.android.com/apk/res/android"
              android:orientation="vertical"
              android:id="@+id/ll_main"
              android:layout_awidth="fill_parent"
              android:layout_height="fill_parent">

</LinearLayout>
Và 1 xml layout file khác tên là item_button.xml như sau:
<Button xmlns:android="http://schemas.android.com/apk/res/android"
    android:layout_awidth="match_parent"
    android:layout_height="wrap_content"
    android:text="Custom Button"
    android:id="@+id/custom_button">
</Button>
và bây giờ tôi sẽ sử dụng lần lượt các phương thức inflate và tôi sẽ chỉ ra kết quả sau khi chúng ta sử dụng nó
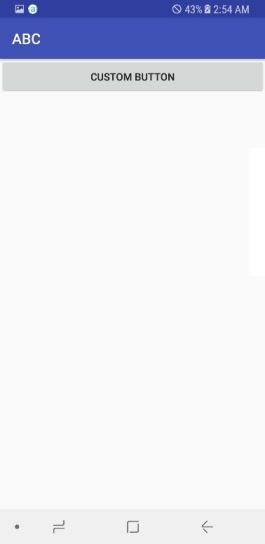
// TH1: Chúng ta chỉ sử dụng 2 tham số tuy nhiên attachToRoot sẽ được đặt mặc định bằng true và kết quả là item_button sẽ được chuyển đổi thành View và được add vào llMain ngay khi chuyển đổi xong.
public class DemoLayoutInflater extends AppCompatActivity {
    @Override
    protected void onCreate(@Nullable Bundle savedInstanceState) {
        super.onCreate(savedInstanceState);
        setContentView(R.layout.activity_demo);
        LinearLayout llMain = findViewById(R.id.ll_main);
        View view = LayoutInflater.from(this).inflate(R.layout.item_button, llMain);
	}
}
//TH2: Chúng ta chỉ sử dụng 3 tham với attachToRoot = true, khi đó item_button sẽ được chuyển thành View và được add vào llMain ngay khi chuyển đổi hoàn tất giống TH1.
public class DemoLayoutInflater extends AppCompatActivity {
    @Override
    protected void onCreate(@Nullable Bundle savedInstanceState) {
        super.onCreate(savedInstanceState);
        setContentView(R.layout.activity_demo);
        LinearLayout llMain = findViewById(R.id.ll_main);
        View view = LayoutInflater.from(this).inflate(R.layout.item_button, llMain, true);
	}
}
TH1 và TH2 có cùng kết quả như hình dưới đây:
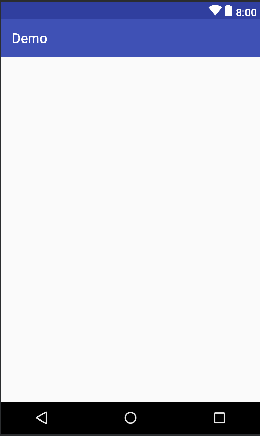
//TH3: Trường hợp này chúng ta cũng sử dụng 3 tham số nhưng với attachToRoot = false, khi này nó LayoutInflater chỉ chuyển đổi item_button thành View trong java mà không làm bất cứ thứ gì khác.
public class DemoLayoutInflater extends AppCompatActivity {
    @Override
    protected void onCreate(@Nullable Bundle savedInstanceState) {
        super.onCreate(savedInstanceState);
        setContentView(R.layout.activity_demo);
        LinearLayout llMain = findViewById(R.id.ll_main);
        View view = LayoutInflater.from(this).inflate(R.layout.item_button, llMain, false);
	}
}
Kết quả của TH3 là button không được add vào LinearLayout như hình bên dưới.
View này sẽ không được add vào llMain(ViewGroup) và chỉ khi chúng ta gọi phương thức addView của ViewGroup thì View sẽ được add vào ViewGroup, sau khi gọi phương thức addView thì kết quả sẽ giống TH1 và TH2:
public class DemoLayoutInflater extends AppCompatActivity {
    @Override
    protected void onCreate(@Nullable Bundle savedInstanceState) {
        super.onCreate(savedInstanceState);
        setContentView(R.layout.activity_demo);
        LinearLayout llMain = findViewById(R.id.ll_main);
        View view = LayoutInflater.from(this).inflate(R.layout.item_button, llMain, false);
        llMain.addView(view); //Different
	}
}
Lưu ý khi sử dụng LayoutInflater trong custom adapter
Qua 3 ví dụ trên chắc bạn cũng đã hiểu tham số attachToRoot dùng để làm gì rồi phải không? Tóm lại thì attachToRoot quyết định View mà được tạo ra bởi qua trình inflate của LayoutInflater có được add vào ViewGroup parent hay không.
Nhưng chúng ta thử phân tích trường hợp dùng LayoutInflater trong phương thức getView khi custom adapter xem nhé.
Ở trong phương thức getView chúng ta hay sử dụng như sau:
@Override
public View getView(int position, View convertView, ViewGroup parent) {
    View view = LayoutInflater.from(mContext).inflate(R.layout.item_message, parent, false);
    /*
    *chỗ nàyánh xạ view và cập nhật dữ liệu của view
    */
    return view;
}
Ở phương thức trên thì LayoutInflater sẽ đọc file item_message.xml và chuyển đổi nó thành 1 view và sẽ không attach ngay vào ViewGroup parent(ex:ListView, GridView...)
Nếu bạn sử dụng đoạn code trên và bên Activity bạn set adapter thì mọi chuyện đều ổn..ứng dụng bạn chạy bình thường và listview sẽ hiển thị các tin nhắn.
Nhưng bạn nhận thấy là listview muốn hiển thị các item message, vậy tại sao khi tạo ra view từ item_message.xml chúng ta không gán luôn nó vào listview bằng cách cho tham số attachToRoot=true ở trong phương thức getView luôn nhỉ...Thử code bên dưới nhé
    @Override
    public View getView(int position, View convertView, ViewGroup parent) {
        View view = LayoutInflater.from(mContext).inflate(R.layout.item_message, parent, true);
        /*
        *chỗ nàyánh xạ view và cập nhật dữ liệu của view
        */
        return view;
    }
Nếu bạn sử dụng code này thì ứng dụng của bạn sẽ bị dừng đột ngột với nguyên nhân:
01-17 01:57:21.961 14112-14112/com.dvt.abc E/AndroidRuntime: FATAL EXCEPTION: main
    Process: com.dvt.abc, PID: 14112
    android.view.InflateException: Binary XML file line #20: addView(View, LayoutParams) is not supported in AdapterView
    Caused by: java.lang.UnsupportedOperationException: addView(View, LayoutParams) is not supported in AdapterView
        at android.widget.AdapterView.addView(AdapterView.java:880)
        at android.view.LayoutInflater.inflate(LayoutInflater.java:534)
        at android.view.LayoutInflater.inflate(LayoutInflater.java:427)
        at com.dvt.abc.MessageAdapter.getView(MessageAdapter.java:38)
Tại sao lại như vậy... Khi bạn sử dụng đoạn code:
public class DemoLayoutInflater extends AppCompatActivity {
    @Override
    protected void onCreate(@Nullable Bundle savedInstanceState) {
        super.onCreate(savedInstanceState);
        setContentView(R.layout.activity_demo);
        LinearLayout llMain = findViewById(R.id.ll_main);
        View view = LayoutInflater.from(this).inflate(R.layout.item_button, llMain, true);
	}
}
Ở đây LayoutInflater sẽ đọc file item_button.xml thành View (Java code) và add nó làm con của ViewGroup llMain. Kết quả sẽ tương tự với xml layout file này:
<LinearLayout xmlns:android="http://schemas.android.com/apk/res/android"
              android:orientation="vertical"
              android:id="@+id/ll_main"
              android:layout_awidth="fill_parent"
              android:layout_height="fill_parent">
    <Button
        android:layout_awidth="match_parent"
        android:layout_height="wrap_content"
        android:text="Custom Button"
        android:id="@+id/custom_button">
    </Button>

</LinearLayout>
Hành động add view đối với các ViewGroup như LinearLayout hay RelativeLayout thì hoàn toàn bình thường, vì các viewgroup có thể chứa nhiều View con hoặc ViewGroup khác ở trong nó. nhưng một lớp con của AdapterView như ListView, GridView thì các item con của nó không thể thủ công bằng việc add trong xml hoặc trong code như dưới đây:
//xml layout file
<ListView
        android:id="@+id/lv_data"
        android:layout_awidth="match_parent"
        android:layout_height="wrap_content" >
        <TextView
            android:layout_awidth="match_parent"
            android:layout_height="wrap_content" />

</ListView>
//Activity
@Override
protected void onCreate(Bundle savedInstanceState) {
    super.onCreate(savedInstanceState);
    setContentView(R.layout.activity_main);
    ListView lvData = findViewById(R.id.lv_data);
    TextView tvContent = new TextView(this);
    lvData.addView(tvContent); //Don't do this
}
//Adapter
@Override
public View getView(int position, View convertView, ViewGroup parent) {
    //Don't set attachToRoot=true
    View view = LayoutInflater.from(mContext).inflate(R.layout.item_message, parent, true);
    /*
    *chỗ nàyánh xạ view và cập nhật dữ liệu của view
    */
    return view;
}
Nên nếu bạn gặp lỗi: addView(View, LayoutParams) is not supported in AdapterView thì hãy kiểm tra lại xem bạn có gọi add view thủ công vào AdapterView không nhé..
Đó là toàn bộ những gì mình muốn nói với các bạn về LayoutInflater. Hẹn gặp các bạn ở các bài tiếp nhé.
