Học jQuery CSS3 qua hiệu ứng Lighbox Gallery
Theo mình thì cách học CSS3 và jQuery tốt nhất là cứ thực hành và tự tay làm thật nhiều , từ những hiệu ứng đơn giản nhất. Nhằm minh chứng cho câu nói của mình, các bạn thử tự tay làm theo các bước trong hiệu ứng Lightbox Gallery mà mình giới thiệu cho các bạn sau đây. Trong bài viết này, các bạn ...
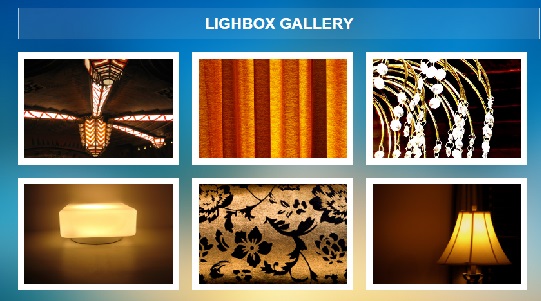
Theo mình thì cách học CSS3 và jQuery tốt nhất là cứ thực hành và tự tay làm thật nhiều , từ những hiệu ứng đơn giản nhất. Nhằm minh chứng cho câu nói của mình, các bạn thử tự tay làm theo các bước trong hiệu ứng Lightbox Gallery mà mình giới thiệu cho các bạn sau đây. Trong bài viết này, các bạn sẽ học được cách tạo hiệu ứng lightbox, rồi chuyển ảnh qua lại, cuối cùng là hiểu và sử dụng tốt những hàm thư viện trong jQuery.
Xem Demo | Download
HTML
Để tạo lightbox, trước hết chúng ta cần có khung chuẩn cho hình ảnh như sau :
   <img src="images/lb1_small.png" data-large="images/lb1.png"/>
            <div class="image_title">
                <h5 class="title">Celling Art</h5>
            </div>
Trong đoạn html bên trên, chúng ta sử dụng thuộc tính data-large để chứa đường dẫn ảnh lớn, ảnh này chúng ta sẽ lấy ra sử dụng bằng jQuery. Trong bài viết này , mình sẽ minh họa với 6 ảnh như sau :
<div id="lightbox">
    <h1>Lighbox Gallery</h1>
    <ul>
        <li>
            <img src="images/lb1_small.png" data-large="images/lb1.png"/>
            <div class="image_title">
                <h5 class="title">Celling Art</h5>
            </div>
        </li>

        <li>
            <img src="images/lb2_small.png" data-large="images/lb2.png"/>
            <div class="image_title">
                <h5 class="title">Lit Curtain</h5>
            </div>
        </li>

        <li>
            <img src="images/lb3_small.png" data-large="images/lb3.png"/>
            <div class="image_title">
                <h5 class="title">Ornamental Lights</h5>
            </div>
        </li>

        <li>
            <img src="images/lb4_small.png" data-large="images/lb4.png"/>
            <div class="image_title">
                <h5 class="title">Cube Light</h5>
            </div>
        </li>

        <li>
            <img src="images/lb5_small.png" data-large="images/lb5.png"/>
            <div class="image_title">
                <h5 class="title">Damask 14</h5>
            </div>
        </li>

        <li>
            <img src="images/lb6_small.png" data-large="images/lb6.png"/>
            <div class="image_title">
                <h5 class="title">Dark Lamp</h5>
            </div>
        </li>
    </ul>
</div>
CSS
Việc tiếp theo mà chúng ta cần phải làm là định dạng css cho các thẻ html. Đầu tiên, là định dạng cơ bản như sau :
*{margin:0;padding:0;}
body{
    /* Fancy Full Page BG*/
    background:url(sunsky_m.png) center center fixed;
    background-size:cover;
    font-family:arial, verdana, tahoma;
}

#lightbox{
    margin:10px auto;
    awidth:810px;
}

#lightbox h1{
    text-transform: uppercase;
    text-align:center;
    padding:10px 0;
    margin:20px 0;
    color:white;
    font-size:24px;
    background:rgba(255,255,255,0.1);
    border-left:2px solid rgba(255,255,255,0.65);
    border-right:2px solid rgba(255,255,255,0.65);
}
Các bạn sắp xếp hình ảnh và tạo hiệu ứng khi rê chuột vào ảnh với đoạn css sau :
#lightbox ul{ overflow:hidden; }
/* Images styles */

#lightbox ul li{
    float:left;
    padding:10px;
    background:#fff;
    margin:0 20px 20px 0;
    list-style-type:none;
    position:relative;
    cursor:pointer;
}

#lightbox ul li img{
    display:block;
}
/* Image titles */
#lightbox .image_title{
    awidth:250px;
    height:175px;
    background:rgba(0,0,0,0.5);
    position:absolute;
    top:0; left:0;
    display:table;
    /* Hover effect - default state */
    opacity:0;
    transition:all 0.5s;
}

#lightbox .title{
    color:#fff;
    background:rgba(0,0,0,0.5);
    text-transform:uppercase;
    font-size:14px;
    text-align:center;
    /* Vertical center align */
    display:table-cell;
    vertical-align:middle;
    /* Hover effect - defaulte state */
    transform: scale(0.2);
    transition:all 0.25s;
}

/* Zoom icon over each time using iconfont and pseudo elements */
#lightbox .title::before{
    content:'L';
    font-family:websymbols;
    font-size:24px;
    color:#fff;
    opacity:0.5;
    display:block;
    line-height:36px;
}

/* Hover states */

#lightbox li:hover{
    box-shadow:inset 0 0 10px 1px rgba(0,0,0,0.75);
}

#lightbox li:hover .image_title{
    opacity:1;
}

#lightbox li:hover .title{
    transform:scale(1);
}

/*Lets change the iconfont to websymbols since entypo has some issues with rendering on windows*/
@font-face {
	font-family: websymbols;
	src: url("fonts/websymbols.eot");
	src: url('fonts/websymbols.eot?#iefix') format('embedded-opentype'),
     url('fonts/websymbols.woff') format('woff'),
     url('fonts/websymbols.ttf') format('truetype'),
	 url('fonts/websymbols.svg#WebSymbolsRegular') format('svg');
}
Tiếp theo là dành cho ảnh lớn khi được click và bộ điều hướng.
/*Lightbox element style*/
.lb_backdrop {
	background: rgba(0, 0, 0, 0.9);
	position: fixed;
	top: 0; left: 0; right: 0; bottom: 0;
}
/*The canvas contains the larger image*/
.lb_canvas {
	background: white;
	awidth: 50px; height: 50px;
	position: fixed;
	top: 0; left: 0; /*Will be centered later by Jquery*/
	box-shadow: 0 0 20px 5px black;
	padding: 10px;
}
/*A separate class for loading GIF, for easy Jquery handling*/
.lb_canvas.loading {
	background: white url("loading.gif") center center no-repeat;
}
/*Lightbox Controls*/
.lb_controls {
	awidth: 400px;
	background: rgba(0, 0, 0, 0.75);
	position: fixed;
	bottom: 10px;
	color: white;
	/*To horizontally center it*/
	left: 0; right: 0; margin: 0 auto;
}
.lb_controls span {
	line-height: 30px;
	height: 30px;
}
.lb_controls span.inactive {
	opacity: 0.25;
}
.lb_previous, .lb_next {
	position: absolute;
	top: 0;
	padding: 5px 12px;
	font-family: websymbols;
	font-size: 14px;
	background: black;
	cursor: pointer;
}
.lb_previous {
	left: 0;
	border-right: 1px solid rgba(255, 255, 255, 0.1);
}
.lb_next {
	right: 0;
	border-left: 1px solid rgba(255, 255, 255, 0.1);
}
.lb_title {
	text-align: center;
	display: block;
	font-size: 14px;
	text-transform: uppercase;
	padding: 5px 0;
	font-weight: bold;
}
jQuery
Và để hiệu ứng có thể chạy được, thì các bạn cần đoạn script sau. Mỗi dùng code mình có để lại ghi chú cẩn thận, các bạn đọc là sẽ hiểu ý nghĩa của nó và hiểu cách dùng các hàm thư viện trong jQuery.
/*Jquery time*/
$(document).ready(function(){
	var item, img, title, large_img;
	var CW, CH, CL, CT, hpadding, vpadding, imgtag;
	//Flag for preventing multiple image displays
	var lb_loading = false;
	var doc = $(document);

	$("#lightbox li").click(function(){
		if(lb_loading) return false;
		lb_loading= true;

		item = $(this);
		img = item.find("img");
		title = item.find(".title").html();

		//Remove active class from previously clicked LI
		$("#lightbox li.active").removeClass("active");
		//Mark the clicked LI as active for later use
		item.addClass("active");

		//The large image
		large_img = new Image();
		//Use data-large or the src itself if large image url is not available
		large_img.src = img.attr("data-large") ? img.attr("data-large") : img.attr("src");

		//Adding additional HTML - only if it hasn't been added before
		if($(".lb_backdrop").length < 1)
		{
			var lb_backdrop = '<div class="lb_backdrop"></div>';
			var lb_canvas = '<div class="lb_canvas"></div>';
			var lb_previous = '<span class="lb_previous"><</span>';
			var lb_title = '<span class="lb_title"></span>';
			var lb_next = '<span class="lb_next">></span>';
			var lb_controls = '<div class="lb_controls">'+lb_previous+lb_title+lb_next+'</div>';
			var total_html = lb_backdrop+lb_canvas+lb_controls;

			$(total_html).appendTo("body");
		}
		//Fade in lightbox elements if they are hidden due to a previous exit
		if($(".lb_backdrop:visible").length == 0)
		{
			$(".lb_backdrop, .lb_canvas, .lb_controls").fadeIn("slow");
		}

		//Display preloader till the large image loads and make the previous image translucent so that the loader in the BG is visible
		if(!large_img.complete)
			$(".lb_canvas").addClass("loading").children().css("opacity", "0.5")

		//Disabling left/right controls on first/last items
		if(item.prev().length == 0)
			$(".lb_previous").addClass("inactive");
		else
			$(".lb_previous").removeClass("inactive");
		if(item.next().length == 0)
			$(".lb_next").addClass("inactive");
		else
			$(".lb_next").removeClass("inactive");

		//Centering .lb_canvas
		CW = $(".lb_canvas").outerWidth();
		CH = $(".lb_canvas").outerHeight();
		//top and left coordinates
		CL = ($(window).awidth() - CW)/2;
		CT = ($(window).height() - CH)/2;
		$(".lb_canvas").css({top: CT, left: CL});

		//Inserting the large image into .lb_canvas once it's loaded
		$(large_img).load(function(){
			//Recentering .lb_canvas with new dimensions
			CW = large_img.awidth;
			CH = large_img.height;
			//.lb_canvas padding to be added to image awidth/height to get the total dimensions
			hpadding = parseInt($(".lb_canvas").css("paddingLeft")) + parseInt($(".lb_canvas").css("paddingRight"));
			vpadding = parseInt($(".lb_canvas").css("paddingTop")) + parseInt($(".lb_canvas").css("paddingBottom"));
			CL = ($(window).awidth() - CW - hpadding)/2;
			CT = ($(window).height() - CH - vpadding)/2;

			//Animating .lb_canvas to new dimentions and position
			$(".lb_canvas").html("").animate({awidth: CW, height: CH, top: CT, left: CL}, 500, function(){
				//Inserting the image but keeping it hidden
				imgtag = '<img src="'+large_img.src+'" style="opacity: 0;" />';
				$(".lb_canvas").html(imgtag);
				$(".lb_canvas img").fadeTo("slow", 1);
				//Displaying the image title
				$(".lb_title").html(title);

				lb_loading= false;
				$(".lb_canvas").removeClass("loading");
			})
		})
	})

	//Click based navigation
	doc.on("click", ".lb_previous", function(){ navigate(-1) });
	doc.on("click", ".lb_next", function(){ navigate(1) });
	doc.on("click", ".lb_backdrop", function(){ navigate(0) });

	//Keyboard based navigation
	doc.keyup(function(e){
		//Keyboard navigation should work only if lightbox is active which means backdrop is visible.
		if($(".lb_backdrop:visible").length == 1)
		{
			//Left
			if(e.keyCode == "37") navigate(-1);
			//Right
			else if(e.keyCode == "39") navigate(1);
			//Esc
			else if(e.keyCode == "27") navigate(0);
		}
	});

	//Navigation function
	function navigate(direction)
	{
		if(direction == -1) // left
			$("#lightbox li.active").prev().trigger("click");
		else if(direction == 1) //right
			$("#lightbox li.active").next().trigger("click");
		else if(direction == 0) //exit
		{
			$("#lightbox li.active").removeClass("active");
			$(".lb_canvas").removeClass("loading");
			//Fade out the lightbox elements
			$(".lb_backdrop, .lb_canvas, .lb_controls").fadeOut("slow", function(){
				//empty canvas and title
				$(".lb_canvas, .lb_title").html("");
			})
			lb_loading= false;
		}
	}
})
Hy vọng các bạn sẽ học được cách tạo các hiệu ứng khác từ bài viết này, nếu các bạn có thể nâng cao với những câu lệnh hay hiệu ứng đẹp hơn thì chia sẻ cho mình và mọi người khác nhé.
Chúc các bạn thành công !
Chuyên Mục: Css, Javascript
Bài viết được đăng bởi webmaster
