Tạo Multi Step Form với Progress Bar sử dụng jQuery và CSS3
Trong thiết kế cũng như lập trình, Form thường được mọi người sử dụng nhiều nhất vì những tính năng mà nó mang lại cho website. Hôm nay mình sẽ chia sẻ với các bạn một cách sắp xếp Form gọn gàng với hiệu ứng đẹp mắt nhờ 2 công cụ hot nhất hiện nay là jQuery và CSS3 . Trước khi bắt đầu các bạn ...
Trong thiết kế cũng như lập trình, Form thường được mọi người sử dụng nhiều nhất vì những tính năng mà nó mang lại cho website. Hôm nay mình sẽ chia sẻ với các bạn một cách sắp xếp Form gọn gàng với hiệu ứng đẹp mắt nhờ 2 công cụ hot nhất hiện nay là jQuery và CSS3.
Trước khi bắt đầu các bạn có thể xem demo bài viết hoặc download trực tiếp về máy của mình để tham khảo chi tiết hơn nhé.
Xem Demo | Download
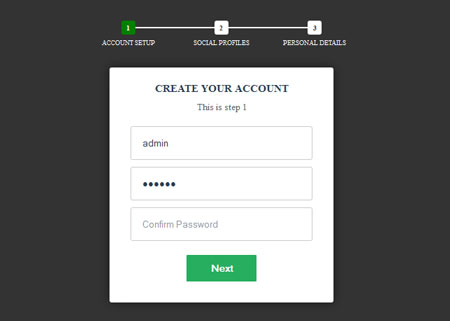
Bước 1: Đầu tiên chúng ta sẽ cần một bộ khung html với Form mà chúng ta cần làm:
<form id="msform">

<ul id="progressbar">
	<li class="active">Account Setup</li>
    <li>Social Profiles</li>
    <li>Personal Details</li>
</ul>


<fieldset>
<h2 class="fs-title">Create Your Account</h2>
<h3 class="fs-subtitle">This is step 1</h3>
<input type="text" name="email" placeholder="Email"  />
<input type="password" name="pass" placeholder="Password"  />
<input type="password" name="cpass" placeholder="Confirm Password"  />
<input type="button" name="next" class="next action-button" value="Next" />
</fieldset>

<fieldset>
<h2 class="fs-title">Social Profiles</h2>
<h3 class="fs-subtitle">This is step 2</h3>
<input type="text" name="twitter" placeholder="Twitter"  />
<input type="text" name="facebook" placeholder="Facebook"  />
<input type="text" name="gplus" placeholder="Google Plus"  />
<input type="button" name="previous" class="previous action-button" value="Previous" />
<input type="button" name="next" class="next action-button" value="Next" />
</fieldset>

<fieldset>
<h2 class="fs-title">Personal Details</h2>
<h3 class="fs-subtitle">This is step 3</h3>
<input type="text" name="fname" placeholder="First Name"  />
<input type="text" name="lname" placeholder="Last Name"  />
<input type="text" name="phone" placeholder="Phone"  />
<textarea name="address" placeholder="address"></textarea>
<input type="button" name="previous" class="previous action-button" value="Previous" />
<input type="submit" name="next" class="submit action-button" value="Submit" />
</fieldset>

</form>
Trong đoạn html trên chúng ta có 1 form được chia làm 3 đoạn, tương ứng với từng thẻ <fieldset> và một thanh điều hướng (Progress bar)
Bước 2 : Kế tiếp các bạn tạo một file css để định dạng Form, copy đoạn css bên dưới và dán vào :
@charset "utf-8";
/* CSS Document */

*{ margin:0; padding:0;}

body{
	background-color:#333;
	height:100%;
}

/* form style */
#msform{
	awidth:400px;
	margin:50px auto;
	text-align:center;
	position:relative;
}

#msform fieldset{
	background:white;
	border:0 none;
	border-radius:3px;
	box-shadow:0 0 15px 1px rgba(0,0,0,0.4);
	padding:20px 30px;
	box-sizing:border-box;
	-moz-box-sizing:border-box; /* Firefox */
	awidth:80%;
	margin:0 10%;
	/*stacking fieldsets above each other*/
	position: absolute;
}

/* headings */
.fs-title{
	font-size:15px;
	text-transform:uppercase;
	color: #2C3E50;
	margin-bottom:10px;
}

.fs-subtitle{
	font-weight:normal;
	font-size:13px;
	color:#666;
	margin-bottom:20px;
}

/* progress bar */
#progressbar{
	margin-bottom:30px;
	overflow:hidden;
	/* CSS counters to number the steps */
	counter-reset:sothutu;
}

#progressbar li{
	list-style-type:none;
	color:white;
	text-transform:uppercase;
	font-size:9px;
	awidth:33.33%;
	float:left;
	position:relative;
}

#progressbar li:before{
	content:counter(sothutu);
	counter-increment:sothutu;
	awidth:20px;
	line-height:20px;
	font-size:10px;
	background:#fff;
	color:#333;
	font-weight:bold;
	border-radius:3px;
	margin:0 auto 5px auto;
	display:block;
}

/* progressbar connectors */
#progressbar li:after{
	content:';
	awidth:100%;
	height:2px;
	background:#fff;
	position:absolute;
	left:-50%;
	top:9px;
	z-index:-1; /* put it behind the numbers */
}

#progressbar li:first-child:after{
	/*connector not needed before the first step*/
	content:none;
}

/*marking active/completed steps green*/
#progressbar li.active:before,#progressbar li.active:after{
	background:green;
	color:#fff;
}

/* Hide all except first fieldset */
#msform fieldset:not(:first-of-type){
	display:none;
}

/* inputs */
#msform input, #msform textarea{
	padding:15px;
	border:1px solid #ccc;
	border-radius:3px;
	margin-bottom:10px;
	awidth:100%;
	box-sizing:border-box;
	-moz-box-sizing:border-box; /* for Firefox */
	color: #2C3E50;
}

/* buttons */
#msform .action-button{
	awidth:100px;
	background: #27AE60;
	font-weight: bold;
	color: white;
	border:0 none;
	border-radius:1px;
	cursor:pointer;
	padding:10px 5px;
	margin:10px 5px;
}

#msform .action-button:hover,#msform .action-button:focus{
	box-shadow:0 0 0 2px white,0 0 0 3px #27AE60;
}
Việc định dạng đã xong, bây giờ chúng ta sẽ tiếp tục làm hiệu ứng chuyển động (animate) nữa là xong.
Bước 3 : Tạo một file mới đặt tên là script.js , sau đó copy đoạn code bên dưới cho vào nó:
// JavaScript Document
var current_fs,next_fs,previous_fs; // fields set
var left,opacity,scale; //fieldset properties which we will animate
var animating; //flag to prevent quick multi-click glitches

$('.next').click(function(){
	if(animating) return false
	animating = true;
	current_fs = $(this).parent();
	next_fs = $(this).parent().next();
	//activate next step on progressbar using the index of next_fs
	$("#progressbar li").eq($("#msform fieldset").index(next_fs)).addClass("active");
	next_fs.show(); //show the next fieldset
	// hide the current field set with style
	current_fs.animate({opacity:0},{
		step:function(now,fx){
			//1. scale current_fs down to 80%, now = 0 (same as opacity = 0)
			scale = 1 - (1- now)*0.2;
			//2. bring next_fs from the right(50%)
			left = (now* 50)+ "%";
			//3. increase opacity of next_fs to 1 as it moves in
			opacity = 1 - now;
			current_fs.css({'transform':'scale('+scale+')'});
			next_fs.css({'left':left,'opacity':opacity});
		},
		duration:800,
		complete:function(){
			current_fs.hide();
			animating = false;
		},
		//this comes from the custom easing plugin
		easing: 'easeInOutBack'
	});

});

$('.previous').click(function(){

	if(animating) return false
	animating = true;

	current_fs = $(this).parent();
	previous_fs = $(this).parent().prev();
	$('#progressbar li').eq($("#msform fieldset").index(current_fs)).removeClass("active");
	previous_fs.show();
	//hide the current fieldset with style
	current_fs.animate({opacity: 0}, {
		step: function(now, mx) {
			//as the opacity of current_fs reduces to 0 - stored in "now"
			//1. scale previous_fs from 80% to 100%
			scale = 0.8 + (1 - now) * 0.2;
			//2. take current_fs to the right(50%) - from 0%
			left = ((1-now) * 50)+"%";
			//3. increase opacity of previous_fs to 1 as it moves in
			opacity = 1 - now;
			current_fs.css({'left': left});
			previous_fs.css({'transform': 'scale('+scale+')', 'opacity': opacity});
		},
		duration: 800,
		complete: function(){
			current_fs.hide();
			animating = false;
		},
		//this comes from the custom easing plugin
		easing: 'easeInOutBack'
	});
});

$('.submit').click(function(){
	return false;
});
Mọi việc coi như đã xong, tuy nhiên các bạn cần phải chèn thêm đoạn khai báo sau vào bên dưới trước thẻ </body>
<script src="https://code.jquery.com/jquery-1.10.2.min.js" type="text/javascript"></script>

<script src="http://www.thuthuatweb.net/demo/Multi-step-form/jquery.easing.min.js" type="text/javascript"></script>
<script type="text/javascript" src="script.js"></script>
Mình hy vọng với hiệu ứng đơn giản này sẽ giúp các bạn có thêm kinh nghiệm về jQuery và CSS3, nếu bạn nào trong quá trình làm có thắc mắc hay vướng mắc điều gì thì cứ để lại lời nhắn dưới dạng comments nhé, mình sẽ giúp các bạn hoàn thành bài viết này.
Chúc các bạn thành công !
Chuyên Mục: Css, Javascript
Bài viết được đăng bởi webmaster
-
anonymous
-
papyrut
-
anonymous
-
-
-
Mr.Hai
-
papyrut
-
-
The Gooner
