Android Collapsing ToolbarLayout
Trong bài này mình xin giới thiệu với các bạn về Collapsing ToolbarLayout trong Android. Collapsing ToolbarLayout là thuộc tính bắt đầu được giới thiệu từ phiên bản Android Lollipop. Collapsing ToolbarLayout là gì? đó là thuộc tính mà khi người dùng cuộn lên hoặc cuộn xuống màn hình, nó sẽ ...
Trong bài này mình xin giới thiệu với các bạn về Collapsing ToolbarLayout trong Android.
Collapsing ToolbarLayout là thuộc tính bắt đầu được giới thiệu từ phiên bản Android Lollipop.
Collapsing ToolbarLayout là gì? đó là thuộc tính mà khi người dùng cuộn lên hoặc cuộn xuống màn
hình, nó sẽ cung cấp và điều khiển cho ứng dụng chúng ta hiệu ứng động.
Như các bạn đã biết thì hiện nay có rất nhiều ứng dụng android được thiết kế và sử dụng
Collapsing ToolbarLayout, điển hình như Google play, và hiện tại mình cũng đang làm project với
giao diện sử dụng Collapsing ToolbarLayout. Để sử dụng thuộc tính này chúng ta cần thêm thư viện
trong file build.gradle như sau:
    compile 'com.android.support:appcompat-v7:23.0.1'
    compile 'com.android.support:design:23.0.1'
Trong file activity_main.xnl như sau:
<?xml version="1.0" encoding="utf-8"?>
<android.support.design.widget.CoordinatorLayout
    android:id="@+id/main_content"
    xmlns:android="http://schemas.android.com/apk/res/android"
    xmlns:app="http://schemas.android.com/apk/res-auto"
    android:layout_awidth="match_parent"
    android:layout_height="match_parent">
</android.support.design.widget.CoordinatorLayout>
ở đây chúng ta sử dụng CoordinatorLayout là main layout chứa các View hoặc ViewGroup.
CoordinatorLayout là mở rộng của FrameLayout, chúng ta xét hành vi cụ thể cho các View con chứa
bên trong CoordinatorLayout và chúng có thể tương tác với nhau theo các hành vi khác nhau.
CoordinatorLayout cho phép xét vị trí các View theo điểm neo trong Layout. Ví dụ khi chúng ta sử
dụng FloatingActionButton, chúng ta xét vị trí cho nó tùy vào điểm neo chúng ta lựa chọn app:layout_anchor="@id/app_bar_layout" app:layout_anchorGravity="bottom|right|end"
Tiếp theo chúng ta thêm AppBarLayout:
<?xml version="1.0" encoding="utf-8"?>
<android.support.design.widget.CoordinatorLayout
    android:id="@+id/main_content"
    xmlns:android="http://schemas.android.com/apk/res/android"
    xmlns:app="http://schemas.android.com/apk/res-auto"
    android:layout_awidth="match_parent"
    android:layout_height="match_parent">

    <android.support.design.widget.AppBarLayout
        android:id="@+id/appBar"
        android:layout_awidth="match_parent"
        android:layout_height="@dimen/app_bar_layout_height">
    </android.support.design.widget.AppBarLayout>
</android.support.design.widget.CoordinatorLayout>
**AppBarLayout: **
- Là LinearLayout có hướng theo chiều thẳng đứng và có các thuộc tính được material design hộ
trợ. Như cử chỉ cuộn, để làm điều này chúng ta sét thuộc tính app:layout_scrollFlags.
AppBarLayout là phần tử con được sử dụng trực tiếp bên trong CoordinatorLayout, nếu sử dụng
AppBarLayout bên trong ViewGroup khác nó sẽ không làm việc.
Tiếp theo chúng ta thêm CollapsingToolbarLayout:
<?xml version="1.0" encoding="utf-8"?>
<android.support.design.widget.CoordinatorLayout
    android:id="@+id/main_content"
    xmlns:android="http://schemas.android.com/apk/res/android"
    xmlns:app="http://schemas.android.com/apk/res-auto"
    android:layout_awidth="match_parent"
    android:layout_height="match_parent">

    <android.support.design.widget.AppBarLayout
        android:id="@+id/appBar"
        android:layout_awidth="match_parent"
        android:layout_height="@dimen/app_bar_layout_height">

        <android.support.design.widget.CollapsingToolbarLayout
            android:id="@+id/collapsing_toolbar"
            android:layout_awidth="match_parent"
            android:layout_height="@dimen/app_bar_layout_height"
            app:layout_scrollFlags="scroll|exitUntilCollapsed">

            <android.support.v7.widget.Toolbar
                android:id="@+id/toolbar"
                popupTheme="@style/ThemeOverlay.AppCompat.Light"
                android:layout_awidth="match_parent"
                android:layout_height="@dimen/tool_bar_height"
                android:layout_marginTop="@dimen/margin_for_status_bar"
                android:background="@android:color/transparent"
                android:elevation="@dimen/elevation_dimen"
                android:theme="@style/AppTheme.Base"
                app:layout_collapseMode="pin">
            </android.support.v7.widget.Toolbar>
        </android.support.design.widget.CollapsingToolbarLayout>
    </android.support.design.widget.AppBarLayout>
</android.support.design.widget.CoordinatorLayout>
CollapsingToolbarLayout:
- Là lớp mở rộng của Toolbar, nó thường chứa ảnh trên header của ứng dụg và khi chúng ta cuộn lên
hoặc cuộn xuống thì các ảnh này sẽ bị collapse. Chúng ta sét thuộc tính cờ scrolls cho Toolbar
app:layout_scrollFlags. Ở đây chúng ta có một số cờ cơ bản như sau:
-
Scroll: cờ này nên được thiết lập cho tất cả các View mà muốn di chuyển ra khỏi màn hình
-
enterAlways: cờ này đảm bảo rằng bất kỳ View khi cuộn xuống sẽ được nhìn thấy.
-
enterAlwaysCollapsed: Khi bạn đã xét minheight và bạn sử dụng lá cờ này, View của bạn sẽ bị
Collapse và xuất hiện khi đạt chiều cao tối thiểu của nó.
- exitUntilCollapsed: Cờ này sẽ làm cho View bị collapse khi nó đạt đến độ cao tối thiểu của nó.
Tiếp theo chúng ta sét ảnh làm ảnh header của ứng dụng như sau:
<?xml version="1.0" encoding="utf-8"?>
<android.support.design.widget.CoordinatorLayout
    android:id="@+id/main_content"
    xmlns:android="http://schemas.android.com/apk/res/android"
    xmlns:app="http://schemas.android.com/apk/res-auto"
    android:layout_awidth="match_parent"
    android:layout_height="match_parent">

    <android.support.design.widget.AppBarLayout
        android:id="@+id/appBar"
        android:layout_awidth="match_parent"
        android:layout_height="@dimen/app_bar_layout_height">

        <android.support.design.widget.CollapsingToolbarLayout
            android:id="@+id/collapsing_toolbar"
            android:layout_awidth="match_parent"
            android:layout_height="@dimen/app_bar_layout_height"
            app:layout_scrollFlags="scroll|exitUntilCollapsed">

            <ImageView
                android:id="@+id/image_banner_app_detail"
                android:layout_awidth="match_parent"
                android:layout_height="match_parent"
                android:adjustViewBounds="true"
                android:scaleType="centerCrop"
                app:layout_collapseMode="parallax"/>

            <android.support.v7.widget.Toolbar
                android:id="@+id/toolbar"
                popupTheme="@style/ThemeOverlay.AppCompat.Light"
                android:layout_awidth="match_parent"
                android:layout_height="@dimen/tool_bar_height"
                android:layout_marginTop="@dimen/margin_for_status_bar"
                android:background="@android:color/transparent"
                android:elevation="@dimen/elevation_dimen"
                android:theme="@style/AppTheme.Base"
                app:layout_collapseMode="pin">
            </android.support.v7.widget.Toolbar>
        </android.support.design.widget.CollapsingToolbarLayout>
    </android.support.design.widget.AppBarLayout>
</android.support.design.widget.CoordinatorLayout>
Trong ImageView chúng ta xét thuộc tính collapseMode cho ImageView, ở đây có 2 thuộc tính
collapseMode:
-
Parallax: Thuộc tính này sẽ ẩn và xuất hiện hình ảnh khi chúng ta cuộn AppBarLayout.
-
Pin: Thuộc tính này sẽ sẽ ẩn hình ảnh đến khi nó đạt đến vị trí cuối cùng của
CollapsingToolbarLayout.
Tiếp theo mình sẽ thêm vào NestedScrollView và CardView và FloatingActionButton :
<?xml version="1.0" encoding="utf-8"?>
<android.support.design.widget.CoordinatorLayout
    xmlns:android="http://schemas.android.com/apk/res/android"
    xmlns:app="http://schemas.android.com/apk/res-auto"
    android:layout_awidth="match_parent"
    android:layout_height="match_parent"
    android:fitsSystemWindows="true">

    <android.support.design.widget.AppBarLayout
        android:id="@+id/app_bar_layout"
        android:layout_awidth="match_parent"
        android:layout_height="wrap_content"
        android:fitsSystemWindows="true"
        android:theme="@style/ThemeOverlay.AppCompat.Dark.ActionBar">

        <android.support.design.widget.CollapsingToolbarLayout
            android:id="@+id/collapsing_toolbar"
            android:layout_awidth="match_parent"
            android:layout_height="match_parent"
            android:fitsSystemWindows="true"
            app:contentScrim="@color/primary_dark"
            app:expandedTitleMarginEnd="64dp"
            app:expandedTitleMarginStart="48dp"
            app:layout_scrollFlags="scroll|exitUntilCollapsed">

            <ImageView
                android:id="@+id/image"
                android:layout_awidth="match_parent"
                android:layout_height="wrap_content"
                android:fitsSystemWindows="true"
                android:scaleType="centerCrop"
                android:src="@drawable/img_header"
                app:layout_collapseMode="parallax"/>

            <android.support.v7.widget.Toolbar
                android:id="@+id/toolbar"
                android:layout_awidth="match_parent"
                android:layout_height="?attr/actionBarSize"
                app:layout_collapseMode="pin"
                app:popupTheme="@style/ThemeOverlay.AppCompat.Light"/>
        </android.support.design.widget.CollapsingToolbarLayout>
    </android.support.design.widget.AppBarLayout>

    <android.support.v4.widget.NestedScrollView
        android:id="@+id/scroll"
        android:layout_awidth="match_parent"
        android:layout_height="match_parent"
        android:clipToPadding="false"
        app:layout_behavior="@string/appbar_scrolling_view_behavior">

        <android.support.v7.widget.CardView
            android:layout_awidth="match_parent"
            android:layout_height="wrap_content"
            app:cardElevation="6dp"
            app:cardUseCompatPadding="true">

            <LinearLayout
                android:layout_awidth="match_parent"
                android:layout_height="wrap_content"
                android:orientation="vertical">

                <TextView
                    android:id="@+id/title"
                    android:layout_awidth="match_parent"
                    android:layout_height="wrap_content"
                    android:layout_margin="20dp"
                    android:gravity="center_horizontal"
                    android:text="@string/title"
                    android:textAppearance="@style/TextAppearance.AppCompat.Body1"/>

                <TextView
                    android:id="@+id/description"
                    android:layout_awidth="match_parent"
                    android:layout_height="wrap_content"
                    android:layout_margin="30dp"
                    android:text="@string/description"
                    android:textAppearance="@style/TextAppearance.AppCompat.Body1"/>
            </LinearLayout>
        </android.support.v7.widget.CardView>
    </android.support.v4.widget.NestedScrollView>

    <android.support.design.widget.FloatingActionButton
        android:id="@+id/fab"
        style="@style/fab"
        app:layout_anchor="@id/app_bar_layout"
        app:layout_anchorGravity="bottom|right|end"
        app:theme="@style/ThemeOverlay.AppCompat.Light"/>
</android.support.design.widget.CoordinatorLayout>
- NestedScrollView là giống như scrollview, nhưng nó hỗ trợ hoạt động cho cả ViewGroup và View
lồng nhau. Chúng ta cũng có thể sử dụng RecyclerView bên trong NestedScrollView tùy thuộc vào
thiết kế của từng Layout của ứng dụng.
- FloatingActionButton: Là button động, nó được hiển thị trên màn hình tùy vào vị trí mà chúng ta
sắp xếp. Ở đây mình sẽ hiển thị ở bên dưới AppBarLayout.
- CardView: Giống như FrameLayout với hình nênf được bo tròn góc và đổ bóng.
Trong MainActivity.java chúng ta làm như sau:
public class MainActivity extends AppCompatActivity {
    CollapsingToolbarLayout collapsingToolbarLayout;
    ImageView image;

    @Override
    protected void onCreate(Bundle savedInstanceState) {
        super.onCreate(savedInstanceState);
        setContentView(R.layout.activity_main);
        image = (ImageView) findViewById(R.id.image);
        setSupportActionBar((Toolbar) findViewById(R.id.toolbar));
        collapsingToolbarLayout = (CollapsingToolbarLayout) findViewById(R.id.collapsing_toolbar);
        collapsingToolbarLayout.setTitle("Collapsing");
        collapsingToolbarLayout.setExpandedTitleColor(getResources().getColor(R.color.accent));
    }
}
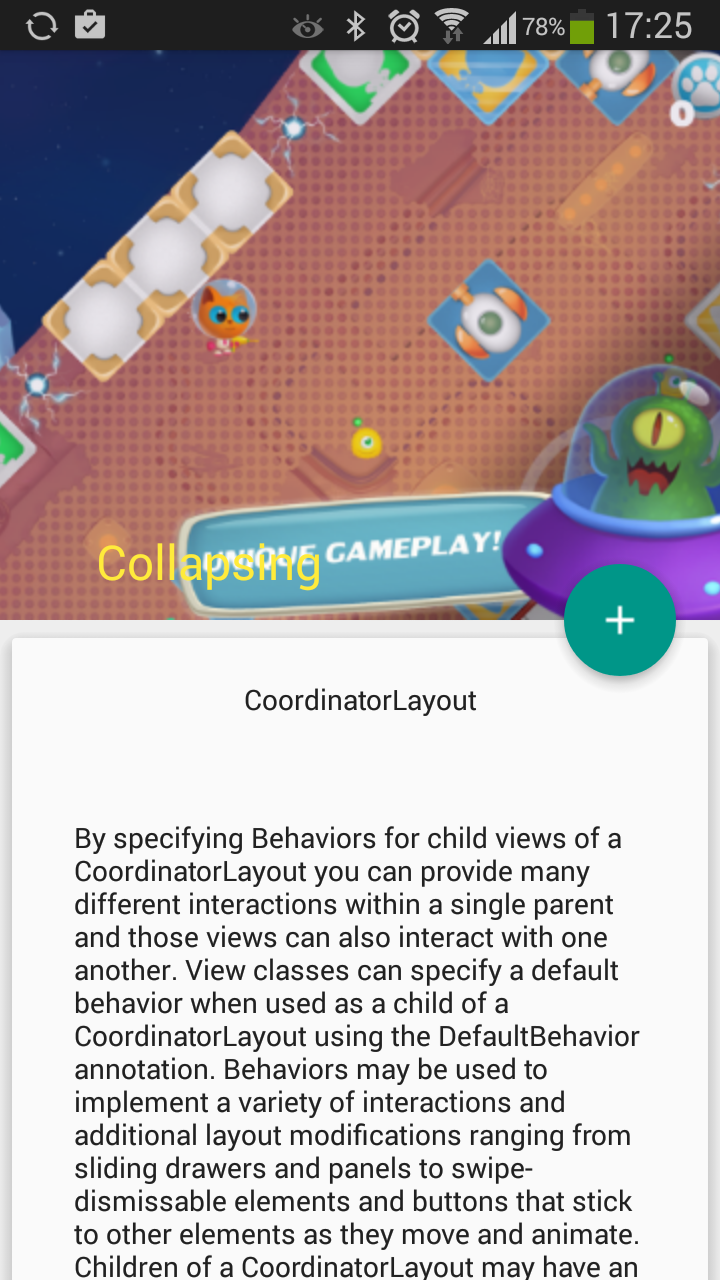
và sau khi chạy ứng dụng chúng ta có kết quả như sau:

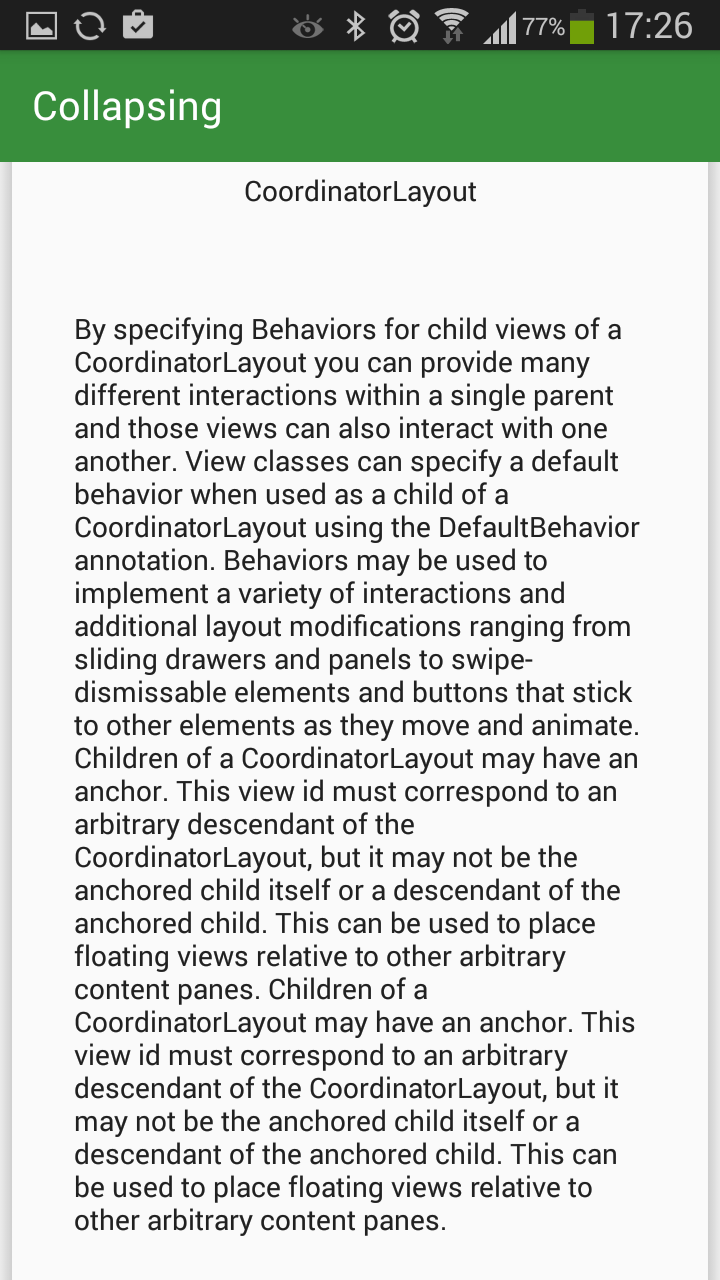
Sau khi cuộn lên sẽ nhìn như sau:

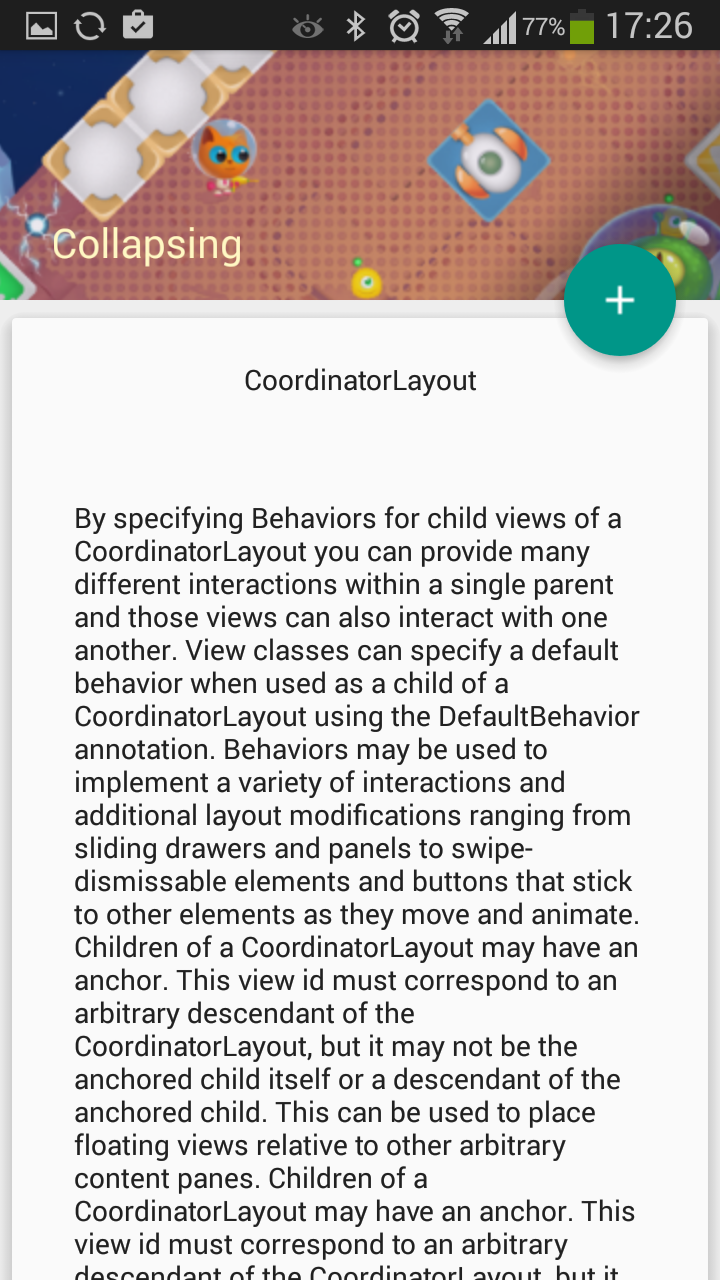
Và khi cuộn xuống thì ImageView sẽ xuất hiện trở lại như sau:

trên đây là bài giới thiệu về các thuộc tính cơ bản mà Android Material design hỗ trợ, và chúng
ta có thể sử dụng các thuộc tính này để phát triển ứng dụng theo Material design.
