Authenticate with Azure AD and access office 365 API in rails apps
Trong bài viết này, mình xin giới thiệu về Microsoft Office 365, Azure Active Directory và hướng dẫn tạo một ứng dụng demo nhỏ cho phép người dùng thực hiện việc authenticate để truy cập tới tài nguyên người dùng cũng như tới các API của Office365 theo chuẩn oauth2 trong rails (ok). Microsoft ...
Trong bài viết này, mình xin giới thiệu về Microsoft Office 365, Azure Active Directory và hướng dẫn tạo một ứng dụng demo nhỏ cho phép người dùng thực hiện việc authenticate để truy cập tới tài nguyên người dùng cũng như tới các API của Office365 theo chuẩn oauth2 trong rails (ok).
Microsoft Office 365
Nếu như Google có bộ công cụ Google Apps với rất nhiều ứng dụng sử dụng nền tảng điện toán đám mây hấp dẫn thì Microsoft cũng có bộ Office Web Apps với Words, Excel, Powerpoint và One Note. Về cơ bản Microsoft Office 365 là gói phần mềm dịch vụ thương mại cung cấp các phiên bản đám mây của các phần mềm thông dụng của Microsoft trong đó bao gồm: gói ứng dụng văn phòng Microsoft Office và các phần mềm máy chủ như Exchange Server, SharePoint Server, và Lync Server.

Microsoft Graph
Microsoft đã cho ra mắt tập các giao diện lập trình ứng dụng (APIs) cho Office 365 dưới tên gọi là Microsoft Graph. Các API là cách mà các chương trình bên thứ ba truy cập thông tin và các khả năng của bộ phần mềm Office trực tuyến, bao gồm như các API cho mail, các tập tin, lịch và các liên hệ. Các API này cho phép các nhà phát triển có thể tiếp cận tới 1,2 tỉ khách hàng dùng Microsoft và tận dụng hơn 450 PB (petabyte) dữ liệu người dùng trong bất kỳ ứng dụng nào, từ một ứng dụng đặt phòng du lịch kết nối với Office 365 lịch và địa chỉ liên lạc, đến ứng dụng bán hàng tự động tích hợp hoàn toàn với Office 365 mail và các tập tin.
Điểm nổi bật của Microsoft Graph so với các API cũ của Microsoft đó là API cho tất cả các dịch vụ Office 365 được đưa về cùng 1 endpoint duy nhất

Azure Active Directory
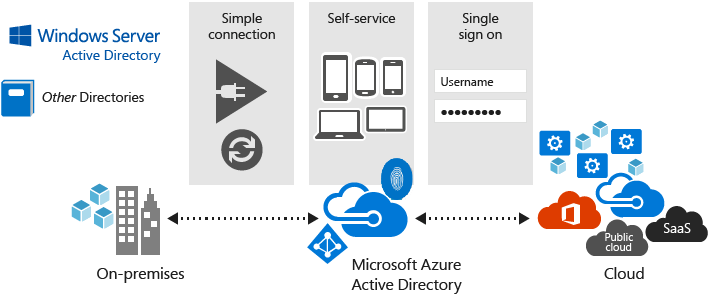
Azure Active Directory (AzureAD) là một giải pháp điện toán đám mây dùng để quản lý danh tính (identity) và quản lý truy cập toàn diện, cung cấp các tính năng mạnh mẽ để quản lý người dùng và các nhóm người dùng, giúp đảm bảo an toàn việc truy cập tới ứng dụng bao gồm các dịch vụ Microsoft online như cũng như rất nhiều những ứng dụng non-SaaS (Software as a Service) của Microsoft. Trong đó, Office 365 là một trong những ứng dụng sử dụng dịch vụ xác thực người dùng trên nền tảng điện toán đám mây AzureAD để quản trị người dùng. Bạn có thể tìm hiểu thêm chi tiết về các mô hình quản trị người dùng trong office365 với AzureAD tại đây.

Azure Active Directory đơn giản hóa việc truy cập tới bất cứ ứng dụng nền điện toán đám mây nào bằng việc cho phép đăng nhập một lần duy nhất (single sign-on) để truy cập tới hàng ngàn các ứng dụng điện toán đám mây khác từ bất cứ thiết bị nào (windows, mac, android, ios).
Okay, trong phần tiếp theo mình sẽ trình bày về mô hình authen với AzureAD mà Microsoft cung cấp cho các nhà phát triển (goodjob).
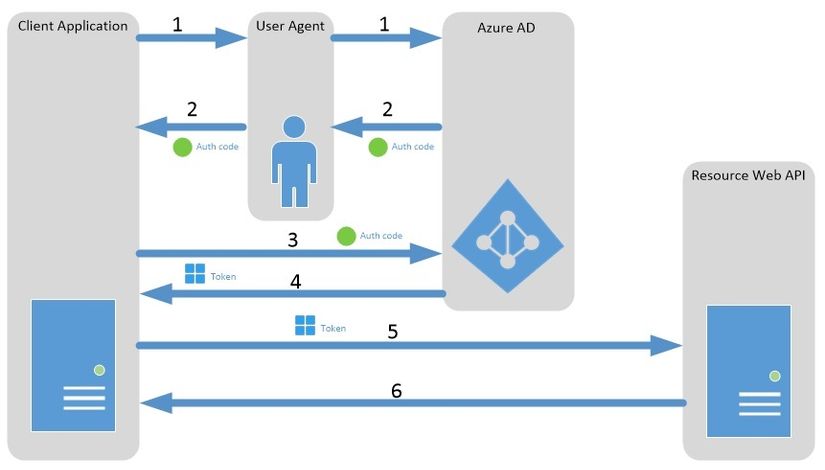
Microsoft cung cấp cho các nhà phát triển mô hình xác thực tài khoản và cấp phép truy cập tới tài nguyên người dùng trên AzureAD và tới Office365 API cho ứng dụng bên thứ 3 được xây dựng theo mô hình ủy quyền Oauth 2.0.

Mô hình này gồm 6 bước:
- Client App sẽ chuyển hướng người dùng tới địa chỉ cho phép người dùng xác thực tài khoản với Azure AD và cấp phép cho client app các quyền (permission) đã được đăng ký trên Azure AD.
- Sau khi xác thực và cấp phép thành công, Azure AD chuyển hướng người dùng ngược lại về user agent, user agent tiếp tục chuyển hướng người dùng về client app tại địa chỉ redirect URI (reply url) đã đăng ký với Azure AD, đi kèm với mã ủy quyền (authorization code).
- Client app thực hiện gửi yêu cầu lấy access token (mã cho phép truy cập tới tài nguyên và các API) đến Azure AD, gửi kèm với authorization code để chứng minh người dùng đã ủy quyền và cấp phép trước đó.
- Azure AD trả lại trực tiếp cho client app access token và refresh token (sử dụng để lấy lại access token khi hết hạn).
- Client app sử dụng access token đã lấy được để xác thực và truy cập tới Web API.
- Sau khi xác thực client app, web API trả lại tài nguyên mà client app đã yêu cầu.
Chuẩn bị
- Ứng cho phép authenticate với tài khoản office 365 trước hết cần được đăng ký với Azure AD với tài khoản office 365 developer (hướng dẫn đăng ký app tại đây và hướng dẫn đăng ký tài khoản office 365 cho developer tại đây).
- Sau khi tạo app thành công, trong phần config app, set địa chỉ Reply Url, chính là địa chỉ chuyển hướng về client app chính xác sau khi người dùng xác thực và cấp phép cho ứng dụng thành công như sau: http://localhost:3000/sessions/callback.
- Chọn YES trong phần APPLICATION IS MULTI-TENANT.
- Trong phần permissions to other applications, ta add thêm application Microsoft Graph và chọn Delegated Permissions với các quyền Sign users in, Send mail as signed in user.
- Lưu lại thông tin về CLIENT ID và key CLIENT SECRET.
Cài đặt
- Add gem vào Gemfile và bundle install
gem "adal"
gem "config"
- Generate model
$ rails g migration create_users
class CreateUsers < ActiveRecord::Migration
  def change
    create_table :users do |t|
      t.string :name
      t.string :email
      t.string :access_token, { limit: 10000 }
      t.string :refresh_token, { limit: 2000 }
      t.string :expires_on
    end
  end
end
- Config trong routes file
Rails.application.routes.draw do
  root "sessions#index"
  resource :sessions, except: [:edit]
  post "sessions/callback"
  post "sessions/send_mail"
end
- Lưu thông tin client_id và client_secret ở trên trong các biến môi trường /config/environment.rb
...
ENV["CLIENT_ID"] = "your_client_id"
ENV["CLIENT_SECRET"] = "your_secret_key"
...
- Lưu các thông tin về các endpoint, resource, content type, tenant .. trong file config app/config/settings.yml
office_365_api:
  TENANT: "common"
  REPLY_URL: "http://localhost:3000/sessions/callback"
  AUTHORIZE_ENDPOINT: "https://login.microsoftonline.com/common/oauth2/authorize"
  LOGOUT_ENDPOINT: "https://login.microsoftonline.com/common/oauth2/logout"
  GRAPH_RESOURCE: "https://graph.microsoft.com"
  CONTEXT_PATH: "login.microsoftonline.com"
  CONTENT_TYPE: "application/json;odata.metadata=minimal;odata.streaming=true"
  ADAL_SUCCESS: "ADAL::SuccessResponse"
- Tạo ra Sessions controller, trong ứng dụng demo này, ta sẽ xây dựng chức năng login/logout, get new access token và send mail
class SessionsController < ApplicationController
  before_action :load_office365_service, except: [:new, :index]
  before_action :find_user
  skip_before_action :verify_authenticity_token

  def index
  end

  def new
  end

  def create
    redirect_to @office365_service.get_login_url sessions_callback_url
  end

  def update
    @token = @user.access_token if @office365_service.renew_token @user
    render :index
  end

  def destroy
    reset_session
    redirect_to @office365_service.get_logout_url root_url
  end

  def callback
    unless @office365_service.store_access_token params
      flash[:error] = "Something went wrong ..."
    end
    session[:email] = @office365_service.email
    redirect_to root_url
  end

  private
  def load_office365_service
    @office365_service = Office365Service.new
  end

  def find_user
    @user = User.find_by email: session[:email]
  end
end
- Tạo ra view cho action index
<h1>Sessions#index</h1>
<% if @user.nil? %>
  <%= link_to "Login via office365 account", sessions_path, method: :post %>
<% else %>
  <%= link_to "Back to homepage", root_path %>
  <p>Welcome <h3><%= @user.name %></h3> with <h3><%= @user.email %></h3> </p>
  <% if @token %>
    Your new access token is: <h3><%= @token %></h3>
  <% end %>
  <form action="<%= sessions_send_mail_path %>" method="POST">
    <h1><%= @message if @message %></h1>
    <input type="text" name="receiver" />
    <button type="submit">Send mail</button>
  </form>
  <%= link_to "Renew token", sessions_path, method: :put %>
  <%= link_to "Logout", sessions_path, method: :delete %>
<% end %>
- Tạo một service class chứa các method thực hiện authenticate, get access token và access tới các API Microsoft Graph, trong file app/services/office365_service.rb
- Hàm get_login_url redirect người dùng tới authenticate endpoint của AzureAD và yêu cầu authorization code trả về trong form_post
class Office365Service
  attr_accessor :email

  SENDMAIL_ENDPOINT = "/v1.0/me/microsoft.graph.sendmail"
  CLIENT_CRED = ADAL::ClientCredential.new(
    ENV["CLIENT_ID"], ENV["CLIENT_SECRET"])

  def initialize
  end

  def get_login_url callback_url
    "#{Settings.office_365_api.AUTHORIZE_ENDPOINT}?client_id=#{ENV["CLIENT_ID"]}
      &redirect_uri=#{ERB::Util.url_encode callback_url}
      &response_mode=form_post&response_type=code+id_token&nonce=#{nonce}"
  end
- Sau khi người dùng authen và consent permission, AzureAD trả lại authorize code để client app sử dụng get access token và lưu thông tin người dùng vào DB. Chú ý thông tin email, name của người dùng được trả về đã được mã hõa dưới định dạng JSON Web Token => cần viết hàm giải mã get_user_info_from_id_token
...
def store_access_token params
    # authorize code, use this to get access token
    auth_code = params["code"]
    user_info = get_user_info_from_id_token params["id_token"]
    @email = user_info[:email]
    response = request_access_token auth_code, Settings.office_365_api.REPLY_URL
    if response.class.name == Settings.office_365_api.ADAL_SUCCESS
      return create_or_update_user response, user_info[:email], user_info[:name]
    end
    false
  end

  private
  def nonce
    SecureRandom.uuid
  end

  def request_access_token auth_code, reply_url
    auth_context = ADAL::AuthenticationContext.new(
      Settings.office_365_api.CONTEXT_PATH, Settings.office_365_api.TENANT)
    auth_context.acquire_token_with_authorization_code auth_code, reply_url,
      CLIENT_CRED, Settings.office_365_api.GRAPH_RESOURCE
  end

  # get user info code from jwt
  def get_user_info_from_id_token id_token
    token_parts = id_token.split(".")
    encoded_token = token_parts[1]
    leftovers = token_parts[1].length.modulo(4)
    if leftovers == 2
      encoded_token << "=="
    elsif leftovers == 3
      encoded_token << "="
    end
    decoded_token = Base64.urlsafe_decode64(encoded_token)
    jwt = JSON.parse decoded_token
    {email: jwt["unique_name"], name: jwt["name"]}
  end

  def create_or_update_user response, email, name
    params = {access_token: response.access_token, refresh_token: response.refresh_token,
      account_type: :office365, expires_on: response.expires_on, name: name, email: email}
    user = User.find_by email: email
    return user.update_attributes params if user
    user = User.new params
    user.save
  end
end
...
- Để send mail được, cần khởi tạo một HTTP Post request tới endpoint của API với body của request là content muốn gửi (Tài liệu về các API khác của Microsoft Graph có thể tìm thấy tại đây)
...
  def send_mail params, session, user
    name = session[:name]
    email = session[:email]
    receiver = params[:receiver]
    send_mail_endpoint = URI "#{Settings.office_365_api.GRAPH_RESOURCE}#{SENDMAIL_ENDPOINT}"
    http = Net::HTTP.new send_mail_endpoint.host, send_mail_endpoint.port
    http.use_ssl = true

    email_message = "{
      Message: {
        Subject: 'Welcome your polla',
        Body: {
          ContentType: 'HTML',
          Content: 'Hello world'
        },
        ToRecipients: [
          {
            EmailAddress: {
              Address: '#{receiver}'
            }
          }
        ]
      },
      SaveToSentItems: true
    }"

    response = http.post(
      SENDMAIL_ENDPOINT,
      email_message,
      "Authorization" => "Bearer #{user.access_token}",
      "Content-Type" => Settings.office_365_api.CONTENT_TYPE
    )
    return true if response.code == "202"
    false
  end
...
- Sử dụng gem adal để có thể lấy được access_token bằng refresh_token khi access_token hết hạn
...
  def renew_token user
    auth_context = ADAL::AuthenticationContext.new(
      Settings.office_365_api.CONTEXT_PATH, Settings.office_365_api.TENANT)
    response = auth_context.acquire_token_with_refresh_token user.refresh_token,
      CLIENT_CRED, Settings.office_365_api.GRAPH_RESOURCE
    if response.class.name == Settings.office_365_api.ADAL_SUCCESS
      return user.update_attributes access_token: response.access_token,
        expires_on: response.expires_on, refresh_token: response.refresh_token
    end
    false
  end
...
- Thực hiện logout bằng cách redirect tới logout endpoint
...
  def get_logout_url target_url
    "#{Settings.office_365_api.LOGOUT_ENDPOINT}?post_logout_redirect_uri=#{ERB::Util.url_encode target_url}"
  end
...
Trên đây mình đã giới thiệu về mô hình authen trong AzureAD, cách gọi đến Office365 API và xây dựng một ứng dụng demo Ruby on Rails nho nhỏ. Hi vọng bài viết sẽ giúp ích phần nào cho bạn đọc đang cần tìm hiểu mô hình OAuth2 với Office365 account (yeah)(lay2).
- https://azure.microsoft.com/en-us/services/active-directory/
- https://support.office.com/en-us/article/Understanding-Office-365-identity-and-Azure-Active-Directory-06a189e7-5ec6-4af2-94bf-a22ea225a7a9?omkt=en-US&ui=en-US&rs=en-US&ad=US
- https://msdn.microsoft.com/en-us/office/office365/howto/add-common-consent-manually
- https://github.com/AzureAD/azure-activedirectory-library-for-ruby
- http://graph.microsoft.io/en-us/docs
Link sản phẩm demo: https://office365-demo.herokuapp.com/
Source code: https://github.com/duyth93/office365-demo
