Chat Demo with Private Pub in Ruby on Rails
Trong bài viết này, tôi sẽ hướng dẫn các bạn tạo một ứng dụng Chat nho nhỏ trong Ruby on Rails sử dụng Private Pub gem. Private Pub là một Ruby gem sử dụng cho Rails để publish và subscribe các thông điệp thông qua Faye. Nó cho phép bạn dễ dàng cung cấp các cập nhật thời gian thực thông qua một ...
Trong bài viết này, tôi sẽ hướng dẫn các bạn tạo một ứng dụng Chat nho nhỏ trong Ruby on Rails sử dụng Private Pub gem. Private Pub là một Ruby gem sử dụng cho Rails để publish và subscribe các thông điệp thông qua Faye. Nó cho phép bạn dễ dàng cung cấp các cập nhật thời gian thực thông qua một open socket. Tất cả các kênh là riêng tư nên những người dùng chỉ có thể lắng nghe được những thông điệp từ những kênh mà họ đã subscribe.
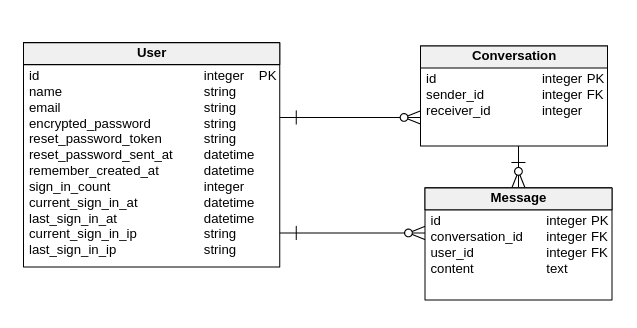
Sơ đồ mối quan hệ giữa các lớp thực thể được thể hiện dưới đây:

Ứng dụng sẽ sử dụng gem Devise để xác thực người dùng. Conversation được tạo ra để lưu những cuộc hội thoại riêng tư giữa hai người dùng bất kỳ nào đó. Message dùng để lưu tin nhắn được gửi từ một người dùng đến một người khác, và nó sẽ thuộc về cuộc hội thoại (conversation) giữa hai người.
Tạo Conversation model
Một conversation sẽ bao gồm người gửi (sender) và người nhận (receiver), và cả 2 đều là instance của lớp user. Để tạo conversation model, chúng ta chạy lệnh trong terminal như sau:
$ rails g model Conversation sender_id:integer receiver_id:integer
Sau đó chạy lệnh rake db:migrate để migrating database. Sau đó chúng ta sẽ cập nhật user model, thêm quan hệ has_many đối với conversations, đồng thời thêm khóa ngoại sender_id.
# app/models/user.rb
class User < ActiveRecord::Base
  devise :database_authenticatable, :registerable,
         :recoverable, :rememberable, :trackable, :validatable

  has_many :conversations, foreign_key: :sender_id
end
Tiếp theo, chúng ta cập nhật conversation model. Một conversation sẽ thuộc về một sender và một receiver và nó sẽ có có nhiều messages.
# app/models/conversation.rb
class Conversation < ActiveRecord::Base
  belongs_to :sender, class_name: User.name, foreign_key: :sender_id
  belongs_to :receiver, class_name: User.name, foreign_key: :receiver_id

  has_many :messages, dependent: :destroy

  validates_uniqueness_of :sender_id, scope: :receiver_id

  scope :involving, ->(user) do
    where("sender_id = ? OR receiver_id = ?", user.id, user.id)
  end

  scope :existing_conversation, ->(sender_id, receiver_id) do
    where("(sender_id = ? AND receiver_id = ?) OR (sender_id = ? AND receiver_id = ?)",
      sender_id, receiver_id, receiver_id, sender_id)
  end
end
Ở đây, chúng ta có 2 scope là involving và existing_conversation. involving để lấy ra tất cả conversations có liên quan đến người dùng, còn existing_conversation để kiểm tra xem có một cuộc hội thoại nào đã tồn tại giữa 2 người dùng không trước khi tạo một cuộc hội thoại mới.
Tạo Message model
Một message sẽ bao gồm conversation_id, user_id và content. conversation_id tương ứng với một conversation mà message đó thuộc về, user_id tương ứng với người dùng mà đã gửi message đó, còn content là nội dung của message đó. Chúng ta sẽ chạy lệnh terminal sau để tạo message model và sau đó chạy rake db:migrate:
$ rails g model Message content:text conversation:references user:references
Sau khi migrating database, chúng ta sẽ cập nhật message model.
# app/models/message.rb
class Message < ActiveRecord::Base
  belongs_to :conversation
  belongs_to :user

  validates_presence_of :content, :conversation_id, :user_id
end
Logic flow
Tôi sẽ giải thích cơ chế hoạt động của ứng dụng chat này. Ở trang Home, tôi sẽ thêm nút Send message cùng với mỗi người dùng. Nút này sẽ lưu 2 thuộc tính giá trị gồm id của người gửi (ở đây là người dùng hiện tại- sender_id) và id của người nhận (receiver_id). Mỗi khi người dùng click vào nút Send message, một request sẽ được gửi lên server bao gồm id người gửi và id của người nhận. Nếu đã có một cuộc hội thoại tồn tại giữa 2 người dùng đó rồi thì id của cuộc hội thoại đó sẽ được trả về ngay lập tức, còn nếu không thì ta sẽ tạo một cuộc hội thoại mới giữa 2 người dùng đó sau đó trả về id của cuộc hội thoại mới được tạo đó.
Các conversation_id được trả về bởi server sử dụng jQuery. Sử dụng conversation_id này, chúng ta sẽ request lên một trang show của conversation tương ứng. Giả sử, nếu conversation_id trả về là 1 thì chúng ta sẽ request lên trang conversations/1. Chúng ta sẽ thêm các dữ liệu của cuộc hội thoại đó lên trang Home trong một chatbox.
Khi một người dùng gửi một tin nhắn ở chatbox đến một người dùng khác, một request sẽ được gửi lên server bao gồm id của cuộc hội thoại và nội dung của tin nhắn. Trên server, tin nhắn sẽ được tạo, bao gồm conversation_id, user_id và content. Sau khi tin nhắn được tạo, hệ thống sử dụng Private Pub để publish tin nhắn lên một kênh thoại (sử dụng đường dẫn cuộc hội thoại giữa 2 người vì nó là duy nhất), sau đó, các chatbox giữa 2 người đã subscribe cùng kênh thoại đó sẽ được cập nhật các tin nhắn của cuộc hội thoại đó.
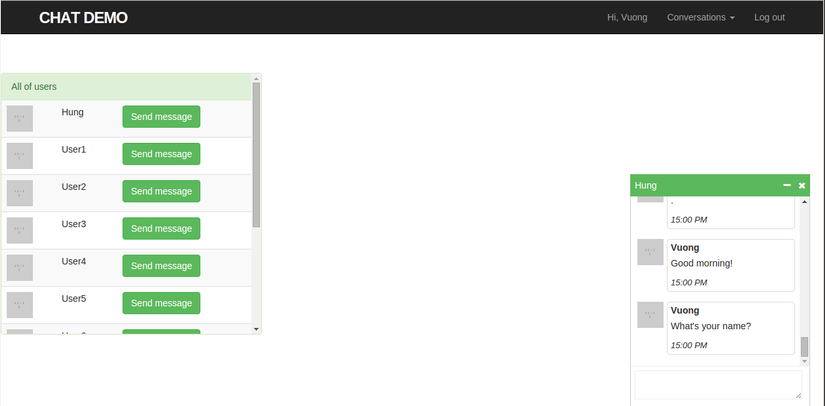
Ở trang Home, tất cả các user sẽ được hiển thị ở đây, tương ứng với mỗi user sẽ hiển thị một nút Send message.
# app/view/users/_users.html.erb
<% @users.each_with_index do |user, index| %>
    <tr>
        <td><%= image_tag "http://placehold.it/40x40", class: "media-object" %></td>
        <td><%= user.name %></td>
        <td><%= link_to "Send message", "#", class: "btn btn-success start-conversation", "data-sid" => current_user.id, "data-rid" => user.id %></td>
    </tr>
<% end %>
Thuộc tính data-sid sẽ lưu id của người dùng hiện tại, còn data-rid sẽ lưu id của người cần gửi. Chúng sẽ được truyền đi thông qua một ajax request tới server dùng để tạo mới một conversation nếu cần.
Mỗi khi click nút Send message ở trên, một chatbox nhỏ được hiện lên bao gồm nội dung cuộc trò chuyện giữa hai người giống như cửa sổ chatbox của Facebook. Chatbox đó được tạo trong view show của conversations.
# app/views/conversations/show.html.erb
<div class="chatboxhead">
  <div class="chatboxtitle">
    <%= @receiver.name %>
  </div>
  <div class="chatboxoptions">
    <%= link_to "<i class='fa  fa-minus'></i> ".html_safe, "#", class: "toggleChatBox", "data-cid" => @conversation.id %>
    <%= link_to "<i class='fa  fa-times'></i> ".html_safe, "#", class: "closeChatBox", "data-cid" => @conversation.id %>
  </div>
  <br/>
</div>
<div class="chatboxcontent">
  <div class="chatboxmessage">
    <ul class="media-list">
      <% if @messages.any? %>
        <%= render @messages %>
      <% end %>
    </ul>
  </div>
</div>
<div class="chatboxinput">
  <%= form_for [@conversation, @message], remote: true, html: {id: "conversation_form_#{@conversation.id}"} do |f| %>
    <%= f.text_area :content, class: "chatboxtextarea", "data-cid" => @conversation.id %>
  <% end %>
</div>
Styles của chatbox được định nghĩa trong chat.css.
# app/views/messages/_message.html.erb
<li class="media">
  <div class="media-left">
    <%= image_tag "http://placehold.it/40x40", class: "media-object" %>
  </div>
  <div class="media-body">
    <h5 class="media-heading">
      <b><%= message.user.name %></b>
    </h5>
    <p><%= message.content %></p>
    <time datetime="<%= message.created_at %>" title="<%= message.created_at %>">
      <i><%= message.created_at.strftime "%H:%M %p"%></i>
    </time>
  </div>
</li>
Tất cả các sự kiện ở trên sẽ được xử lý trong file user.js. Trong đó, những hàm trong user.js sẽ được gọi từ chat.js.
# app/assets/javascripts/user.js
var ready = function () {
  $(".start-conversation").click(function(e){
    e.preventDefault();

    var sender_id = $(this).data("sid");
    var receiver_id = $(this).data("rid");

    $.post("/conversations", {sender_id: sender_id, receiver_id: receiver_id}, function(data){
      chatWith(data.conversation_id);
    });
  });

  $(document).on("click", ".toggleChatBox", function(e){
    e.preventDefault();

    var id = $(this).data("cid");
    toggleChatBoxGrowth(id);
  });

  $(document).on("click", ".closeChatBox", function(e){
    e.preventDefault();

    var id = $(this).data("cid");
    closeChatBox(id);
  });

  $("a.conversation").click(function(e){
    e.preventDefault();

    var conversation_id = $(this).data("cid");
    chatWith(conversation_id);
  });

  $(document).on("keydown", ".chatboxtextarea", function(e){
    var id = $(this).data("cid");
    checkChatBoxInputKey(e, $(this), id);
  });
}

$(document).ready(ready);
$(document).on("page:load", ready);
Sau khi tạo xong các views chúng ta sẽ được một trang Home giống như sau:

Chúng ta đã có views và các file javascripts, nhiệm vụ còn lại là tạo ra conversations và messages controllers để xử lý tất cả những request từ những file javascripts đó.
Tạo conversations controller
Để tạo conversations controller, sử dụng lệnh terminal sau:
$ rails g controller conversations
Sau đó, chúng ta tiến hành cập nhật conversations controller:
# app/controllers.conversations_controller.rb
class ConversationsController < ApplicationController
  layout false

  def create
    if Conversation.existing_conversation(params[:sender_id], params[:receiver_id]).present?
      @conversation = Conversation.existing_conversation(params[:sender_id], params[:receiver_id]).first
    else
      @conversation = Conversation.create! conversation_params
    end

    render json: {conversation_id: @conversation.id}
  end

  def show
    @conversations = Conversation.involving(current_user).order "created_at DESC"
    @conversation = Conversation.find params[:id]
    @receiver = conversation_receiver @conversation
    @messages = @conversation.messages
    @message = Message.new
  end

  private
  def conversation_params
    params.permit :sender_id, :receiver_id
  end
end
Chú ý rằng layout false để loại bỏ những view thừa kế từ layout application.html.
Ở create action, chúng ta sẽ kiểm tra xem đã có một cuộc hội thoại nào tồn tại giữa sender_id và receiver_id chưa với hàm existing_conversation, nếu chưa thì sẽ tạo mới một conversation giữa họ, còn nếu có rồi thì ta sẽ lấy conversation đó. Sau đó, ta sẽ trả lại một json response là id của conversation đó.
Ở show action, hàm conversation_receiver @conversation để xác định xem người nhận tin nhắn ở trong cuộc trò chuyện này là ai. Hàm đó được viết trong ConversationsHelper.
module ConversationsHelper
  def conversation_receiver conversation
    conversation.sender == current_user ? conversation.receiver : conversation.sender
  end
end
Tạo messages controller
Tạo messages controller với lệnh terminal sau:
$ rails g controller messages
# app/controllers/messages_controller.rb
class MessagesController < ApplicationController
  def create
    @conversation = Conversation.find params[:conversation_id]
    @message = @conversation.messages.build message_params
    @message.user = current_user
    @message.save!
  end

  private
  def message_params
    params.require(:message).permit :content
  end
end
Sau khi tạo xong controllers cho conversations và messages, chúng ta sẽ định nghĩa các đường dẫn tương ứng cho chúng:
# config/routes.rb
Rails.application.routes.draw do
  devise_for :users

  root "users#index"

  resources :conversations do
    resources :messages
  end
end
Đây chính là bước quan trọng nhất mà tôi muốn đề cập trong bài viết này. Để cài đặt Private Pub, chúng ta thêm gem private_pub vào Gemfile và chạy bundle. Cài đặt này cũng sẽ cài đặt Faye. Chúng ta cũng cần cài đặt Thin gem để sử dụng nó cho Faye server.
# Gemfile
gem 'private_pub'
gem 'thin'
Tiếp theo, chúng ta cần sử dụng lệnh sau đây để tạo ra các file cấu hình và file Rackup để khởi động Faye server.
$ rails g private_pub:install
Bây giờ, chúng ta đã có thể khởi động Faye server bằng file Rackup vừa được tạo ra bằng lệnh sau:
rackup private_pub.ru -s thin -E production
Bước cuối cùng là thêm private_pub vào file application.js:
//= require private_pub
Bây giờ, ở trong view show của conversations, chúng ta sẽ tiến hành subscribe một kênh (như đã nói ở trên chúng ta sẽ sử dụng đường dẫn của cuộc hội thoại đó). Và chúng ta cũng sẽ sử dụng cùng một đường dẫn này để publish các cập nhật thay đổi đến kênh này từ controller. Để làm điều đó, chúng ta sử dụng hàm subscribe_to.
# app/views/conversations/show.html.erb
.
.
.
<%= subscribe_to conversation_path(@conversation) %>
Tiếp theo, chúng ta sẽ thực hiện publish để đẩy các thay đổi lên các kênh. Chúng ta sẽ thực hiện điều này mỗi khi một tin nhắn được tạo ra với hàm publish_to.
# app/views/messages/create.js.erb
<% publish_to conversation_path(@conversation) do %>
  var conversation_id = <%= @conversation.id %>;
  chatWith(conversation_id);
  var chatbox = $("#chatbox_" + conversation_id + " .media-list");
  chatbox.append("<%= j render(@message) %>");

  $("#chatbox_" + conversation_id+ " .chatboxcontent").scrollTop(9999999);
<% end %>
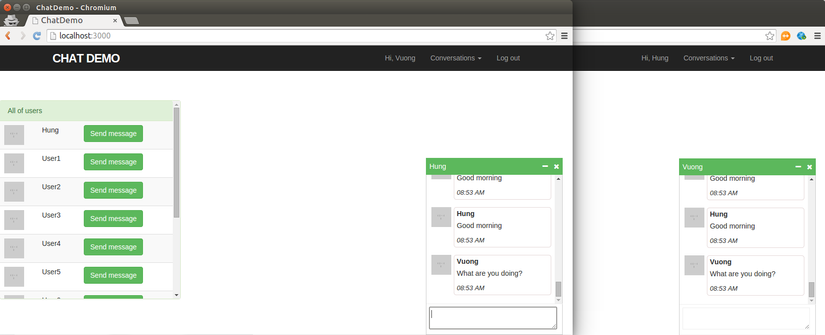
Như vậy, sau khi một người dùng gửi tin nhắn đến một người dùng khác, tin nhắn đó sẽ được publish lên một kênh (chính là đường dẫn của cuộc hội thoại giữa 2 người), khi đó các chatbox giữa 2 người mà đã subscribe kênh đó sẽ được append một tin nhắn mới được tạo ra (cuoideu).
Cuối cùng, chúng ta có một ứng dụng Chat như sau:

Source Code
- https://github.com/ryanb/private_pub
- http://railscasts.com/episodes/316-private-pub?view=asciicast
- http://josephndungu.com/tutorials/gmail-like-chat-application-in-ruby-on-rails
