12/08/2018, 17:32
Chi tiết về material design trong Android (Google) phần III - a
Xin chào mọi người, với mong muốn chia sẻ ít kiến thức của mình, hôm nay mình sẽ tiếp tục seri về material design trong android . Đây là phần thứ 3 về material design: Bold graphic design . Mình sẽ chia phần này thành 2 phần a và b để tiện cho mọi người theo dõi. Phần này sẽ nói về các phần ...
- Xin chào mọi người, với mong muốn chia sẻ ít kiến thức của mình, hôm nay mình sẽ tiếp tục seri về material design trong android.
- Đây là phần thứ 3 về material design: Bold graphic design. Mình sẽ chia phần này thành 2 phần a và b để tiện cho mọi người theo dõi.
- Phần này sẽ nói về các phần tử như: space, color, type, font và image.
- Nó sẽ cho bạn tạo ra 1 màn hình hài hòa giữa các phần tử, cũng như sử dụng chúng trong các trường hợp để phù hợp với các loại ứng dụng.
1. Luật ngầm định
-
Đây là 1 tập các nguyên tắc thiết kế được gọi là Gestalt Law of Grouping (luật định dạng của nhóm):
-
Law of proximity (luật gần gũi):
- Những view gần nhau phải có liên quan với nhau.
- Ví dụ: Khi hiển thị địa chỉ của 1 người dùng, bạn có 1 hàng với 1 TextView (để hiển thị title) và 1 EditText (để người dùng nhập dữ liệu) thì chúng phải có quan hệ với nhau. TextView hiển thị title như Address, còn EditText cho người dùng nhập dữ liệu về địa chỉ người dùng mà thôi.
-
Law of similaritysimilarity (luật tương tự):
- Mỗi item trong 1 danh sách nhất đinh nên biểu diễn cho 1 đối tượng nhất định.
- Ví dụ: Mỗi item trong 1 danh sách các user.
-
Note: Để danh sách thêm trực quan mình cũng khuyên các bạn thêm space giữa các phần tử (Xem phần tiếp theo).
2. Grid and keyline
a. Gird
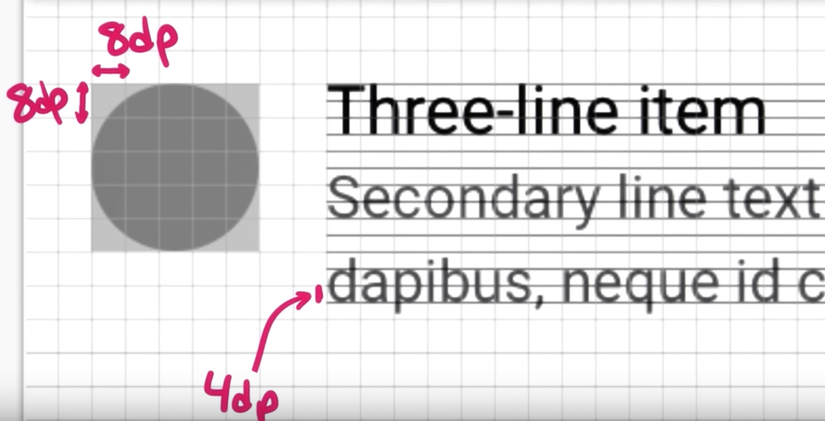
- Với View: nếu bạn chia màn hình thành 1 lưới (gird), thì mỗi ô trong đó sẽ là 1 hình vuông với cạnh là 8dp. Bạn nên sử dụng các ô 8dp đó để căn chỉnh và tạo ra hình dạng của View và margin giữa các đối tượng.
- Với text: material design dùng đường cơ sở với 4dp để căn chỉnh text.

b. Keyline
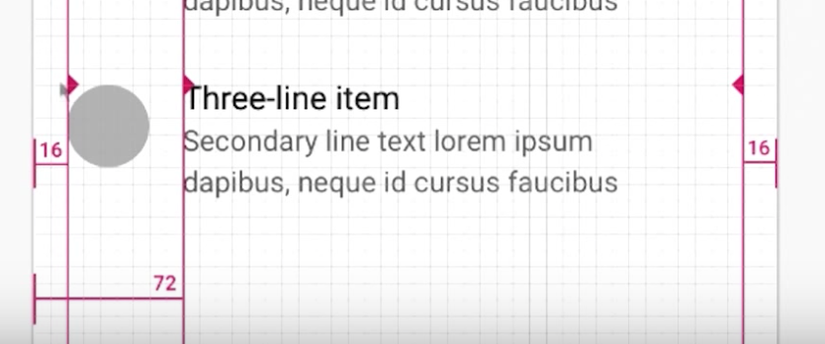
- Keyline là 1 đường tưởng tượng căn chỉnh dọc và ngang trong giao diện người dùng.
- Chúng rất hữu dụng trong việc giúp quét màn hình và lấy thông tin.
- Material design khuyên chúng ta nên sử dụng 1 số keyline chung như:
- 16dp cho margin left và right đối với các nội dung bổ trợ như: icon, avatar...
- 72dp cho margin left cho nội dung chính như page tittle, page contents...
- Nếu không có nội dung bổ trợ (icon, avatar) thì nội dung chính sẽ có margin left và right là 16dp.

3. Color
- Material design khuyên bạn nên sử dụng các màu sắc đậm nét. Nó làm cho ứng dụng của bạn vừa dễ sử dụng vừa có tính thẩm mỹ.
- Material design cũng cung cấp cho developer 1 bảng mã màu đáp ứng cho bạn hầu hết các yêu cầu của ứng dụng: https://material.io/guidelines/style/color.html#color-color-palette
- Bạn vẫn hay gặp rắc rối về cách chọn màu mang tính thẩm mỹ cao cho ứng dụng của bạn như colorParimary, colorPrimaryDark, colorAccent, Hãy xem lại bảng màu mà mình suggest ở trên và mình suggest cho bạn 1 cách lựa chọn:
- colorPrimary: thường có sắc độ là 500
- colorPrimaryDark: thường có sắc độ từ 700 -> 900
- colorAccent: màu này sẽ bão hòa hơn là A100, A200, A400...

4. Pallete
- Pallete là công cụ mà Android hỗ trợ để các mã màu đặc trưng của 1 image.
- Có thể lấy được 2 loại màu chính:
- Vibrant color: vibrant, vibrant dark, vibrant light.
- Muted color: muted, muted dark, muted light.
- Trong bài viết này mình chỉ thêm 1 phần luyện tập về Pallete để lấy mã màu của hình ảnh.
- Đầu tiên bạn hãy tạo ra item_picking_palette.xml để lấy mã màu của image:
<?xml version="1.0" encoding="utf-8"?>
<android.support.v7.widget.CardView xmlns:android="http://schemas.android.com/apk/res/android"
    xmlns:app="http://schemas.android.com/apk/res-auto"
    android:layout_awidth="match_parent"
    android:layout_height="wrap_content"
    app:cardCornerRadius="@dimen/dp_4"
    app:cardUseCompatPadding="true">

    <android.support.constraint.ConstraintLayout
        android:layout_awidth="match_parent"
        android:layout_height="wrap_content"
        android:padding="@dimen/dp_8">

        <View
            android:id="@+id/view"
            android:layout_awidth="@dimen/dp_48"
            android:layout_height="@dimen/dp_48"
            android:background="@color/cyan_500"
            app:layout_constraintStart_toStartOf="parent" />

        <TextView
            android:id="@+id/text_color"
            android:layout_awidth="wrap_content"
            android:layout_height="wrap_content"
            android:layout_marginStart="@dimen/dp_8"
            android:text="@string/app_name"
            android:textAppearance="@style/TextAppearance.AppCompat"
            app:layout_constraintStart_toEndOf="@id/view"
            app:layout_constraintTop_toTopOf="@id/view" />

        <TextView
            android:id="@+id/text_hex"
            android:layout_awidth="wrap_content"
            android:layout_height="wrap_content"
            android:layout_marginStart="@dimen/dp_8"
            android:text="@string/app_name"
            app:layout_constraintBottom_toBottomOf="@id/view"
            app:layout_constraintStart_toEndOf="@id/view" />

    </android.support.constraint.ConstraintLayout>

</android.support.v7.widget.CardView>
- Tiếp theo hãy tạo ra activity_picking_pallete.xml :
<?xml version="1.0" encoding="utf-8"?>
<android.support.constraint.ConstraintLayout xmlns:android="http://schemas.android.com/apk/res/android"
    xmlns:app="http://schemas.android.com/apk/res-auto"
    android:layout_awidth="match_parent"
    android:layout_height="match_parent">

    <android.support.v7.widget.Toolbar
        android:id="@+id/toolbar"
        android:layout_awidth="0dp"
        android:layout_height="?android:attr/actionBarSize"
        android:background="@color/cyan_500"
        app:layout_constraintEnd_toEndOf="parent"
        app:layout_constraintStart_toStartOf="parent"
        app:navigationIcon="@drawable/ic_menu"
        app:title="@string/label_picking_palette"
        app:titleTextColor="@android:color/white" />

    <android.support.v4.widget.NestedScrollView
        android:layout_awidth="0dp"
        android:layout_height="wrap_content"
        android:orientation="vertical"
        app:layout_constraintEnd_toEndOf="parent"
        app:layout_constraintStart_toStartOf="parent"
        app:layout_constraintTop_toBottomOf="@id/toolbar">

        <android.support.constraint.ConstraintLayout
            android:layout_awidth="match_parent"
            android:layout_height="wrap_content">

            <ImageView
                android:id="@+id/image_picking_palette"
                android:layout_awidth="0dp"
                android:layout_height="@dimen/dp_240"
                android:layout_marginTop="@dimen/dp_8"
                android:background="@drawable/bg_image_picking_pallete"
                android:contentDescription="@string/description_image"
                android:scaleType="centerCrop"
                app:layout_constraintEnd_toEndOf="parent"
                app:layout_constraintStart_toStartOf="parent"
                app:layout_constraintTop_toTopOf="parent" />

            <TextView
                android:id="@+id/text_info"
                android:layout_awidth="wrap_content"
                android:layout_height="wrap_content"
                android:layout_marginStart="@dimen/dp_8"
                android:layout_marginTop="@dimen/dp_8"
                android:text="@string/label_color_information"
                android:textAppearance="@style/TextAppearance.AppCompat.Title"
                app:layout_constraintStart_toStartOf="parent"
                app:layout_constraintTop_toBottomOf="@id/image_picking_palette" />

            <android.support.v7.widget.RecyclerView
                android:id="@+id/recycler"
                android:layout_awidth="0dp"
                android:layout_height="wrap_content"
                android:layout_marginEnd="@dimen/dp_8"
                android:layout_marginStart="@dimen/dp_8"
                android:layout_marginTop="@dimen/dp_8"
                android:orientation="vertical"
                app:layoutManager="StaggeredGridLayoutManager"
                app:layout_constraintEnd_toEndOf="parent"
                app:layout_constraintStart_toStartOf="parent"
                app:layout_constraintTop_toBottomOf="@id/text_info"
                app:spanCount="2" />

        </android.support.constraint.ConstraintLayout>

    </android.support.v4.widget.NestedScrollView>

    <android.support.design.widget.FloatingActionButton
        android:id="@+id/fab"
        android:layout_awidth="wrap_content"
        android:layout_height="wrap_content"
        android:layout_margin="@dimen/dp_8"
        android:elevation="@dimen/dp_6"
        android:src="@drawable/ic_add"
        app:fabSize="normal"
        app:layout_constraintBottom_toBottomOf="parent"
        app:layout_constraintEnd_toEndOf="parent"
        app:pressedTranslationZ="@dimen/dp_12" />

</android.support.constraint.ConstraintLayout>
- Khi bạn ấn bào FloatingActionButton (fab) ở Activity sẽ hiển thị 1 dialog cho bạn có thể chọn ảnh để lấy mã màu.
- Tiếp theo hãy tạo ra PickingPaletteDialogFragment.java để tạo ra dialog pick image:
package com.fs_sournary.framgia.materialdesignsample.boldgraphicsdesign.pickingpalette;

import android.app.Dialog;
import android.content.DialogInterface;
import android.content.Intent;
import android.os.Bundle;
import android.provider.MediaStore;
import android.support.annotation.NonNull;
import android.support.v4.app.DialogFragment;
import android.support.v7.app.AlertDialog;

import com.fs_sournary.framgia.materialdesignsample.R;

/**
 * Created by fs-sournary.
 * Data: 3/24/18.
 * Description:
 */

public class PickingPaletteDialogFragment extends DialogFragment {

    public static final int RC_CHOOSE_IMAGE = 101;
    public static final int RC_TAKE_IMAGE = 102;

    @Override
    public void onCreate(Bundle savedInstanceState) {
        super.onCreate(savedInstanceState);
    }

    @NonNull
    @Override
    public Dialog onCreateDialog(Bundle savedInstanceState) {
        final int[] selectedItem = new int[1];
        AlertDialog.Builder builder = new AlertDialog.Builder(getActivity());
        builder.setTitle(R.string.label_picking_palette)
                .setSingleChoiceItems(R.array.picking_action, -1,
                        new DialogInterface.OnClickListener() {
                            @Override
                            public void onClick(DialogInterface dialogInterface, int i) {
                                selectedItem[0] = i;
                            }
                        })
                .setPositiveButton(R.string.label_ok, new DialogInterface.OnClickListener() {
                    @Override
                    public void onClick(DialogInterface dialogInterface, int i) {
                        onPositiveClick(selectedItem[0]);
                    }
                })
                .setNegativeButton(R.string.label_cancel, new DialogInterface.OnClickListener() {
                    @Override
                    public void onClick(DialogInterface dialogInterface, int i) {
                        dismiss();
                    }
                });
        return builder.create();
    }

    private void onPositiveClick(int index) {
        switch (index) {
            case 0:
                Intent ChooseImageIntent = new Intent(Intent.ACTION_PICK);
                ChooseImageIntent.setType("image/*");
                getActivity().startActivityForResult(ChooseImageIntent, RC_CHOOSE_IMAGE);
                break;
            case 1:
                Intent takeImageIntent = new Intent(MediaStore.ACTION_IMAGE_CAPTURE);
                if (takeImageIntent.resolveActivity(getActivity().getPackageManager()) != null) {
                    getActivity().startActivityForResult(takeImageIntent, RC_TAKE_IMAGE);
                }
                break;
            default:
                break;
        }
    }
}
- Tiếp theo tạo ra PickingPaletteAdapter.java là Adapter cho RecyclerView của Activity hiển thị danh sách các màu lấy từ image :
package com.fs_sournary.framgia.materialdesignsample.boldgraphicsdesign.pickingpalette;

import android.support.v7.widget.RecyclerView;
import android.view.LayoutInflater;
import android.view.View;
import android.view.ViewGroup;
import android.widget.TextView;

import com.fs_sournary.framgia.materialdesignsample.R;

/**
 * Created by fs-sournary.
 * Data: 3/24/18.
 * Description:
 */

public class PickingPaletteAdapter
        extends RecyclerView.Adapter<PickingPaletteAdapter.PickingPaletteViewHolder> {

    private String[] mColor;
    private Integer[] mHex;

    public PickingPaletteAdapter(String[] color, Integer[] hex) {
        mColor = color;
        mHex = hex;
    }

    @Override
    public PickingPaletteViewHolder onCreateViewHolder(ViewGroup parent, int viewType) {
        View view = LayoutInflater.from(parent.getContext()).inflate(
                R.layout.item_picking_palette, parent, false);
        return new PickingPaletteViewHolder(view);
    }

    @Override
    public void onBindViewHolder(PickingPaletteViewHolder holder, int position) {
        holder.bindView(mColor[position], mHex[position]);
    }

    @Override
    public int getItemCount() {
        return mColor.length;
    }

    class PickingPaletteViewHolder extends RecyclerView.ViewHolder {

        private View mView;
        private TextView mColorTextView;
        private TextView mHexTextView;

        PickingPaletteViewHolder(View itemView) {
            super(itemView);
            mColorTextView = itemView.findViewById(R.id.text_color);
            mHexTextView = itemView.findViewById(R.id.text_hex);
            mView = itemView.findViewById(R.id.view);
        }

        void bindView(String color, int hex) {
            mView.setBackgroundColor(hex);
            mColorTextView.setText(color);
            String hexText = "(#" + Integer.toHexString(hex).toUpperCase() + ")";
            mHexTextView.setText(hexText);
        }

    }
}
- Cuối cùng tạo ra PickingPaletteActivity.xml:
package com.fs_sournary.framgia.materialdesignsample.boldgraphicsdesign.pickingpalette;

import android.content.Intent;
import android.graphics.Bitmap;
import android.graphics.BitmapFactory;
import android.net.Uri;
import android.os.Bundle;
import android.support.v7.app.AppCompatActivity;
import android.support.v7.graphics.Palette;
import android.support.v7.widget.RecyclerView;
import android.view.View;
import android.widget.ImageView;
import android.widget.Toast;

import com.bumptech.glide.Glide;
import com.fs_sournary.framgia.materialdesignsample.R;

import java.io.FileNotFoundException;
import java.io.InputStream;
import java.util.ArrayList;
import java.util.Collection;
import java.util.HashMap;
import java.util.List;
import java.util.Map;
import java.util.Set;

public class PickingPaletteActivity extends AppCompatActivity
        implements View.OnClickListener {

    private ImageView mPaletteImageView;
    private RecyclerView mRecyclerView;

    @Override
    protected void onCreate(Bundle savedInstanceState) {
        super.onCreate(savedInstanceState);
        setContentView(R.layout.activity_picking_pallete);

        mRecyclerView = findViewById(R.id.recycler);

        mPaletteImageView = findViewById(R.id.image_picking_palette);
        findViewById(R.id.fab).setOnClickListener(this);
    }

    @Override
    public void onClick(View view) {
        switch (view.getId()) {
            case R.id.fab:
                PickingPaletteDialogFragment pickingDialog = new PickingPaletteDialogFragment();
                pickingDialog.show(getSupportFragmentManager(), pickingDialog.getTag());
                break;
            default:
                break;
        }
    }

    @Override
    protected void onActivityResult(int requestCode, int resultCode, Intent data) {
        switch (requestCode) {
            case PickingPaletteDialogFragment.RC_CHOOSE_IMAGE:
                if (resultCode == RESULT_OK) {
                    Uri imageUri = data.getData();
                    Glide.with(this).load(imageUri).into(mPaletteImageView);
                    createPalette(imageUri);
                }
                break;
            case PickingPaletteDialogFragment.RC_TAKE_IMAGE:

                break;
            default:
                Toast.makeText(this, "default", Toast.LENGTH_SHORT).show();
                break;
        }
    }

    private void createPalette(Uri imageUri) {
        try {
            InputStream inputStream = getContentResolver().openInputStream(imageUri);
            Bitmap bitmap = BitmapFactory.decodeStream(inputStream);
            Palette.from(bitmap).generate(new Palette.PaletteAsyncListener() {
                @Override
                public void onGenerated(Palette palette) {
                    HashMap<String, Integer> map = processPalette(palette);

                    // keys -> array
                    Set<String> keys = map.keySet();
                    String[] colors = keys.toArray(new String[keys.size()]);

                    // values -> array
                    Collection<Integer> collection = map.values();
                    Integer[] hex = collection.toArray(new Integer[collection.size()]);

                    PickingPaletteAdapter adapter = new PickingPaletteAdapter(colors, hex);

                    mRecyclerView.setAdapter(adapter);
                }
            });
        } catch (FileNotFoundException e) {
            e.printStackTrace();
        }
    }

    private HashMap<String, Integer> processPalette(Palette p) {
        HashMap<String, Integer> map = new HashMap<>();

        if (p.getVibrantSwatch() != null) {
            map.put("vibrant", p.getVibrantSwatch().getRgb());
        }
        if (p.getDarkVibrantSwatch() != null) {
            map.put("dark_vibrant", p.getDarkVibrantSwatch().getRgb());
        }
        if (p.getLightVibrantSwatch() != null) {
            map.put("light_vibrant", p.getLightVibrantSwatch().getRgb());
        }
        if (p.getMutedSwatch() != null) {
            map.put("muted", p.getMutedSwatch().getRgb());
        }
        if (p.getDarkMutedSwatch() != null) {
            map.put("dark_muted", p.getDarkMutedSwatch().getRgb());
        }
        if (p.getLightMutedSwatch() != null) {
            map.put("light_muted", p.getLightMutedSwatch().getRgb());
        }
        return map;
    }
}
- Mình đã trình bày hết part a của phần thứ 3 trong material design.
- Bài viết chắc chắn còn nhiều chỗ sai, mong mọi người góp ý và đóng góp ở phía dưới.
- Project mẫu: https://github.com/fs-sournary/MaterialDesignSample/
