Giới thiệu Retrofit 2 HTTP Client
Retrofit là gì Retrofit là một thư viện HTTP Client cho Android và Java. Retrofit giups dễ dàng kết nối tới một REST web service bằng cách dịch API thành các Java interface. Thư viện mạnh mẽ này giup chúng ta làm việc dễ dàng với dữ liệu JSON hay XML sau đó phân tích thành các đối tượng ...

Retrofit là gì
Retrofit là một thư viện HTTP Client cho Android và Java. Retrofit giups dễ dàng kết nối tới một REST web service bằng cách dịch API thành các Java interface.
Thư viện mạnh mẽ này giup chúng ta làm việc dễ dàng với dữ liệu JSON hay XML sau đó phân tích thành các đối tượng object cơ bản Plain Old Java Objects (POJOs). Nó cũng cung cấp đầy đủ các phương thức GET, POST, PUT, PATCH, và DELETE.
Gioongs như hầu hết các thư viện mã nguồn mở khác, Retrofit được xây dựng dựa trên một số thư viện và công cụ mạnh mẽ. Cụ thể, Retrofit được xây dựng dựa trên OkHttp để xử lí network request. Ngoài ra, Retrofit không có bất kì converter nào để phân tích từ JSON sang các Java object. Thay vào đó nó hỗ trợ các thư viện phân tích JSON khác để thực hiện việc đó :
- Gson: com.squareup.retrofit:converter-gson
- Jackson: com.squareup.retrofit:converter-jackson
- Moshi: com.squareup.retrofit:converter-moshi
Đối với Protocol Buffers, Retrofit hỗ trợ :
- Protobuf: com.squareup.retrofit2:converter-protobuf
- Wire: com.squareup.retrofit2:converter-wire
Và cho XML, Retrofit hỗ trợ :
- Simple Framework: com.squareup.retrofit2:converter-simpleframework
1. Tạo Project
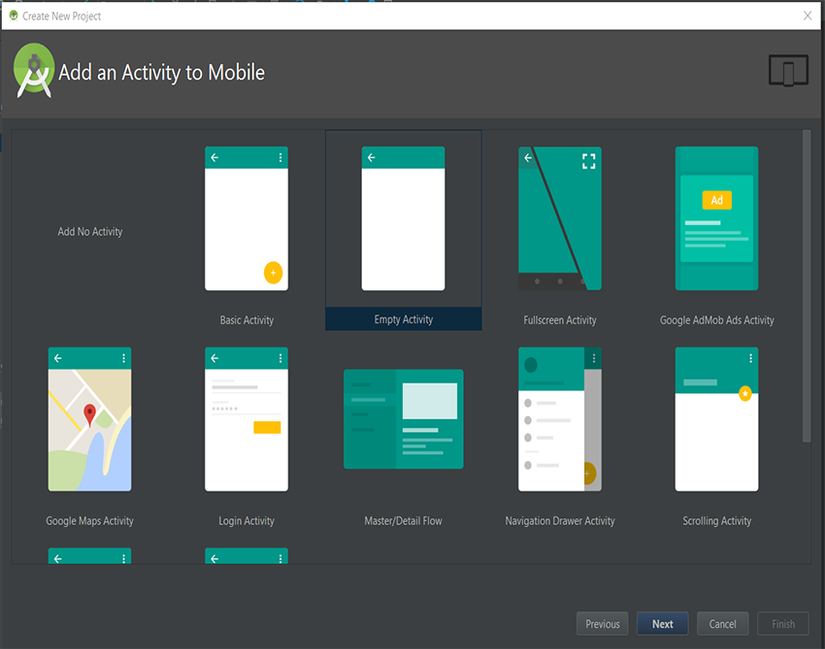
Mở Android Studio và tạo mới một Project với một actitivy rỗng MainActivity

2. Khai báo thư viện
Sau khi đã tạo Project, khai báo các thư viện sau trong build.gradle, bao gồm recyclerview, Retrofit, và Google Gson để parser JSON thành các Java object :
// Retrofit
compile 'com.squareup.retrofit2:retrofit:2.1.0'

// JSON Parsing
compile 'com.google.code.gson:gson:2.6.1'
compile 'com.squareup.retrofit2:converter-gson:2.1.0'

// recyclerview
compile 'com.android.support:recyclerview-v7:25.0.1'
Đừng quên sync project để download các thư viện đã khai báo ở trên.
3. Thêm permission INTERNET
Để thực hiện các tác vụ liên quan đến network, chúng ta cần thên permission INTERNET trong AndroidManifest.xml :
<?xml version="1.0" encoding="utf-8"?>
<manifest xmlns:android="http://schemas.android.com/apk/res/android"
          package="com.chikeandroid.retrofittutorial">

    <uses-permission android:name="android.permission.INTERNET" />

    <application
            android:allowBackup="true"
            android:icon="@mipmap/ic_launcher"
            android:label="@string/app_name"
            android:supportsRtl="true"
            android:theme="@style/AppTheme">
        <activity android:name=".MainActivity">
            <intent-filter>
                <action android:name="android.intent.action.MAIN"/>

                <category android:name="android.intent.category.LAUNCHER"/>
            </intent-filter>
        </activity>
    </application>

</manifest>
4. Tạo các model
Chúng ta sẽ tạo ra các model từ JSON trả về bằng tool sau : jsonschema2pojo
Ví dụ
Copy và paste link sau https://api.stackexchange.com/2.2/answers?order=desc&sort=activity&site=stackoverflow lên trình duyệt của bạn ( hoặc Postman nếu bạn đã từng dùng ). Bạn sẽ thấy dữ liệu trả về là JSON như sau :

{
  "items": [
    {
      "owner": {
        "reputation": 1,
        "user_id": 6540831,
        "user_type": "registered",
        "profile_image": "https://www.gravatar.com/avatar/6a468ce8a8ff42c17923a6009ab77723?s=128&d=identicon&r=PG&f=1",
        "display_name": "bobolafrite",
        "link": "http://stackoverflow.com/users/6540831/bobolafrite"
      },
      "is_accepted": false,
      "score": 0,
      "last_activity_date": 1480862271,
      "creation_date": 1480862271,
      "answer_id": 40959732,
      "question_id": 35931342
    },
    {
      "owner": {
        "reputation": 629,
        "user_id": 3054722,
        "user_type": "registered",
        "profile_image": "https://www.gravatar.com/avatar/0cf65651ae9a3ba2858ef0d0a7dbf900?s=128&d=identicon&r=PG&f=1",
        "display_name": "jeremy-denis",
        "link": "http://stackoverflow.com/users/3054722/jeremy-denis"
      },
      "is_accepted": false,
      "score": 0,
      "last_activity_date": 1480862260,
      "creation_date": 1480862260,
      "answer_id": 40959731,
      "question_id": 40959661
    },
    ...
  ],
  "has_more": true,
  "backoff": 10,
  "quota_max": 300,
  "quota_remaining": 241
}
Phân tích dữ liệu JSON thành các đối tượng Java
Sự dụng jsonschema2pojo để phân tích dữ liệu JSON ở trên :

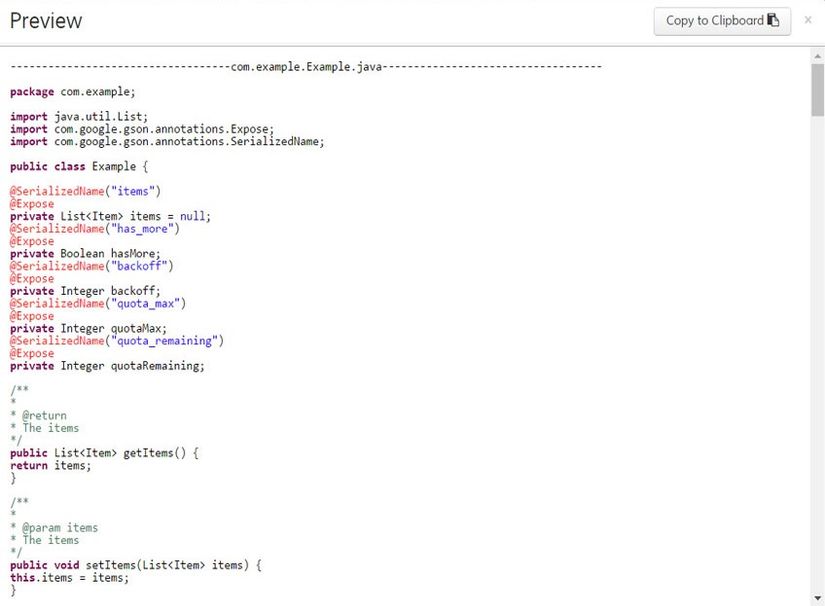
Click Preview để sinh ra các Java object :

@SerializedName annotation được sử dụng để map giuwax JSON keys và các trường trong Object :
@SerializedName("quota_remaining")
@Expose
private Integer quotaRemaining;
Import model vào Android Studio
Bây giowf chúng ta quay lại Android Stuio, tạo một package mới bên trong main, đặt tên là data. Bên trong package data, tạo thêm 1 package nữa tên là model. Bên trong package model, tạo một class tên là Owner. COpy class mà được tạo ra bởi jsonschema2pojo ở trên và paste nó vào Owner clas trong Android Studio :
import com.google.gson.annotations.Expose;
import com.google.gson.annotations.SerializedName;

public class Owner {

    @SerializedName("reputation")
    @Expose
    private Integer reputation;
    @SerializedName("user_id")
    @Expose
    private Integer userId;
    @SerializedName("user_type")
    @Expose
    private String userType;
    @SerializedName("profile_image")
    @Expose
    private String profileImage;
    @SerializedName("display_name")
    @Expose
    private String displayName;
    @SerializedName("link")
    @Expose
    private String link;
    @SerializedName("accept_rate")
    @Expose
    private Integer acceptRate;


    public Integer getReputation() {
        return reputation;
    }

    public void setReputation(Integer reputation) {
        this.reputation = reputation;
    }

    public Integer getUserId() {
        return userId;
    }

    public void setUserId(Integer userId) {
        this.userId = userId;
    }

    public String getUserType() {
        return userType;
    }

    public void setUserType(String userType) {
        this.userType = userType;
    }

    public String getProfileImage() {
        return profileImage;
    }

    public void setProfileImage(String profileImage) {
        this.profileImage = profileImage;
    }

    public String getDisplayName() {
        return displayName;
    }

    public void setDisplayName(String displayName) {
        this.displayName = displayName;
    }

    public String getLink() {
        return link;
    }

    public void setLink(String link) {
        this.link = link;
    }

    public Integer getAcceptRate() {
        return acceptRate;
    }

    public void setAcceptRate(Integer acceptRate) {
        this.acceptRate = acceptRate;
    }
}
Tương tự với class Item :
import com.google.gson.annotations.Expose;
import com.google.gson.annotations.SerializedName;

public class Item {

    @SerializedName("owner")
    @Expose
    private Owner owner;
    @SerializedName("is_accepted")
    @Expose
    private Boolean isAccepted;
    @SerializedName("score")
    @Expose
    private Integer score;
    @SerializedName("last_activity_date")
    @Expose
    private Integer lastActivityDate;
    @SerializedName("creation_date")
    @Expose
    private Integer creationDate;
    @SerializedName("answer_id")
    @Expose
    private Integer answerId;
    @SerializedName("question_id")
    @Expose
    private Integer questionId;
    @SerializedName("last_edit_date")
    @Expose
    private Integer lastEditDate;

    public Owner getOwner() {
        return owner;
    }

    public void setOwner(Owner owner) {
        this.owner = owner;
    }

    public Boolean getIsAccepted() {
        return isAccepted;
    }

    public void setIsAccepted(Boolean isAccepted) {
        this.isAccepted = isAccepted;
    }

    public Integer getScore() {
        return score;
    }

    public void setScore(Integer score) {
        this.score = score;
    }

    public Integer getLastActivityDate() {
        return lastActivityDate;
    }

    public void setLastActivityDate(Integer lastActivityDate) {
        this.lastActivityDate = lastActivityDate;
    }

    public Integer getCreationDate() {
        return creationDate;
    }

    public void setCreationDate(Integer creationDate) {
        this.creationDate = creationDate;
    }

    public Integer getAnswerId() {
        return answerId;
    }

    public void setAnswerId(Integer answerId) {
        this.answerId = answerId;
    }

    public Integer getQuestionId() {
        return questionId;
    }

    public void setQuestionId(Integer questionId) {
        this.questionId = questionId;
    }

    public Integer getLastEditDate() {
        return lastEditDate;
    }

    public void setLastEditDate(Integer lastEditDate) {
        this.lastEditDate = lastEditDate;
    }
}
Và cuối cùng là SOAnswersResponse
import com.google.gson.annotations.Expose;
import com.google.gson.annotations.SerializedName;

import java.util.List;

public class SOAnswersResponse {

    @SerializedName("items")
    @Expose
    private List<Item> items = null;
    @SerializedName("has_more")
    @Expose
    private Boolean hasMore;
    @SerializedName("backoff")
    @Expose
    private Integer backoff;
    @SerializedName("quota_max")
    @Expose
    private Integer quotaMax;
    @SerializedName("quota_remaining")
    @Expose
    private Integer quotaRemaining;

    public List<Item> getItems() {
        return items;
    }

    public void setItems(List<Item> items) {
        this.items = items;
    }

    public Boolean getHasMore() {
        return hasMore;
    }

    public void setHasMore(Boolean hasMore) {
        this.hasMore = hasMore;
    }

    public Integer getBackoff() {
        return backoff;
    }

    public void setBackoff(Integer backoff) {
        this.backoff = backoff;
    }

    public Integer getQuotaMax() {
        return quotaMax;
    }

    public void setQuotaMax(Integer quotaMax) {
        this.quotaMax = quotaMax;
    }

    public Integer getQuotaRemaining() {
        return quotaRemaining;
    }

    public void setQuotaRemaining(Integer quotaRemaining) {
        this.quotaRemaining = quotaRemaining;
    }
}
5. Tạo Retrofit instance
Để thực hiện các request tới một REST API với Retrofit, chúng ta cần tạo một instance sử dụng lớp Retrofit.Builder và cấu hính nó với một base URL.
Tạo thêm một package bên trong package data và đặt tên nó là remote. Bên trong package remote,. Bên trong package remote, tạo một class tên là RetrofitClient. Retrofit cần một base URL để tạo instance của nó, do đó ta sẽ truyền vào một URL :
import retrofit2.Retrofit;
import retrofit2.converter.gson.GsonConverterFactory;

public class RetrofitClient {

    private static Retrofit retrofit = null;

    public static Retrofit getClient(String baseUrl) {
        if (retrofit==null) {
            retrofit = new Retrofit.Builder()
                    .baseUrl(baseUrl)
                    .addConverterFactory(GsonConverterFactory.create())
                    .build();
        }
        return retrofit;
    }
}
6. Tạo API Interface
Bên trong package remote, tạo một interface tên là SOService. Nó sẽ bao gồm các phương thức để chúng ta thực hiện các HTTP request chẳng hạn như GET, POST, PUT, PATCH, và DELETE.
import java.util.List;

import retrofit2.Call;
import retrofit2.http.GET;

public interface SOService {

   @GET("/answers?order=desc&sort=activity&site=stackoverflow")
   Call<SOAnswersResponse> getAnswers();

   @GET("/answers?order=desc&sort=activity&site=stackoverflow")
   Call<SOAnswersResponse> getAnswers(@Query("tagged") String tags);
}
7. Tạo API Utils
public class ApiUtils {

    public static final String BASE_URL = "https://api.stackexchange.com/2.2/";

    public static SOService getSOService() {
        return RetrofitClient.getClient(BASE_URL).create(SOService.class);
    }
}
8. Hiển thị lên RecyclerView
Để kết qủa hiển thị lên một recyclerview, chúng ta cần một Adapter :
public class AnswersAdapter extends RecyclerView.Adapter<AnswersAdapter.ViewHolder> {

    private List<Item> mItems;
    private Context mContext;
    private PostItemListener mItemListener;

    public class ViewHolder extends RecyclerView.ViewHolder implements View.OnClickListener{

        public TextView titleTv;
        PostItemListener mItemListener;

        public ViewHolder(View itemView, PostItemListener postItemListener) {
            super(itemView);
            titleTv = (TextView) itemView.findViewById(android.R.id.text1);

            this.mItemListener = postItemListener;
            itemView.setOnClickListener(this);
        }

        @Override
        public void onClick(View view) {
            Item item = getItem(getAdapterPosition());
            this.mItemListener.onPostClick(item.getAnswerId());

            notifyDataSetChanged();
        }
    }

    public AnswersAdapter(Context context, List<Item> posts, PostItemListener itemListener) {
        mItems = posts;
        mContext = context;
        mItemListener = itemListener;
    }

    @Override
    public AnswersAdapter.ViewHolder onCreateViewHolder(ViewGroup parent, int viewType) {

        Context context = parent.getContext();
        LayoutInflater inflater = LayoutInflater.from(context);

        View postView = inflater.inflate(android.R.layout.simple_list_item_1, parent, false);

        ViewHolder viewHolder = new ViewHolder(postView, this.mItemListener);
        return viewHolder;
    }

    @Override
    public void onBindViewHolder(AnswersAdapter.ViewHolder holder, int position) {

        Item item = mItems.get(position);
        TextView textView = holder.titleTv;
        textView.setText(item.getOwner().getDisplayName());
    }

    @Override
    public int getItemCount() {
        return mItems.size();
    }

    public void updateAnswers(List<Item> items) {
        mItems = items;
        notifyDataSetChanged();
    }

    private Item getItem(int adapterPosition) {
        return mItems.get(adapterPosition);
    }

    public interface PostItemListener {
        void onPostClick(long id);
    }
}
9. Thực hiện Request
Bên trong onCreate() của MainActivity, chúng ta khởi tạo instance của SOService, khởi tạo recyclerview, và adapterũng. Cuối cùng chúng ta gọi phương thức loadAnswers() :
private AnswersAdapter mAdapter;
   private RecyclerView mRecyclerView;
   private SOService mService;

   @Override
   protected void onCreate (Bundle savedInstanceState)  {
       super.onCreate( savedInstanceState );
       setContentView(R.layout.activity_main );
       mService = ApiUtils.getSOService();
       mRecyclerView = (RecyclerView) findViewById(R.id.rv_answers);
       mAdapter = new AnswersAdapter(this, new ArrayList<Item>(0), new AnswersAdapter.PostItemListener() {

           @Override
           public void onPostClick(long id) {
               Toast.makeText(MainActivity.this, "Post id is" + id, Toast.LENGTH_SHORT).show();
           }
       });

       RecyclerView.LayoutManager layoutManager = new LinearLayoutManager(this);
       mRecyclerView.setLayoutManager(layoutManager);
       mRecyclerView.setAdapter(mAdapter);
       mRecyclerView.setHasFixedSize(true);
       RecyclerView.ItemDecoration itemDecoration = new DividerItemDecoration(this, DividerItemDecoration.VERTICAL_LIST);
       mRecyclerView.addItemDecoration(itemDecoration);

       loadAnswers();
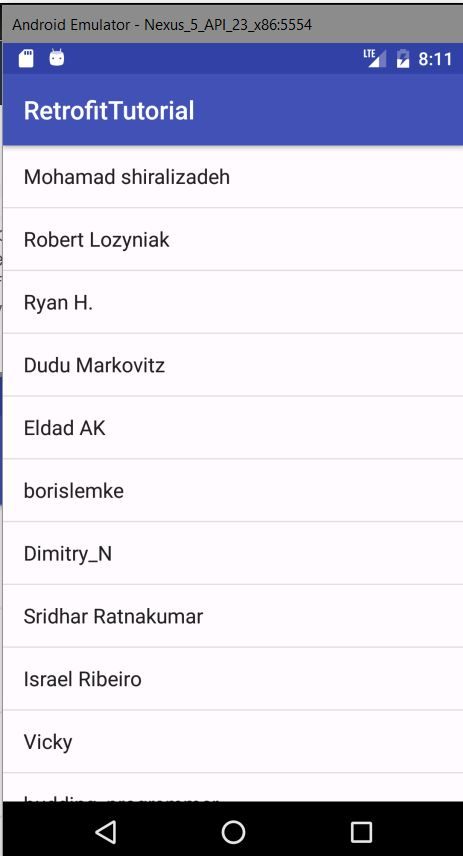
Phương thức loadAnswers() tạo một request đến network bằng cách gọi enqueue(). Khi response trả về, Retrofit sẽ giúp chúng ta parse từ JSON sang các Java object, sử dụng GsonConverter :
public void loadAnswers() {
    mService.getAnswers().enqueue(new Callback<SOAnswersResponse>() {
    @Override
    public void onResponse(Call<SOAnswersResponse> call, Response<SOAnswersResponse> response) {

        if(response.isSuccessful()) {
            mAdapter.updateAnswers(response.body().getItems());
            Log.d("MainActivity", "posts loaded from API");
        }else {
            int statusCode  = response.code();
            // handle request errors depending on status code
        }
    }

    @Override
    public void onFailure(Call<SOAnswersResponse> call, Throwable t) {
       showErrorMessage();
        Log.d("MainActivity", "error loading from API");

    }
});
}

