Learning Spring Persistent
Do tính chất bị động khi học, tài liệu sẽ được cập nhật không theo chuẩn hoặc theo một thứ tự nào cả. Người đọc cân nhắc trước khi tham khảo ))))))))))))). 1 Spring data jpa 1.1 Giới thiệu Spring JPA Trong JPA mỗi một lớp Entity sẽ tương ứng với một bảng trong cơ sở dữ liệu. Có rất nhiều ...
Do tính chất bị động khi học, tài liệu sẽ được cập nhật không theo chuẩn hoặc theo một thứ tự nào cả. Người đọc cân nhắc trước khi tham khảo  ))))))))))))).
1 Spring data jpa
1.1 Giới thiệu Spring JPA
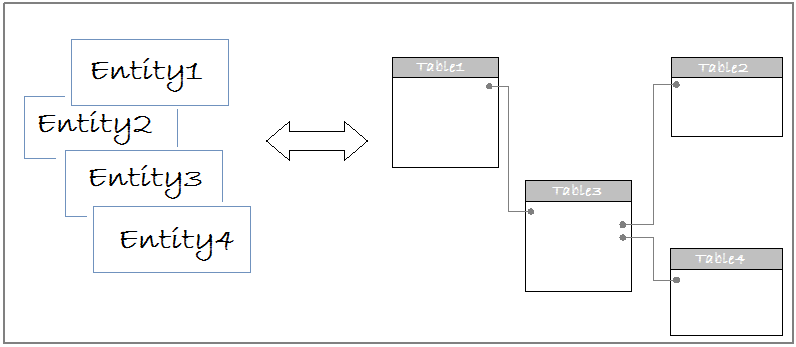
Trong JPA mỗi một lớp Entity sẽ tương ứng với một bảng trong cơ sở dữ liệu. Có rất nhiều bảng trong cơ sở dữ liệu vì vậy sẽ có rất nhiều lớp Entity. Bạn thường xuyên phải làm việc với các Entity.

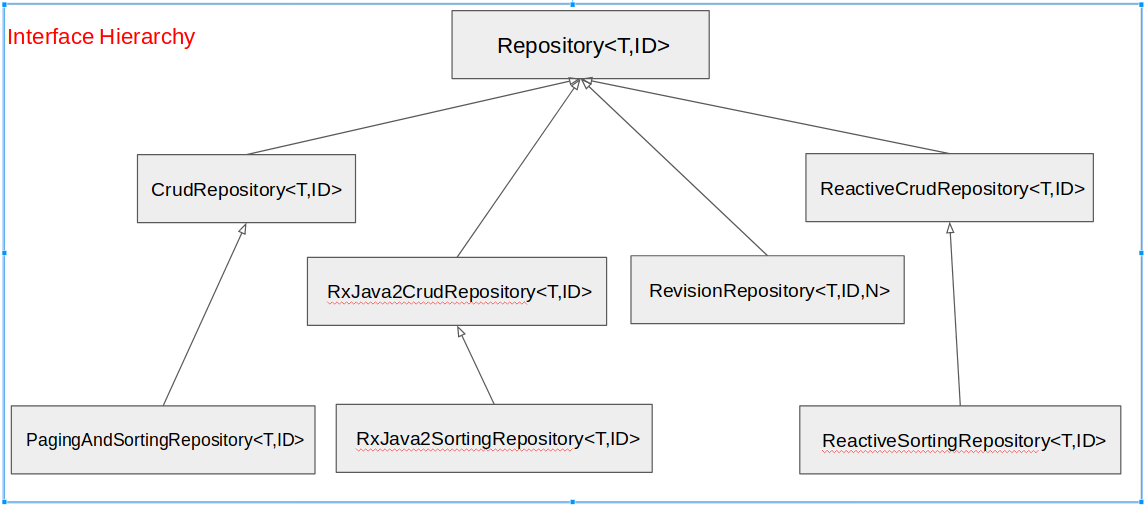
Vậy làm thế nào để có thể thực hiện các thao tác cơ bản CRUD (CREATE, READ, UPDATE, DELETE) đối với một bảng trong database. Rất đơn giản(chém thế thôi, chứ nó không dễ xơi tý nào đâu  ( ),Spring định nghĩa thư viện Spring Data JPA. Theo quy tắc của Spring Data JPA bạn chỉ cần định nghĩa một interface mở rộng interface Repository<T,ID>, và khai báo tên các phương thức để thao tác với dữ liệu của Entity này. Spring Data JPA sẽ tự tạo một lớp thi hành (implements) interface đó cho bạn.

1.2 Install JPA
1.2.1 Pom file
Nội dung File Pom.xml:
<?xml version="1.0" encoding="UTF-8"?>
<project xmlns="http://maven.apache.org/POM/4.0.0" xmlns:xsi="http://www.w3.org/2001/XMLSchema-instance"
	xsi:schemaLocation="http://maven.apache.org/POM/4.0.0 http://maven.apache.org/xsd/maven-4.0.0.xsd">
	<modelVersion>4.0.0</modelVersion>
	<parent>
		<groupId>org.springframework.boot</groupId>
		<artifactId>spring-boot-starter-parent</artifactId>
		<version>1.5.18.RELEASE</version>
		<relativePath/>
	</parent>
	<groupId>learning_spring</groupId>
	<artifactId>learning_jpa</artifactId>
	<version>0.0.1-SNAPSHOT</version>
	<name>learning_jpa</name>
	<description>Demo project for Spring Boot</description>

	<properties>
		<java.version>1.8</java.version>
	</properties>

	<dependencies>
		<dependency>
			<groupId>org.springframework.boot</groupId>
			<artifactId>spring-boot-starter-data-jpa</artifactId>
		</dependency>
        <dependency>
            <groupId>org.springframework.boot</groupId>
            <artifactId>spring-boot-starter-web</artifactId>
        </dependency>

		<dependency>
			<groupId>org.springframework.boot</groupId>
			<artifactId>spring-boot-starter-test</artifactId>
			<scope>test</scope>
		</dependency>
		<dependency>
			<groupId>mysql</groupId>
			<artifactId>mysql-connector-java</artifactId>
			<scope>runtime</scope>
		</dependency>
	</dependencies>

	<build>
		<plugins>
			<plugin>
				<groupId>org.springframework.boot</groupId>
				<artifactId>spring-boot-maven-plugin</artifactId>
			</plugin>
		</plugins>
	</build>

</project>
Spring boot có nhiệm vụ giúp tạo các ứng dụng spring một cách dễ dàng hơn. Nó cho phép tự động cấu hình các chức năng của spring và jpa là một trong số các chức năng mà spring boot cho phép tự động cấu hình.
Để cho phép thực hiện chức năng với jpa,ta cần các dependency sau: spring-boot-starter và spring-boot-starter-data-jpa.
Spring boot cấu hình hibernate như là một lớp implement mặc định cho jpa. Do đó ta không cần thiết định nghĩa mới entityManagerFactory trừ khi người lập trình muốn sửa đổi nó theo yêu cầu của từng bài toán riêng biệt.
1.2.2 Cấu hình spring jpa - hibernate
Mình sẽ có 1 bài riêng và đi vào chi tiết về cấu hình trong spring  )). Trong bài này, mình chỉ đưa ra cách làm để cấu hình project spring boot + jpa nhé
  )).
)).
Cấu hình để spring kết nối đến database. Tạo một class có tên DatabaseConfiguration và nội dung như sau:
package learning_spring.learning_jpa.configuration;

import com.sun.deploy.panel.JavaPanel;
import org.springframework.context.annotation.Bean;
import org.springframework.context.annotation.Configuration;
import org.springframework.jdbc.datasource.DriverManagerDataSource;
import org.springframework.transaction.annotation.EnableTransactionManagement;

import javax.sql.DataSource;

@Configuration
@EnableTransactionManagement
public class DatabaseConfiguration {

    // For database config
    @Bean
    public DataSource restDataSource(){
        DriverManagerDataSource dataSource = new DriverManagerDataSource();
        dataSource.setDriverClassName("com.mysql.jdbc.Driver");
        dataSource.setUrl("jdbc:mysql://localhost:3306/testmanagement");
        dataSource.setUsername("root");
        dataSource.setPassword("123456");
        return dataSource;
    }
}
Cấu hình properties cho jpa hibernate trong file application.properties:
# ===============================
# JPA / HIBERNATE
# ===============================

spring.jpa.show-sql=true
spring.jpa.hibernate.ddl-auto=update
spring.jpa.properties.hibernate.dialect=org.hibernate.dialect.MySQL5Dialect
1.3 Tính chất của Spring JPA
1.3.1 Entity
1.3.2 Repository
1.3.2.1 Định nghĩa JPA Repository 1.3.2.2 Các phương thức QuerryThis section describes the various ways to create a query with Spring Data JPA.
The repository proxy has two ways to derive a store-specific query from the method name:
-
By deriving the query from the method name directly.
-
By using a manually defined query.
Although getting a query derived from the method name is quite convenient, one might face the situation in which either the method name parser does not support the keyword one wants to use or the method name would get unnecessarily ugly. So you can either use JPA named queries through a naming convention or rather annotate your query method with @Query .
1.3.2.3 Querry by method nameVí dụ:
public interface UserRepository extends Repository<User, Long> {

  List<User> findByEmailAddressAndLastname(String emailAddress, String lastname);
}
We create a query using the JPA criteria API from this, but, essentially, this translates into the following query: select u from User u where u.emailAddress = ?1 and u.lastname = ?2.
The following table describes the keywords supported for JPA and what a method containing that keyword translates to:
| Keyword | Sample | JPQL snippet |
|---|---|---|
| And | findByLastnameAndFirstname | … where x.lastname = ?1 and x.firstname = ?2 |
| Or | findByLastnameOrFirstname | … where x.lastname = ?1 or x.firstname = ?2 |
| Is,Equals | findByFirstname,findByFirstnameIs,findByFirstnameEquals | … where x.firstname = ?1 |
| Between | findByStartDateBetween | |
| … where x.startDate between ?1 and ?2 | ||
| LessThan | findByAgeLessThan | |
| … where x.age < ?1 | ||
| LessThanEqual | findByAgeLessThanEqual | … where x.age <= ?1 |
| GreaterThan | findByAgeGreaterThan | … where x.age > ?1 |
| GreaterThanEqual | findByAgeGreaterThanEqual | … where x.age >= ?1 |
| After | findByStartDateAfter | … where x.startDate > ?1 |
| Before | findByStartDateBefore | … where x.startDate < ?1 |
| IsNull | findByAgeIsNull | … where x.age is null |
| IsNotNull,NotNull | findByAge(Is)NotNull | … where x.age not null |
| Like | findByFirstnameLike | … where x.firstname like ?1 |
| NotLike | findByFirstnameNotLike | … where x.firstname not like ?1 |
| Containing | findByFirstnameContaining | … where x.firstname like ?1 (parameter bound wrapped in %) |
| OrderBy | findByAgeOrderByLastnameDesc | … where x.age = ?1 order by x.lastname desc |
| In | findByAgeIn(Collection<Age> ages) | … where x.age in ?1 |
Có hai loại Query:
- Query
- NativeQuery
Sự khác biệt giữa các loại Query đã được trình bày trong link sau: Sự khác biệt giữa các loại Query Trong Spring JPA
Tài liệu này hiên tại chỉ hướng dẫn cách sử dụng NativeQuery :
Chú thích @Query cho phép chạy các câu lệnh native query sql khi cờ nativeQuery được gán là true, như trong ví dụ dưới đây:
public interface UserRepository extends JpaRepository<User, Long> {

  @Query(value = "SELECT * FROM USERS WHERE EMAIL_ADDRESS = ?1", nativeQuery = true)
  User findByEmailAddress(String emailAddress);
}
Có hai cách để thực hiện truyền tham số từ các biến vào câu lệnh query:
- Thực hiện truyền tham số theo vị trí khai báo của biến trong hàm.
    // example for query by native query get input value as order
    @Query(value = "SELECT name FROM role where name=?1",
            nativeQuery = true)
    List<String> findRoleNameByInputName(String inputName);
- Thực hiện truyền tham số theo bí danh của biến trong hàm.
    // example for query by native query and get input by Named Parameters
    @Query(value="SELECT name FROM role where name=:inputName",
            nativeQuery = true)
    List<String> findRoleNameByInputParameterName(@Param("inputName") String inputName);
1.3.2.5 Phân trang và sắp xếp (Pagination and Sorting)
Thay vì phân trang hoặc sắp xếp bằng cách sử dụng trong câu lệnh sql, spring hỗ trợ việc tự động phân trang. Ta chỉ cần chuyền đối tượng Pageable vào các phương thức trong interface Repository.
Ví dụ dưới đinh minh họa rõ hơn quá trình tạo nên đối tượng Pagable đến khi truyền đối tượng Pagable vào các phương thức trong Interface Repository:
- Tạo một Get API trong controller như sau :
    @GetMapping("/getRoleNameByPaginateAndSort")
    public List<String> getRoleNameByPaginateAndSort(){
        PageRequest pageable = new PageRequest(0, 5, Sort.Direction.DESC, "id");
        return roleRepository.findRoleNameByPaginateAndSort(pageable);
    }
-
Với PageRequest là class nội tại của Spring mà implements Interface Pageable. Các tham số khi truyền vào phương thức khởi tạo của lớp PageRequest bao gồm: Vị trí của trang (Bắt đầu từ 0), Số phần tử trong một trang, quy luật sắp xếp (DESC hoặc ASC), thuộc tính trong database sẽ được áp quy luật sắp xếp (vd id).
-
Tạo một phương thức trong Interfece Repository như sau:
    @Query(value = "SELECT name FROM role /*#pageable*/",
            countQuery = "SELECT count(name) FROM role",
            nativeQuery = true)
    List<String> findRoleNameByPaginateAndSort(Pageable pageable);
