PHP CLI sử dụng Symfony Console
Khi sử dụng PHP, đôi khi bạn chỉ muốn kiểm tra các code, viết thử các function với PHP bạn có thể sử dụng text editor, save file và chạy dưới trình duyệt hoặc đơn giản hơn là sử dụng command line. Khi nào command line PHP thường được sử dụng? Khi bạn import hoặc export dữ liệu lớn Xóa cache ...
Khi sử dụng PHP, đôi khi bạn chỉ muốn kiểm tra các code, viết thử các function với PHP bạn có thể sử dụng text editor, save file và chạy dưới trình duyệt hoặc đơn giản hơn là sử dụng command line.
Khi nào command line PHP thường được sử dụng?
- Khi bạn import hoặc export dữ liệu lớn
- Xóa cache và log
- update indexes cho search engine với dữ liệu mới nhất từ database serve
Symfony/Console là 1 package độc lập được phát triển bởi Fabien Potencier, người đứng sau Symfony2 framework. Đương nhiên Symfony/Console là 1 phần của Symfony2 framework nhưng nó cũng là sức mạnh chính của Laravel4’s Artisan CLI và thường được sử dụng trong các Silex applications thông qua ConsoleServiceProvider
I. Cài đặt Symfony/Console
- Composer file
Bạn nên cài đặt thông qua Composer. Tạo file composer.json với nội dung như sau
{
    "name": "truongnv/php_training",
    "description": "PHP CLI with symfony Console",
    "type": "library",
    "require": {
        "symfony/console": "^3.0",
        "php": ">=5.4"
    },
    "autoload": {
        "psr-4": {
            "": "src/"
        }
    },
    "license": "MIT",
    "authors": [
        {
            "name": "Nguyen Truong",
            "email": "truongnv0211@gmail.com"
        }
    ],
    "minimum-stability": "dev"
}
Sau đó chạy lệnh composer install để thực thi. Composer sẽ tạo thư mục vendor và download symfony/console package vào đó, đồng thời composer cũng tạo file autoload.php chúng ta sẽ sử dụng sau đây
- Console file
Tiếp theo các bạn tạo thư mục app, trong đó tạo file console với nội dung như sau:
    <?php

    require __DIR__ . '/../vendor/autoload.php';

    // import the Symfony Console Application
    use SymfonyComponentConsoleApplication;

    $app = new Application();
    $app->run();
    ?>
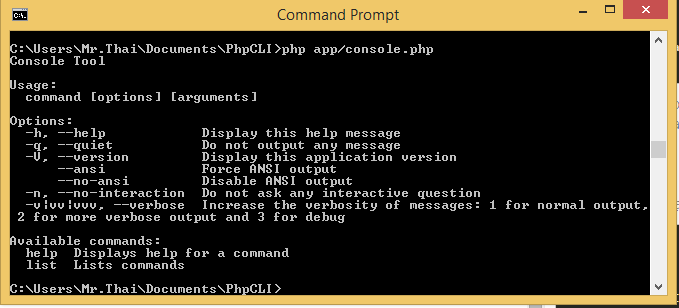
Để thực thi các bạn chạy lệnh php app/console.php. Nếu nhận được kết quả như hình bên dưới thì bạn đã cài đặt thành công.

II. SayHello Command.
Bây giờ chúng ta sẽ tạo 1 command đơn giản. Bạn tạo thư mục src/Commands. Trong thư mục trên tạo file SayHelloCommand.php với nội dung như sau:
<?php

namespace Commands;

use SymfonyComponentConsoleCommandCommand;
use SymfonyComponentConsoleInputInputArgument;
use SymfonyComponentConsoleInputInputInterface;
use SymfonyComponentConsoleInputInputOption;
use SymfonyComponentConsoleOutputOutputInterface;

class SayHelloCommand extends Command
{
    protected function configure()
    {
        $this->setName('say:hello')
             ->setDescription('Say hello with someone')
             ->addArgument(
                'name',
                InputArgument::REQUIRED,
                'Tell me your name?'
             )
             ->addOption(
                'lang',
                null,
                InputOption::VALUE_OPTIONAL,
                'Language you want to display'
             );
    }

    protected function execute(InputInterface $input, OutputInterface $output)
    {
    	$hello = [
    		'en' => 'Hello ',
    		'vn' => 'Xin chào ',
    		'fr' => 'Bonjour ',
    		'cn' => '您好 ',
    		'ru' => 'Здравствуйте',
    		'kr' => '안녕하세요',
    	];

        $name = $input->getArgument('name');

        $lang = $input->getOption('lang');
        if ($lang) {
        	if (!in_array($lang, array_keys($hello))) {
	            $output->writeln('Dont support this language');
	        } else {
	        	$output->writeln(sprintf('%s%s', $hello[$lang], $name));
	        }
        } else {
        	$output->writeln(sprintf('%s%s', $hello['en'], $name));
        }
    }
}
Phân tích một chút về cấu trúc của class SayHelloCommand gồm 2 function configure và excute:
- Hàm configure chứa các cài đặt của command:
- setName() set tên cho command, là tên gọi của của command khi thực thi
- setDescription() Diễn giải nội dung của command.
- Khai báo input cho command addArgument(), addOption(): Input của command gồm 2 loại là Arguments và Options:
- Arguments: Đây là lựa chọn đơn giản hơn và thường dùng để truyền 1 giá trị đơn vào command (ở ví dụ trên là tên), Argument có thể là 1 environment type như là dev, pre-production hoặc production, kiểu file để export như xml, csv, txt hoặc 1 kiểu ngày tháng đơn như 2016-01-28. Nếu bạn có nhiều argument thì thứ tự truyền là không thể thay đổi.
            app/console.php backup:database pre-production
            app/console.php export:marketing csv
            app/console.php export:accounting 2013-04-22
+ Options: Là một lựa chọn khác để truyền giá trị cho command, thường được dùng khi muốn truyền nhiều giá trị, khi truyền bạn cần sẽ cần chỉ rõ tên của option:
            app/console export:accounting --start 2013-02-12 --end 2013-02-01
            app/console export:accounting --end 2013-02-01 --start 2013-02-12
- Hàm excute là nơi chứa logic thực thi của command. Đây là nơi sẽ đưa ra kết quả. Hàm gồm 2 tham số là InputInterface input,OutputInterfaceinput, OutputInterface input,OutputInterfaceoutput. Để đưa giá trị ra màn hình ta sử dụng $$utput->writeln('Output');
Chỉnh sửa 1 chút file app/console.php
<?php

require __DIR__ . '/../vendor/autoload.php';

// import the Symfony Console Application
use SymfonyComponentConsoleApplication;
use CommandsSayHelloCommand;

$app = new Application();
$app->add(new SayHelloCommand());
$app->run();
?>
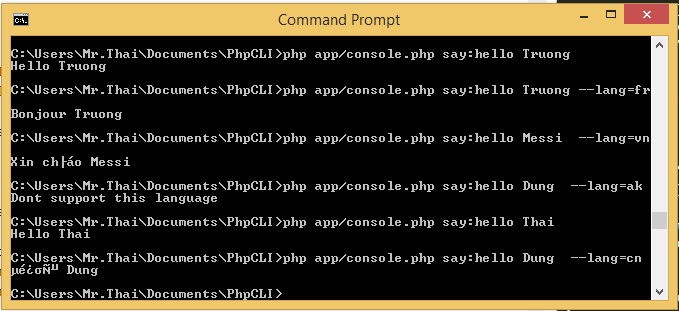
Bây giờ chạy lệnh php app/console 'Your Name' --lang='vn', và đây là kết quả bạn nhận được.

Có vẻ màu sắc hơn đơn điệu và nhàm chán. Chúng ta sẽ thay đổi một chút dữ liệu được hiển thị ra. Chỉnh sửa 1 chút file SayHelloCommand.php
use SymfonyComponentConsoleFormatterOutputFormatterStyle;

...

 $style = new OutputFormatterStyle('green', 'yellow', ['bold', 'blink']);
 $output->getFormatter()->setStyle('output-style', $style);
 if ($lang) {
     if (!in_array($lang, array_keys($hello))) {
	    $output->writeln('<output-style>Dont support this language</>');
	 } else {
	    $output->writeln(sprintf('<output-style>%s%s</>', $hello[$lang], $name));
	 }
  } else {
      $output->writeln(sprintf('<output-style>%s%s</>', $hello['en'], $name));
 }
Để thay đổi format hiển thị ta sử dụng SymfonyComponentConsoleFormatterOutputFormatterStyle. Màu sắc khả dụng cho foreground và background gồm: black, red, green, yellow, blue, magenta, cyan và white.
III. Console Helper
Symfony Console còn chưa các helper giúp bạn thực hiện các công việc khác nhau như:
- Question Helper: giúp người dùng có thể tương tác trực tiếp với command như nhập input..
- Formatter Helper: thay đổi định dạng của output.
- Progress Bar: Hiển thị progress bar
- Table: Hiển thị dữ liệu dưới dạng table
IV. Tổng kết
Symfony Console có thể không mạnh mẽ bằng các Console ra đời sau như Hoa Console, Webmorzat Console nhưng nó vẫn là công cụ tuyệt vời các tính năng có thể giải quyết được hầu hết các trường hợp sử dụng ở mức trung bình.
V.
