Practice Spring Social Connect Facbook
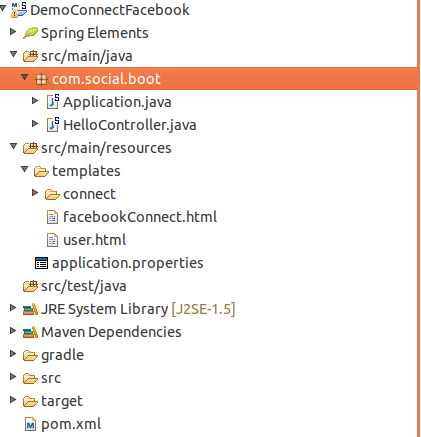
Chào các bạn nay mình xin chia sẻ cách connect tới facebook một cách dễ dàng khi sử dụng Spring Boot. Đây là câu truc project mình tạo, sau đây mình sẽ đi vào phân tích dựng project này. Enable Facebook Trước khi bạn có thể lấy dữ liệu của người dùng từ Facebook, bạn phải chỉ định ID của ứng ...
Chào các bạn nay mình xin chia sẻ cách connect tới facebook một cách dễ dàng khi sử dụng Spring Boot.
Đây là câu truc project mình tạo, sau đây mình sẽ đi vào phân tích dựng project này.

- Enable Facebook Trước khi bạn có thể lấy dữ liệu của người dùng từ Facebook, bạn phải chỉ định ID của ứng dụng trong file
application.properties
spring.social.facebook.appId=233668646673605
spring.social.facebook.appSecret=33b17e044ee6a4fa383f46ec6e28ea1d
- Create connection status views
ConnectController không định nghĩa view cho nó, nên bạn cần phải tạo chúng
Các bạn dựng các file html theo đường dẫn này
src/main/resources/templates/facebookConnect.html (1)
<html>
	<head>
		<title>Hello Facebook</title>
	</head>
	<body style="text-align: center;">
		<h3>Connect to Facebook</h3>

		<form action="/connect/facebook" method="POST">
			<input type="hidden" name="scope" value="user_posts" />
			<p><button type="submit">Connect to Facebook</button></p>
		</form>
	</body>
</html>
. .
src/main/resources/templates/connect/facebookConnected.html (2)
<html>
	<body>
		<h3>Connected to Facebook</h3>
		<p>
			Click <a href="/">here</a> to see some entries from your Facebook feed.
		</p>
	</body>
</html>
src/main/resources/templates/user.html (3)
<html>
	<head>
		<title>Hello Facebook</title>
	</head>
	<body>
		<h3>Hello, <span th:text="${facebookProfile.name}">Some User</span>!</h3>
		<h4>Here is your feed:</h4>
		<div th:each="post:${feed}">
			<b th:text="${post.from.name}">from</b> wrote:
			<p th:text="${post.message}">message text</p>
			<img th:if="${post.picture}" th:src="${post.picture}"/>
			<hr/>
		</div>
	</body>
</html>
. .
- Fetch Facebook data Facebook đã được cấu hình trong ứng dụng bây giờ bạn config Spring MVC lấy dữ liệu cho người dùng đã ủy quyền cho ứng dụng như sau:
src/main/java/hello/HelloController.java
package com.social.boot;

import org.springframework.social.connect.ConnectionRepository;
import org.springframework.social.facebook.api.Facebook;
import org.springframework.social.facebook.api.PagedList;
import org.springframework.social.facebook.api.Post;
import org.springframework.stereotype.Controller;
import org.springframework.ui.Model;
import org.springframework.web.bind.annotation.GetMapping;
import org.springframework.web.bind.annotation.RequestMapping;

@Controller
@RequestMapping("/")
public class HelloController {

    private Facebook facebook;
    private ConnectionRepository connectionRepository;

    public HelloController(Facebook facebook, ConnectionRepository connectionRepository) {
        this.facebook = facebook;
        this.connectionRepository = connectionRepository;
    }

    @GetMapping
    public String helloFacebook(Model model) {
        if (connectionRepository.findPrimaryConnection(Facebook.class) == null) {
            return "facebookConnect";
        }

        model.addAttribute("facebookProfile", facebook.userOperations().getUserProfile());
        PagedList<Post> feed = facebook.feedOperations().getFeed();
        model.addAttribute("feed", feed);
        return "user";
    }

}
Facebook được tạo ra bằng cách tiêm vào hàm constructor của HelloController Nếu người dùng authen Facebook thành công, ứng dụng sẽ lấy profile của người dùng cũng như một vài mục gần đây nhất trong nguồn cấp dữ liệu của người dùng. Dữ liệu được đặt vào model và trả về trang "user". Cuối cùng là file chay ứng dụng spring boot
src/main/java/hello/Application.java
package com.social.boot;

import org.springframework.boot.SpringApplication;
import org.springframework.boot.autoconfigure.SpringBootApplication;

@SpringBootApplication
public class Application {

    public static void main(String[] args) {
        SpringApplication.run(Application.class, args);
    }

}
Trong ứng dụng sping boot thì không cần đến file web.xml
Các bạn có thể xem thêm tại link tham khảo sau
https://spring.io/guides/gs/accessing-facebook/
