Real Time Rails Chat Application (Part 1)
Bạn đã bao giờ nghĩ về việc tạo 1 chat app giống như Facebook messenger ? Trong bài viết này, chúng ta sẽ sử dụng feature ActionCable trong Rails 5 để tạo 1 app có tính năng tương tự mà không sử dụng 1 front-end framework nào(ngoại trừ jquerry). Mục tiêu của chúng ta là tạo nên 1 ứng dụng chat real ...
Bạn đã bao giờ nghĩ về việc tạo 1 chat app giống như Facebook messenger ? Trong bài viết này, chúng ta sẽ sử dụng feature ActionCable trong Rails 5 để tạo 1 app có tính năng tương tự mà không sử dụng 1 front-end framework nào(ngoại trừ jquerry). Mục tiêu của chúng ta là tạo nên 1 ứng dụng chat real time, có thể hiển thị tin nhắn gửi đến và đi mà không cần bất cứ thao tác refresh trang nào.
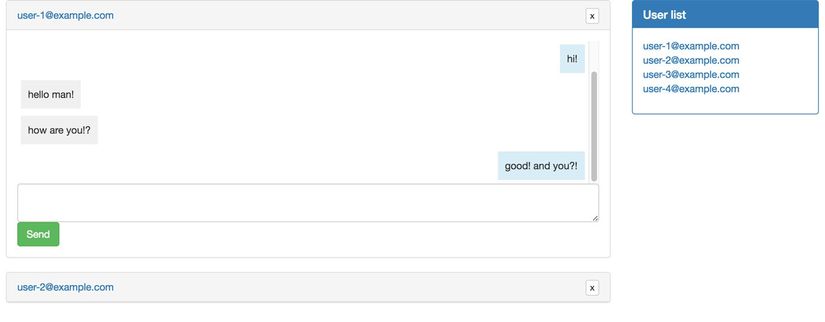
Ứng dụng sau khi hoàn thành sẽ như sau:
Basic setup
Đầu tiên hãy đảm bảo version Rails bạn đang sử dụng là version 5. Để kiểm tra, hãy chạy lệnh
$ rails -v
Rails 5.0.0.1
Nếu không phải Rails 5
$ gem install rails
Sau đó tạo 1 project mới. Chúng ta sẽ sử dụng SQLite làm database
$ rails new chat
$ cd chat
Bây giờ hãy tạo 1 gemset riêng biệt cho ứng dụng của chúng ta
$ touch .ruby-version
$ echo "ruby-2.3.1" > .ruby-version
$ touch .ruby-gemset
$ echo "chat" > .ruby-gemset
Sau đó rejoin thư mục để tạo gemset mới
$ cd ..
$ cd chat
$ gem install bundler
$ bundle install
Adding devise and seeds
Add gem devise, gem file của chúng ta trông sẽ như thế này
source 'https://rubygems.org'

gem 'rails', '~> 5.0.0', '>= 5.0.0.1'
gem 'sqlite3'
gem 'puma', '~> 3.0'
gem 'sass-rails', '~> 5.0'
gem 'uglifier', '>= 1.3.0'
gem 'jquery-rails'
gem 'devise'

group :development, :test do
  gem 'byebug', platform: :mri
end

group :development do
  gem 'listen', '~> 3.0.5'
  gem 'spring'
  gem 'spring-watcher-listen', '~> 2.0.0'
end
Sau đó chạy command
$ rails generate devise:install
$ rails generate devise user
$ rake db:migrate
Thêm authenticate_user! filter vào ApplicationController:
class ApplicationController < ActionController::Base
  before_action :authenticate_user!

  protect_from_forgery with: :exception
end
Tạo home page
$ rails g controller home index
Rails.application.routes.draw do
  devise_for :users
  root 'home#index'
end
Replace application.js và layouts/application.html.erb với
//= require jquery
//= require jquery_ujs
//= require_tree .
<!DOCTYPE html>
<html>
  <head>
    <title>Chat</title>
    <%= csrf_meta_tags %>
    <%= stylesheet_link_tag    'application', media: 'all' %>
    <%= javascript_include_tag 'application' %>
  </head>
  <body>
    <div class="container">
      <%= yield %>
    </div>
  </body>
</html>
seed.rb
password = 'pass123'
1.upto(5) do |i|
 User.create(
   email: "user-#{i}@example.com",
   password: password,
   password_confirmation: password
 )
end
$ rake db:seed
Adding bootstrap Thêm vào gem file
gem 'bootstrap-sass', '~> 3.3.6'
Bundle
$ bundle install
Rename application.css thành application.scss và replace:
/*
 *= require_tree .
 *= require_self
 */

@import "bootstrap-sprockets";
@import "bootstrap";
Chúng ta sẽ không sử dụng Bootstrap JS nên sẽ không thêm nó vào project
Adding application models
App của chúng ta sẽ có 3 model:
- User
- Conversation
- Message
Đó là tất cả những gì chúng ta cần. 1 cuộc trò chuyện có người gửi và người nhận kèm thông báo
$ rails g model conversation recipient_id:integer:index sender_id:integer:index
Update generate file và thêm index
add_index :conversations, [:recipient_id, :sender_id], unique: true
$ rails g model message body:text user:references conversation:references
$ rake db:migrate
Thêm vào user class
has_many :messages
has_many :conversations, foreign_key: :sender_id
Ngoài ra chúng ta cần edit conversation model 1 chút:
class Conversation < ApplicationRecord
  has_many :messages, dependent: :destroy
  belongs_to :sender, foreign_key: :sender_id, class_name: User
  belongs_to :recipient, foreign_key: :recipient_id, class_name: User

  validates :sender_id, uniqueness: { scope: :recipient_id }

  def opposed_user(user)
    user == recipient ? sender : recipient
  end
end
Adding first views
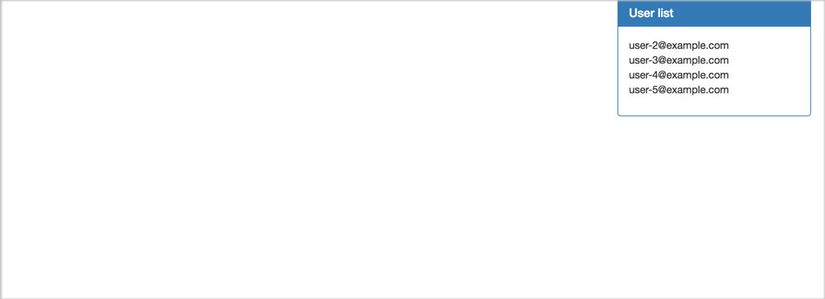
Nếu bạn chưa nhận thấy, Facebook hỗ trợ tính năng trò chuyện khá tuyệt vời. Nếu bạn mở một cửa sổ chat một lần, và đóng một trang hoặc một tab trong trình duyệt, nó vẫn đang hoạt động và xuất hiện trên trang web khi bạn trở lại với nó sau này. Nó trông như thế này:

Làm thế nào chúng ta có thể thêm tính năng này cùng với ứng dụng trò chuyện của chúng ta? Đơn giản! Chúng ta sẽ lưu conversation_ids trong 1 session array mà chúng ta đã mở. Trong khi chúng ta đóng một cửa sổ chat, chúng ta sẽ loại bỏ một conversation_id từ mảng.
Đầu tiên, trong index của HomeController
class HomeController < ApplicationController
  def index
    session[:conversations] ||= []

    @users = User.all.where.not(id: current_user)
    @conversations = Conversation.includes(:recipient, :messages)
                                 .find(session[:conversations])
  end
end
Replace home/index.html.erb với:
<div class="row">
  <div class="col-md-9">
    <ul id="conversations-list">
      <% @conversations.each do |conversation| %>
        <%= render 'conversations/conversation', conversation: conversation, user: current_user %>
      <% end %>
    </ul>
  </div>

  <div class="col-md-3">
    <div class="panel panel-primary">
      <div class="panel-heading">
        <h3 class="panel-title">User list</h3>
      </div>
      <div class="panel-body">
        <ul>
          <% @users.each do |user| %>
            <li><%= user.email %></li>
          <% end %>
        </ul>
      </div>
    </div>
  </div>
</div>
Thêm conversations/_converastion.html.erb
<li>
  <div class="panel panel-default" data-conversation-id="<%= conversation.id %>">
    <div class="panel-heading">
      <%= link_to conversation.opposed_user(user).email, ', class: 'toggle-window' %>
      <%= link_to "x", ', class: "btn btn-default btn-xs pull-right" %>
    </div>

    <div class="panel-body" style="display: none;">
      <div class="messages-list">
        <ul>
          <%= render 'conversations/conversation_content', messages: conversation.messages, user: user %>
        </ul>
      </div>
    </div>
  </div>
</li>
Thêm conversations/_conversation_content.html.erb:
<% messages.each do |message| %>
  <%= render message, user: user %>
<% end %>
Thêm messages/_message.html.erb
<li>
  <div class="row">
    <div class="<%= user.id == message.user_id ? 'message-sent' : 'message-received' %>">
      <%= message.body %>
    </div>
  </div>
</li>
Thêm vào application.scss:
ul {
  padding-left: 0px;
  list-style: none;
}
Chúng ta có:
Trong phần tiếp theo, chúng ta sẽ bắt đầu tạo conversation để gửi tin nhắn, kèm theo các chức năng close, minimum, ...
