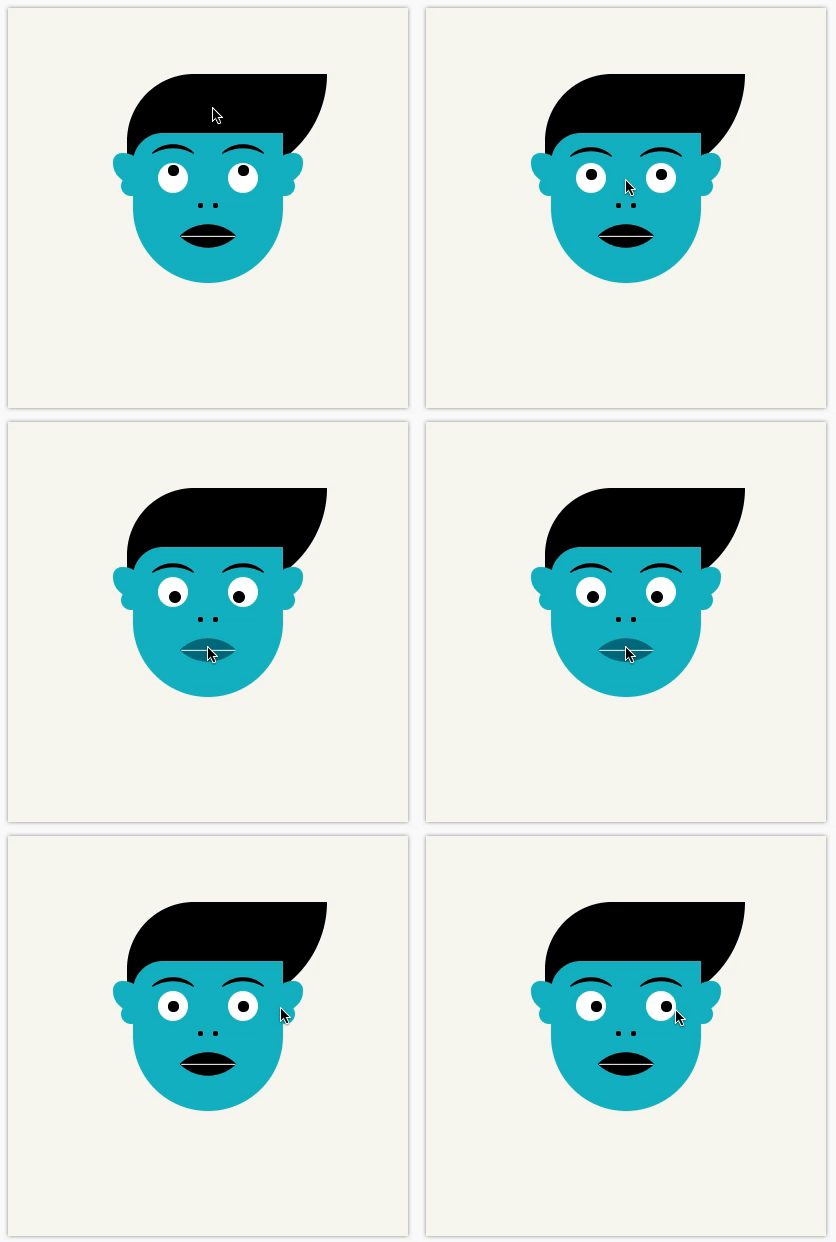
Tạo hiệu ứng khuôn mặt biểu cảm bằng CSS
Chào các bạn, trong post này mình xin gửi tới các bạn cách để tạo ra một khuôn mặt biểu cảm chỉ dùng HTML, CSS. Những gì chúng ta cần sử dụng là: Pseudo Elements: :after, :before Pseudo Classes: :hover CSS Selector: toán tử ~ Xây dựng markup <div id="content"> <div ...
 Chào các bạn, trong post này mình xin gửi tới các bạn cách để tạo ra một khuôn mặt biểu cảm chỉ dùng HTML, CSS.
Những gì chúng ta cần sử dụng là:
- Pseudo Elements: :after, :before
- Pseudo Classes: :hover
- CSS Selector: toán tử ~
Xây dựng markup
<div id="content">
    <div class="hair"></div>
    <div class="face_down">
      <div class="ear_left"></div>
      <div class="ear_right"></div>
      <div class="mouth"></div>
      <div class="eye_left"></div>
      <div class="eye_right"></div>
      <div class="eyebrow_left"></div>
      <div class="eyebrow_right"></div>
      <div class="nose"></div>
    </div>
  </div>
Tạo hình
-
hair: tóc
.hair { background-color: #000000; border-radius: 94px 0 144px 0; height: 104px; left: 119px; position: relative; top: 66px; awidth: 200px; -webkit-transition: all 0.5s; -moz-transition: all 0.5s; -o-transition: all 0.5s; -ms-transition: all 0.5s; transition: all 0.5s; } -
face_down: bao gồm toàn bộ khuôn mặt
.face_down { background-color: #31AFC0; height: 150px; awidth: 150px; top: 125px; left: 125px; position: relative; border-radius: 40px 0 100px 100px; position: absolute; } -
ear_left, ear_right: tai trái/phải Vì tai của chúng ta có hình dạng số 3 nên sẽ cần dùng thêm pseudo element là :before nữa để tạo phần tai nhỏ bên dưới. Chúng ta cũng có thể sử dụng 1 element khác, tuy nhiên không cần thiết và bị dài code. CSS như sau:
.eye_left,.eye_right { background-color: #FFFFFF; border-radius: 30px 30px 30px 30px; height: 30px; position: absolute; awidth: 30px; z-index: 20; } .eye_left:before,.eye_right:before { background-color: #000000; border-radius: 10px 10px 10px 10px; content: ""; display: block; height: 11px; left: 10px; position: relative; top: 10px; awidth: 11px; -webkit-transition: all 0.5s; -moz-transition: all 0.5s; -o-transition: all 0.5s; -ms-transition: all 0.5s; transition: all 0.5s; z-index: 20; } .eye_left { top: 30px; left: 25px; } .eye_right { top: 30px; right: 25px; } -
mouth: Miệng Đầu tiên chúng ta tạo 1 hình elip
.mouth {
     -webkit-transform: rotate(-45deg);
     -moz-transform: rotate(-45deg);
     -o-transform: rotate(-45deg);
     -ms-transform: rotate(-45deg);
     transform: rotate(-45deg);
     background-color: #000000;
     border-radius: 0 60px 0 60px;
     height: 40px;
     left: 55px;
     position: absolute;
     top: 83px;
     awidth: 40px;
 }
Sau đó vẽ thêm 1 đường kẻ ngang để phân biệt 2 môi
.mouth:before { -webkit-transform: rotate(45deg); -moz-transform: rotate(45deg); -o-transform: rotate(45deg); -ms-transform: rotate(45deg); transform: rotate(45deg); background-color: #FFFFFF; content: ""; display: block; height: 1px; left: -7px; position: relative; top: 20px; awidth: 54px; } -
eye_left, eye_right: Mắt Tạo phần mắt màu trắng
.eye_left,.eye_right {
     background-color: #FFFFFF;
     border-radius: 30px 30px 30px 30px;
     height: 30px;
     position: absolute;
     awidth: 30px;
     z-index: 20;
 }
 .eye_left {
     top: 30px;
     left: 25px;
 }

 .eye_right {
     top: 30px;
     right: 25px;
 }
và phần nhân mắt màu đen
.eye_left:before,.eye_right:before { background-color: #000000; border-radius: 10px 10px 10px 10px; content: ""; display: block; height: 11px; left: 10px; position: relative; top: 10px; awidth: 11px; -webkit-transition: all 0.5s; -moz-transition: all 0.5s; -o-transition: all 0.5s; -ms-transition: all 0.5s; transition: all 0.5s; z-index: 20; } -
eyebrow_left, eyebrow_right: Lông mày
.eyebrow_right,.eyebrow_left { -webkit-transform: rotate(45deg); -moz-transform: rotate(45deg); -o-transform: rotate(45deg); -ms-transform: rotate(45deg); transform: rotate(45deg); background-color: #000000; border-radius: 100px 0 100px 0; height: 30px; position: absolute; awidth: 30px; -webkit-transition: all 0.5s; -moz-transition: all 0.5s; -o-transition: all 0.5s; -ms-transition: all 0.5s; transition: all 0.5s; } .eyebrow_right:before,.eyebrow_left:before { background-color: #31AFC0; border-radius: 100px 0 100px 0; content: ""; display: block; height: 40px; left: 0; position: relative; awidth: 50px; } .eyebrow_right { top: 10px; right: 25px; } .eyebrow_left { top: 10px; left: 25px; } -
nose: Mũi Vì có 2 lỗ mũi nên ta dùng .nose và .nose:before
.nose {
    position: absolute;
    height: 5px;
    awidth: 5px;
    top: 70px;
    left: 65px;
    border-radius: 5px;
    background-color: #000;
}

.nose:before {
    background-color: #000000;
    border-radius: 5px 5px 5px 5px;
    content: "";
    display: block;
    height: 5px;
    left: 15px;
    position: relative;
    top: 0;
    awidth: 5px;
}
Hiệu ứng
Cái này khá đơn giản, mình cần bắt các sự kiện hover vào các vị trí trên/dưới/trái/phải như tóc, miệng, tai
.hair:hover + .face_down .eye_left:before,.hair:hover + .face_down .eye_right:before {
	top: 2px;
}

.hair:hover + .face_down .eyebrow_left,.hair:hover + .face_down .eyebrow_right {
	top: 5px;
}

.ear_left:hover ~ .eye_left:before,.ear_left:hover ~ .eye_right:before {
	left: 5px;
}

.ear_right:hover ~ .eye_left:before,.ear_right:hover ~ .eye_right:before {
	left: 15px;
}

.mouth:hover {
	background-color: #03687A;
}

.mouth:hover ~ .eye_left:before {
	height: 12px;
	awidth: 12px;
	top: 14px;
	left: 11px;
}

.mouth:hover ~ .eye_right:before {
	height: 12px;
	awidth: 12px;
	top: 14px;
	left: 5px;
}
Thành quả
Hãy di chuột vào các vị trí trên/dưới/phải/trái trên khuôn mặt và cảm nhận nhé
