Tạo Popular Posts Widget nhiều màu sắc trong blogspot với CSS
Popular Posts Widget là một widget cho phép chủ blog đăng những bài viết được xem nhiều nhất trong tháng, trong tuần hoặc tất cả thời gian cho khách viếng thăm blog của họ. Widget này có sẵn trong blogspot và chúng ta có thể dễ dàng cho nó hiển thị ngoài trang chủ. Mặc định nó sẽ hiển thị hình ...
Popular Posts Widget là một widget cho phép chủ blog đăng những bài viết được xem nhiều nhất trong tháng, trong tuần hoặc tất cả thời gian cho khách viếng thăm blog của họ. Widget này có sẵn trong blogspot và chúng ta có thể dễ dàng cho nó hiển thị ngoài trang chủ. Mặc định nó sẽ hiển thị hình (nếu bài viết đó có) và tiêu đề của bài viết đó, cùng với một nội dung ngắn mô tả (khoảng từ 20 – 25 chữ).

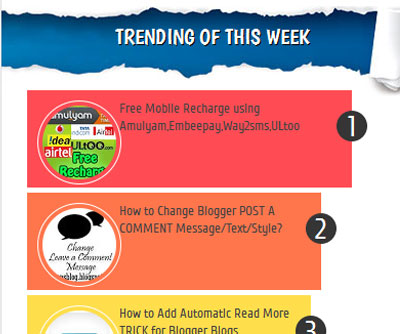
Hôm nay, mình sẽ chia sẻ cho các bạn một thủ thuật tô điểm thêm màu sắc cho những bài viết này. Thủ thuật này sẽ sử dụng một ít CSS3 , và đặc biệt là màu sắc sẽ được tô điểm theo kiểu Flat UI color, vì thế nó sẽ dễ dàng thu hút cái nhìn của khách viếng thăm blog của các bạn nhiều hơn.
Bước 1 : Vào Layout rồi chọn “Add a Gadget” và chèn Popular Posts Widget từ danh sách Widget.
Bước 2 : Đặt tiêu để (title) của Widget, chọn cách hiển thị popular post (theo tháng, tuần, hay tất cả) rồi click Save.
Bước 3 : Vào Template -> Edit HTML , tìm (nhấn Ctrl + F) đoạn code sau :
]]></b:skin>
Sau đó copy đoạn code sau và dán (paste) ngay trên nó :
#PopularPosts1 ul{margin:0;padding:5px 0;list-style-type:none}
#PopularPosts1 ul li{position:relative;margin:5px 0;border:0;padding:10px}
#PopularPosts1 ul li:first-child{background:#ff4c54;awidth:97%}
#PopularPosts1 ul li:first-child:after{content:"1"}
#PopularPosts1 ul li:first-child + li{background:#ff764c;awidth:87%}
#PopularPosts1 ul li:first-child + li:after{content:"2"}
#PopularPosts1 ul li:first-child + li + li{background:#ffde4c;awidth:84%}
#PopularPosts1 ul li:first-child + li + li:after{content:"3"}
#PopularPosts1 ul li:first-child + li + li + li{background:#c7f25f;awidth:81%}
#PopularPosts1 ul li:first-child + li + li + li:after{content:"4"}
#PopularPosts1 ul li:first-child + li + li + li + li{background:#33c9f7;awidth:78%}
#PopularPosts1 ul li:first-child + li + li + li + li:after{content:"5"}
#PopularPosts1 ul li:first-child + li + li + li + li +li{background:#7ee3c7;awidth:75%}
#PopularPosts1 ul li:first-child + li + li + li + li + li:after{content:"6"}
#PopularPosts1 ul li:first-child + li + li + li + li + li +li{background:#f6993d;awidth:72%}
#PopularPosts1 ul li:first-child + li + li + li + li + li + li:after{content:"7"}
#PopularPosts1 ul li:first-child + li + li + li + li + li + li +li{background:#f59095;awidth:69%}
#PopularPosts1 ul li:first-child + li + li + li + li + li + li + li:after{content:"8"}
#PopularPosts1 ul li:first-child + li + li + li + li + li + li + li +li{background:#c7f25f;awidth:66%}
#PopularPosts1 ul li:first-child + li + li + li + li + li + li + li + li:after{content:"9"}
#PopularPosts1 ul li:first-child:after,
#PopularPosts1 ul li:first-child + li:after,
#PopularPosts1 ul li:first-child + li + li:after,
#PopularPosts1 ul li:first-child + li + li + li:after,
#PopularPosts1 ul li:first-child + li + li + li + li:after,
#PopularPosts1 ul li:first-child + li + li + li + li + li:after,
#PopularPosts1 ul li:first-child + li + li + li + li + li + li:after,
#PopularPosts1 ul li:first-child + li + li + li + li + li + li + li:after,
#PopularPosts1 ul li:first-child + li + li + li + li + li + li + li + li:after{position:absolute;top:20px;right:-15px;border-radius:50%;background:#353535;awidth:30px;height:30px;text-align:center;font-size:28px;color:#fff}
#PopularPosts1 ul li .item-thumbnail{float:left;border:0;margin-right:10px;background:transparent;padding:0;awidth:70px;height:70px;}
#PopularPosts1 ul li a{font-size:13px;color:#444;text-decoration:none}
#PopularPosts1 ul li a:hover{color:#222;text-decoration:none}
#PopularPosts1 img{
-moz-border-radius: 130px;
-webkit-border-radius: 130px;
border-radius: 130px;
-webkit-transition: all 0.3s ease;
-moz-transition: all 0.3s ease;
transition: all 0.3s ease;
padding:4px;
border:1px solid #fff !important;
}
#PopularPosts1 img:hover {
border-radius: 0 0 0 0;
-moz-transform: scale(1.2) rotate(-711deg) ;
-webkit-transform: scale(1.2) rotate(-711deg) ;
-o-transform: scale(1.2) rotate(-711deg) ;
-ms-transform: scale(1.2) rotate(-711deg) ;
transform: scale(1.2) rotate(-711deg) ;
}
Click Save để hoàn tất.
Bây giờ các bạn có thể xem thành quả của mình , mình mong là các bạn có thể thích với kiểu thiết kế này.
Chúc các bạn thành công !
Chuyên Mục: Blogspot
Bài viết được đăng bởi webmaster
