Tạo Spring project (annotation) bằng Spring Tool Suite (STS)
Previous Bài này sẽ hướng dẫn bạn cách tạo Spring project (annotation) bằng Spring Tool Suite (STS) trong Eclipse . Đầu tiên, bạn cần phải tạo Spring project với cấu hình mặc định là XML. Project có cấu trúc như sau: Các bước tạo Spring project (annotation) bằng Spring Tool ...
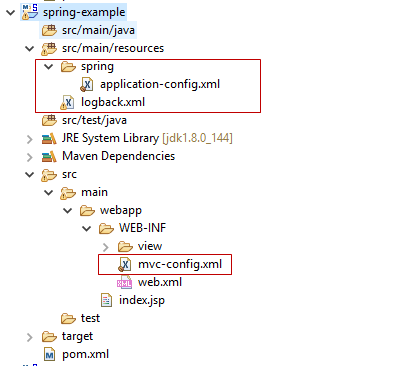
Bài này sẽ hướng dẫn bạn cách tạo Spring project (annotation) bằng Spring Tool Suite (STS) trong Eclipse. Đầu tiên, bạn cần phải tạo Spring project với cấu hình mặc định là XML. Project có cấu trúc như sau:

Các bước tạo Spring project (annotation) bằng Spring Tool Suite (STS)
Sau đây là các bước tạo Spring Web project với cấu hình annotation.
1. Xóa các file cấu hình XML ở trong project trên như sau:
/spring/application-config.xml
/logback.xml
/WEB-INF/mvc-config.xml
2. Tạo file cấu hình annotation
File: ApplicationConfig.java
package vn.viettuts.configuration;

import org.springframework.context.annotation.Bean;
import org.springframework.context.annotation.ComponentScan;
import org.springframework.context.annotation.Configuration;
import org.springframework.web.servlet.config.annotation.EnableWebMvc;
import org.springframework.web.servlet.view.InternalResourceViewResolver;

@EnableWebMvc
@Configuration
@ComponentScan(basePackages = { "vn.viettuts" })
public class ApplicationConfig {
    // define beans
    @Bean
    public InternalResourceViewResolver viewResolver() {
        InternalResourceViewResolver viewResolver
                = new InternalResourceViewResolver();
        viewResolver.setPrefix("/WEB-INF/view/");
        viewResolver.setSuffix(".jsp");
        return viewResolver;
    }
}
3. Cấu hình để sử dụng annotation trong file web.xml
File: web.xml
<?xml version="1.0" encoding="ISO-8859-1"?>
<web-app xmlns:xsi="http://www.w3.org/2001/XMLSchema-instance"
         xmlns="http://java.sun.com/xml/ns/javaee"
         xsi:schemaLocation="http://java.sun.com/xml/ns/javaee
http://java.sun.com/xml/ns/javaee/web-app_2_5.xsd"
         id="WebApp_ID" version="2.5">

    <display-name>spring-annotation-example</display-name>

    <listener>
        <listener-class>
            org.springframework.web.context.ContextLoaderListener
        </listener-class>
    </listener>


    <context-param>
        <param-name>contextClass</param-name>
        <param-value>
            org.springframework.web.context.support.AnnotationConfigWebApplicationContext
        </param-value>
    </context-param>

    <context-param>
        <param-name>contextConfigLocation</param-name>
        <param-value>vn.viettuts.configuration.ApplicationConfig</param-value>
    </context-param>


    <servlet>
        <servlet-name>dispatcherServlet</servlet-name>
        <servlet-class>org.springframework.web.servlet.DispatcherServlet</servlet-class>
        <init-param>
            <param-name>contextConfigLocation</param-name>
            <param-value></param-value>
        </init-param>
        <load-on-startup>1</load-on-startup>
    </servlet>

    <servlet-mapping>
        <servlet-name>dispatcherServlet</servlet-name>
        <url-pattern>/</url-pattern>
    </servlet-mapping>

</web-app>
4. Tạo controller và view
File: HelloWorldController.java
package vn.viettuts.controller;

import javax.servlet.http.HttpServletRequest;
import javax.servlet.http.HttpServletResponse;

import org.springframework.stereotype.Controller;
import org.springframework.web.bind.annotation.RequestMapping;
import org.springframework.web.bind.annotation.RequestMethod;
import org.springframework.web.servlet.ModelAndView;

@Controller
public class HelloWorldController {
    @RequestMapping(value = "/hello", method = RequestMethod.GET)
    public ModelAndView hello(HttpServletRequest request,
            HttpServletResponse response) {
        ModelAndView view = new ModelAndView("showMessage");
        return view;
    }
}
File: index.jsp
<!DOCTYPE html>

<%@ page language="java" contentType="text/html; charset=UTF-8"
     pageEncoding="UTF-8"%>

<html>
<head>
<meta charset="utf-8">
<title>Welcome</title>
</head>
<body>
  <a href="hello">Hello</a>
</body>
</html>
File: showMessage.jsp
<!DOCTYPE html>

<%@ page language="java" contentType="text/html; charset=UTF-8"
pageEncoding="UTF-8"%>

<html>
<head>
<meta charset="utf-8">
<title>Welcome</title>
</head>
<body>
  <h2>Hello World!</h2>
</body>
</html>
5. Update file pom.xml
<project xmlns="http://maven.apache.org/POM/4.0.0"
xmlns:xsi="http://www.w3.org/2001/XMLSchema-instance"
    xsi:schemaLocation="http://maven.apache.org/POM/4.0.0
    http://maven.apache.org/xsd/maven-4.0.0.xsd">
    <modelVersion>4.0.0</modelVersion>
    <groupId>org.springframework.samples.service.service</groupId>
    <artifactId>spring-annotation-example</artifactId>
    <version>0.0.1-SNAPSHOT</version>
    <packaging>war</packaging>

    <properties>

        <java.version>1.8</java.version>
        <project.build.sourceEncoding>UTF-8</project.build.sourceEncoding>
        <project.reporting.outputEncoding>UTF-8</project.reporting.outputEncoding>

        <servlet.version>2.5</servlet.version>

        <spring-framework.version>4.3.6.RELEASE</spring-framework.version>
    </properties>

    <dependencies>

        <dependency>
            <groupId>org.springframework</groupId>
            <artifactId>spring-webmvc</artifactId>
            <version>${spring-framework.version}</version>
        </dependency>

        <dependency>
            <groupId>javax.servlet</groupId>
            <artifactId>servlet-api</artifactId>
            <version>${servlet.version}</version>
            <scope>provided</scope>
        </dependency>
    </dependencies>
</project>
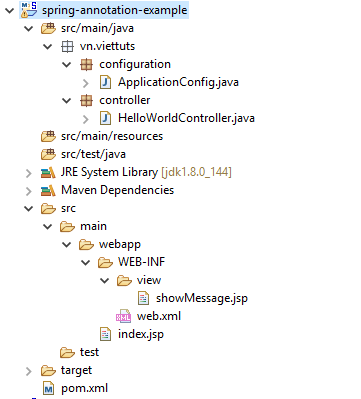
Cấu trúc project sau khi hoàn thành các bước trên như sau:

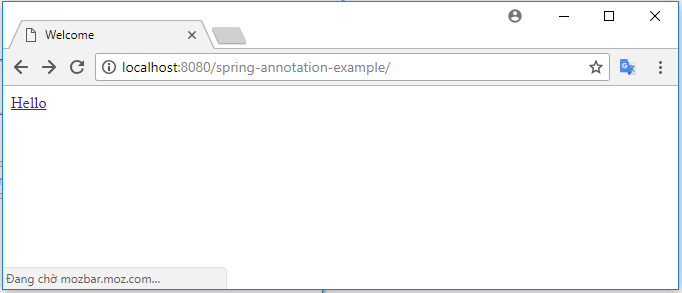
Run ứng dụng

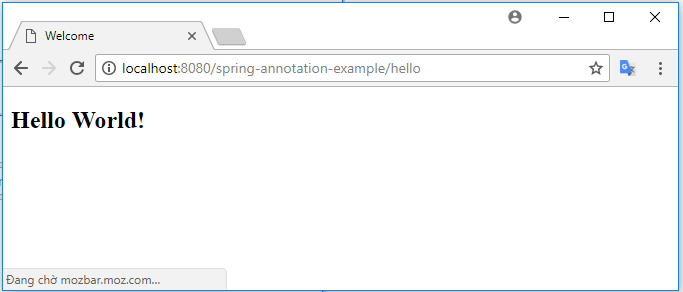
Click link

