AmazonPay: Tích hợp AmazonPay vào EC system (phần 1)
Đối với phát triển các EC system (ecommerce system) cho các khách hàng Nhật, việc tích các hệ thống thanh toán điện tử vào trong system là 1 điều đương nhiên. Trong series AmazonPay này mình sẽ giới thiệu cho các bạn cách tích hợp phương thức thanh toán AmazonPay vào trong 1 EC system thực hiện ...
Đối với phát triển các EC system (ecommerce system) cho các khách hàng Nhật, việc tích các hệ thống thanh toán điện tử vào trong system là 1 điều đương nhiên. Trong series AmazonPay này mình sẽ giới thiệu cho các bạn cách tích hợp phương thức thanh toán AmazonPay vào trong 1 EC system thực hiện bằng javascript và Rails.
Các kiểu cart flow
Theo mình biết (Ko biết đúng hay sai) thì bên Nhật họ có 2 kiểu EC system chính:
- Thanh toán 1 lần (onetime payment)
- Thanh toán định kì (recurring payments)
Bên AmazonPay cũng cung cấp các object phù hợp để có thể đáp ứng được 2 kiểu cart flow bên trên. Dưới đây mình sẽ làm thử cách thanh toán cho kiểu onetime payment
Chuẩn bị
-
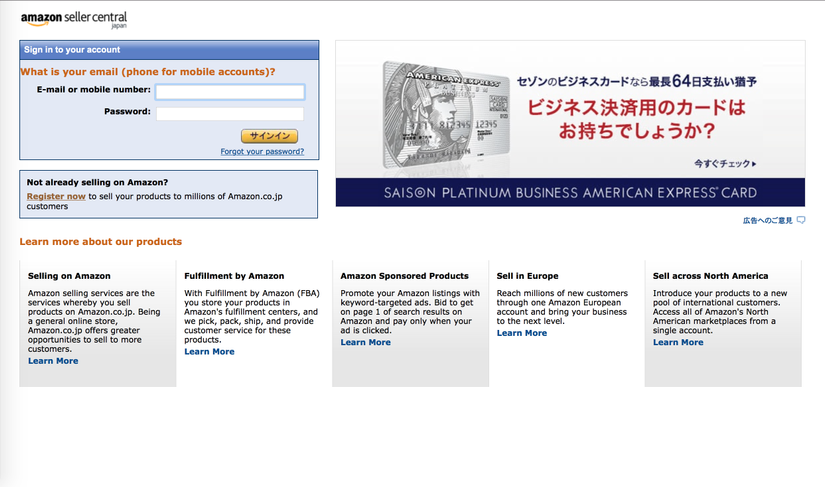
Cần 1 tài khoản Amazon Seller Central có thể thực hiện trên môi trường test. https://stackoverflow.com/questions/6303153/how-to-create-amazon-sandbox-account-for-developer-purpose Việc đăng kí 1 tài khoản với môi trường test cần phải liên lạc với bên Amazon để nhờ họ cung cấp cho mình. Trong trường hợp bạn đang phát triển phần mềm cho khách hàng thì khách hàng cần phải làm việc này.
-
Login vào Amazon Seller Central bằng tài khoản tạo ở trên
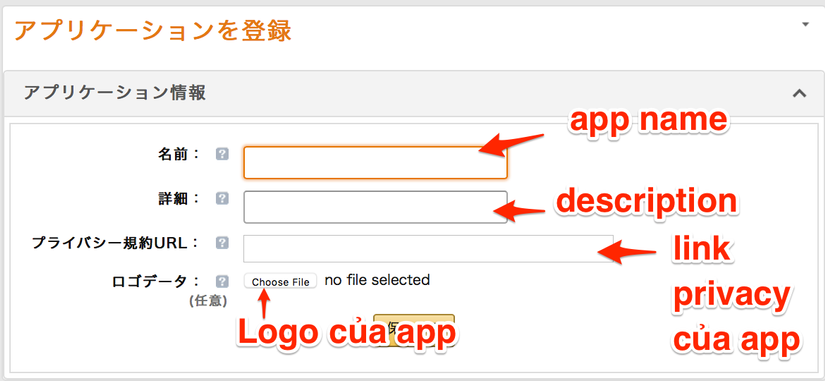
- Đăng kí 1 app mới
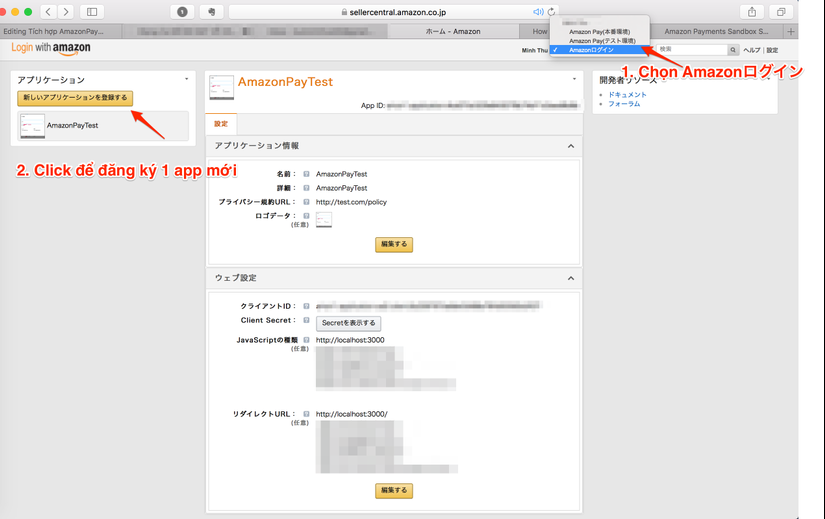
---------------------↓---------------------
-
Cài đặt các thông số sau: ◇ JavaScriptの種類: http://localhost:3000 Link accept javascript cross origin. Bạn có thể thêm nhiều link test. Trong trường hợp cần phải để cho khách hàng test bằng ngrok thì thêm cả ngrok link vào đây. ◇ リダイレクトURL: http://localhost:3000
-
Lấy các thông số sau: ◇ merchant_id ◇ access_key ◇ secret_key ◇ client_id
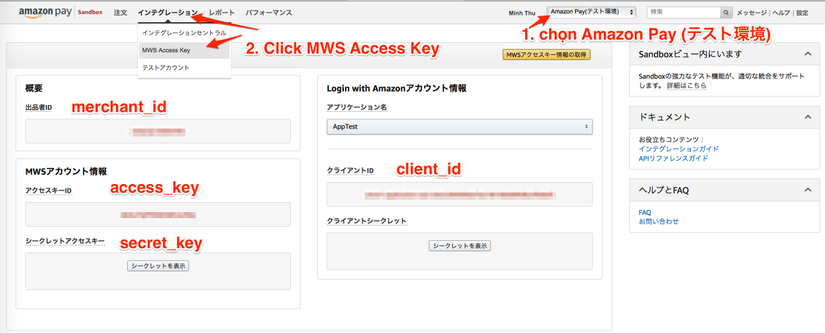
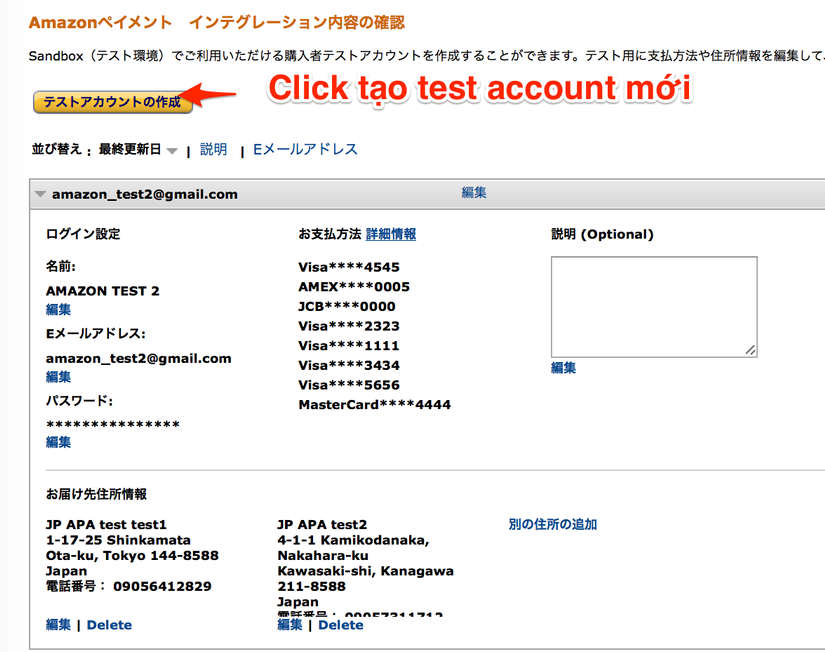
- Tạo các Test account
Tất cả mọi thứ chuẩn bị đã xong. Bây giờ sẽ bắt đầu tích hợp thử AmazonPay vào trong rails app.
Tạo application mới
- Bật terminal và chạy
rails new amazon_pay_test
- Add gem amazon_pay. Xem thêm
- Chạy
bundle install
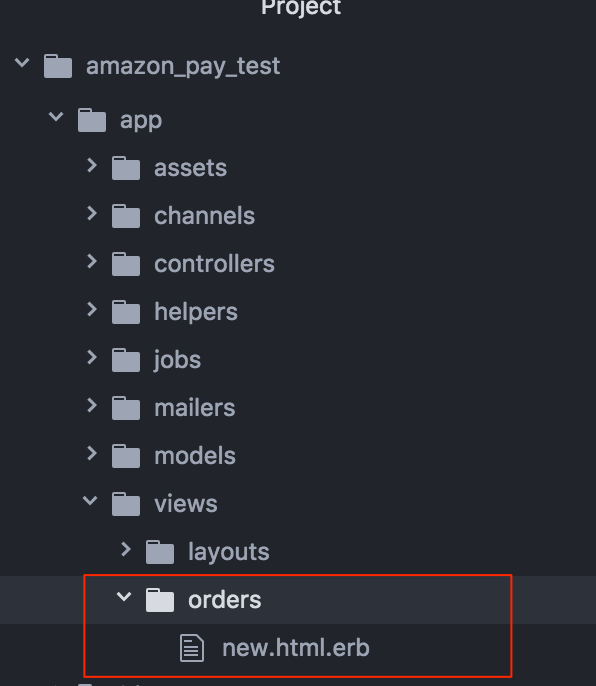
- Tạo OrdersController với action new, create
class OrdersController < ApplicationController
  def new
  end

  def create
  end
end
- Thêm vào routes.rb
resources :orders, only: [:new, :create]
- Tạo thư mục view tương ứng với OrdersController
Thêm Widgets.js
Amazon cung cấp chế độ sandbox giúp developer có thể test trên môi trường test. Nếu sử dụng chế độ sandbox thì bạn sẽ có thể sử dụng thông tin (email, password, credit card, address) của tài khoản test đã tạo ở bên trên để login và mô phỏng việc thực hiện thanh toán. Dưới đây là các URL của Widgets.js cho Japan và chế độ (sandbox và production)
- Production: https://static-fe.payments-amazon.com/OffAmazonPayments/jp/lpa/js/Widgets.js
- Sandbox: https://static-fe.payments-amazon.com/OffAmazonPayments/jp/sandbox/lpa/js/Widgets.js
Mình sẽ thêm Widgets.js ứng với chế độ sandbox vào trong app/views/layouts/application.html.erb
<%= javascript_include_tag "https://static-fe.payments-amazon.com/OffAmazonPayments/jp/sandbox/lpa/js/Widgets.js" %>
Hiển thị Widgets
AmazonPay cung cấp các button widget để login. Xem thêm Đối với onetime payment, Amazon cung cấp thêm 2 widget: AddressBook và Wallet.
Kịch bản thông thường để thực hiện thanh toán bằng AmazonPay:
1. EndUser thêm 1 sản phẩm vào cart
2. EndUser vào trang cart
3. System hiển thị button AmazonPay
4. EndUser click vào button AmazonPay
5. EndUser login vào Amazon trên popup hiện ra
6. System hiển thị AddressBook widget và PaymentMethod widget
7. EndUser chọn address và credit card trên các widget
8. EndUser tạo order mới (click submit button)
Hiển thị AmazonPay button widget
- Khai báo 1 thẻ để chứa AmazonPay button trong view. Trong trường hợp này mình sẽ add vào app/views/orders/new.html.erb
<div id="AmazonPayButton"></div>
- Thêm vào trong application.js code sau:
$(document).ready(function() {
  amazon.Login.setClientId('CLIENT-ID'); // lấy client_id ở bên trên

  displayAmazonPayButton();

  function displayAmazonPayButton() {
    OffAmazonPayments.Button('AmazonPayButton', "MERCHANT-ID", { // merchant_id cũng lấy từ bên trên
      type:  'PwA',
      color: 'Gold',
      size:  'large',
      authorization: function() {
        var loginOptions = {scope: "payments:widget payments:shipping_address", popup: true};

        amazon.Login.authorize(loginOptions,
          "http://localhost:3000/orders/new");
      },

      onError: function(error) {
        console.log(error.getErrorCode() + " - " + error.getErrorMessage());
      }
    });
  }
});
Xem thêm Button widget parameter
- Sau khi thêm đoạn trên, access thử vào http://localhost:3000/orders/new sẽ được kết quả như thế này:

Nếu Amazon server trả lại cho chúng ta 1 access_token dài ngoằng ở trên url → Login thành công access_token này cũng được lưu vào trong cookies.
- Để test login lại, bật console của browser lên, chạy command sau:
amazon.Login.logout()
Hiển thị AddressBook và Wallet widgets
- Thêm container cho mỗi widget vào app/views/orders/new.html.erb
<div id="addressBookWidgetDiv"></div>
<div id="walletWidgetDiv"></div>
- Thêm style vào application.css
#addressBookWidgetDiv {
  min-awidth: 300px;
  awidth: 600px;  /*awidth can be removed and the widget will take up all the page awidth*/
  max-awidth: 100%;
  min-height: 228px;
  height: 240px;
}
#walletWidgetDiv {
  min-awidth: 300px;
  awidth: 600px;  /*awidth can be removed and the widget will take up all the page awidth*/
  max-awidth: 100%;
  min-height: 228px;
  height: 240px;
}
- Thêm code load widget vào application.js
displayAmazonAddressBook();
displayAmazonWallet();

function displayAmazonAddressBook() {
  new OffAmazonPayments.Widgets.AddressBook({
    sellerId: 'MERCHANT_ID', // merchant_id lấy ở bên trên
    scope: 'payments:widget payments:shipping_address',
    onOrderReferenceCreate: function(orderReference) {
      console.log("OffAmazonPayments.Widgets.AddressBook#onOrderReferenceCreate");
      console.log(orderReference.getAmazonOrderReferenceId());
    },
	  onAddressSelect: function(orderReference) {
      console.log("OffAmazonPayments.Widgets.AddressBook#onAddressSelect");
    },
    design: {
      designMode: 'responsive'
    },
    onReady: function(orderReference) {
      console.log("OffAmazonPayments.Widgets.AddressBook#onReady");
      console.log(orderReference.getAmazonOrderReferenceId());
    },
    onError: function(error) {
      console.error(error.getErrorCode() + " - " + error.getErrorMessage());
    }
  }).bind("addressBookWidgetDiv");
}

function displayAmazonWallet() {
  new OffAmazonPayments.Widgets.Wallet({
    sellerId: 'A3QCQLYZKBHFRS',
    scope: 'payments:widget payments:shipping_address',
    onPaymentSelect: function(orderReference) {
      console.log("OffAmazonPayments.Widgets.AddressBook#orderReference");
      console.log(orderReference.getAmazonOrderReferenceId());
    },
    design: {designMode: 'responsive'},
    onError: function(error) {
      console.error(error.getErrorCode() + " - " + error.getErrorMessage());
    }
  }).bind("walletWidgetDiv");
}
- Bây giờ bạn hãy access vào http://localhost:3000/orders/new , sẽ được kết quả như thế này: (Nếu kết quả không được thế này thì là do bạn đen thôi)

OK. Vậy là xong phần hiển thị Amazon Widgets. Mình sẽ tiếp tục phần logic liên quan Onetime Payment của AmazonPay trong phần tiếp theo.
Reference
- AmazonPay documentation