Android demo application of creating QR code using Kotlin
Kotlin is announced as a “first-class” language officially by Google. It's a new programming language built by JetBrains which is the default language for Android development like Java. Kotlin is similar to Java in structure as it's object oriented and statically typed. It's also ...

Kotlin is announced as a “first-class” language officially by Google. It's a new programming language built by JetBrains which is the default language for Android development like Java. Kotlin is similar to Java in structure as it's object oriented and statically typed. It's also designed for similar problems that Java solves. Because of Kotlin's nice features it's becoming popular day by day.
This article primarily focused on the usage of Kotlin to create QR code using a 3rd party library.
Setup Kotlin in Android project
After creating a new blank Android project, we have to add the basic plugin, extension as well as library to use Kotlin through gradle. The app module & the gradle file in the root folder of project will be looked like following:
//  build.gradle (Module: app)

apply plugin: 'com.android.application'
apply plugin: 'kotlin-android'
apply plugin: 'kotlin-android-extensions'

android {
    compileSdkVersion 25
    buildToolsVersion "25.0.3"
    defaultConfig {
       ...
    }
    buildTypes {
        ...
    }
}

dependencies {
    compile fileTree(dir: 'libs', include: ['*.jar'])
    compile 'com.android.support:appcompat-v7:25.3.1'
    compile "org.jetbrains.kotlin:kotlin-stdlib-jre7:$kotlin_version"
}
//  build.gradle (Project: RootFolderName)

buildscript {
    ext.kotlin_version = '1.1.4-3'
    repositories {
        jcenter()
    }
    dependencies {
        classpath 'com.android.tools.build:gradle:2.2.3'
        classpath "org.jetbrains.kotlin:kotlin-gradle-plugin:$kotlin_version"
    }
}

allprojects {
    ...
}
After synced gradle files, you will be able to write Kotlin code. In the Android studio, you can easily create Kotlin files with ready-made sample code like Java. There is a sample MainActivity.kt file is written below:
package com.something

import android.support.v7.app.AppCompatActivity
import android.os.Bundle

class MainActivity : AppCompatActivity() {
    override fun onCreate(savedInstanceState: Bundle?) {
        super.onCreate(savedInstanceState)
        setContentView(R.layout.activity_main)
    }
}
Creating QR Code using 3rd party library
After the basic Kotlin setup, it's time to make a sample project. I am going to add a sample project to create QR code using a 3rd party library. For this purpose, I will use QRGen library. According to their basic guideline in github, you need to add the library as following.
//  build.gradle (Module: app)

dependencies {
    compile 'com.github.kenglxn.QRGen:android:2.3.0'
}
//  build.gradle (Project: RootFolderName)

buildscript {
    ...
}

allprojects {
    repositories {
        jcenter()
        maven { url "https://jitpack.io" }
    }
}
After added it, you may make a basic layout file to create QR code as following.
<?xml version="1.0" encoding="utf-8"?>
<LinearLayout
    xmlns:android="http://schemas.android.com/apk/res/android"
    android:layout_awidth="match_parent"
    android:layout_height="match_parent"
    android:background="@android:color/white"
    android:gravity="center_horizontal"
    android:orientation="vertical"
    android:padding="16dp">

    <EditText
        android:id="@+id/editCode"
        android:layout_awidth="match_parent"
        android:layout_height="wrap_content"
        android:hint="Enter text to create a QR code"/>

    <Button
        android:id="@+id/buttonCreate"
        android:layout_awidth="wrap_content"
        android:layout_height="wrap_content"
        android:layout_marginTop="10dp"
        android:text="Create QR"/>

    <ImageView
        android:id="@+id/imagePreview"
        android:layout_awidth="match_parent"
        android:layout_height="wrap_content"
        android:layout_marginTop="10dp"/>
</LinearLayout>
Then, you need to write the following Kotlin code in the MainActivity.kt file:
package com.something

import android.content.Context
import android.os.Bundle
import android.support.v7.app.AppCompatActivity
import android.view.inputmethod.InputMethodManager
import android.widget.Button
import android.widget.EditText
import android.widget.ImageView
import android.widget.Toast
import net.glxn.qrgen.android.QRCode

class MainActivity : AppCompatActivity() {
    private var mEditCode: EditText? = null
    private var mButtonCreate: Button? = null
    private var mImagePreview: ImageView? = null

    override fun onCreate(savedInstanceState: Bundle?) {
        super.onCreate(savedInstanceState)
        setContentView(R.layout.activity_main)

        mEditCode = findViewById(R.id.editCode) as EditText
        mButtonCreate = findViewById(R.id.buttonCreate) as Button
        mImagePreview = findViewById(R.id.imagePreview) as ImageView

        (mButtonCreate as Button).setOnClickListener {
            val text = (mEditCode as EditText).text.toString()

            if (text.isEmpty()) {
                Toast.makeText(this, getString(R.string.hint_enter_text_to_create_barcode),
                        Toast.LENGTH_SHORT).show()
                return@setOnClickListener
            }

            /*
            * Generate bitmap from the text provided,
            * The QR code can be saved using other methods such as stream(), file(), to() etc.
            * */
            val bitmap = QRCode.from(text).withSize(1000, 1000).bitmap()
            (mImagePreview as ImageView).setImageBitmap(bitmap)
            hideKeyboard()
        }
    }

    fun hideKeyboard() {
        val view = this.currentFocus
        if (view != null) {
            val imm = getSystemService(Context.INPUT_METHOD_SERVICE) as InputMethodManager
            imm.hideSoftInputFromWindow(view.windowToken, 0)
        }
    }
}
Final output
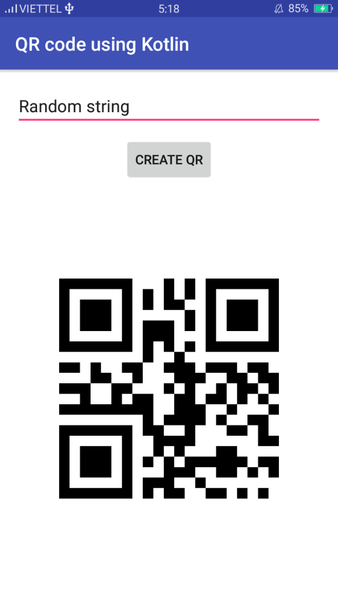
After compiled the project, you will meet the following result according to the above code.

