Circle CI with ECS Fargate
Hôm nay mình sẽ trình bày với các bạn bài viết về dùng Circle CI để deploy ứng dụng trên ECS Fargate. 1. Mô hình Đây là mô hình overview cho phần xử lý của Circle CI và AWS ECS. Đây là process cụ thể các quá trình thực thi. Merge code trên github Circle CI thực hiện build image ...
Hôm nay mình sẽ trình bày với các bạn bài viết về dùng Circle CI để deploy ứng dụng trên ECS Fargate.
1. Mô hình
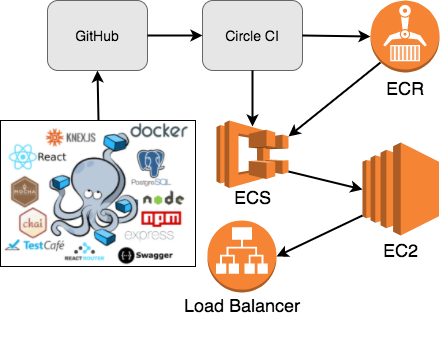
Đây là mô hình overview cho phần xử lý của Circle CI và AWS ECS.

Đây là process cụ thể các quá trình thực thi.
- Merge code trên github
- Circle CI thực hiện build image docker và push lên AWS ECR
- Circle CI tạo container mới với image vừa được push lên (bao gồm các quá trình: tạo task definition mới, update service trong cluster)
- Update service sang container mới
2. Khái niệm
2.1. Github
Quá quen thuộc với các bạn rồi. Là nơi quản lý source code của dự án
2.2. Circle CI
Là 1 công cụ CI được tin dùng bởi hơn 100,000 công ty và developers trên toàn thế giới, trong đó có Facebook, Segment, Kickstarter, Percolate, Spotify, ... Trong đó có các ưu điểm
- Faster Performance: Có thể tùy chọn resource để tối ưu performance cho quá trình building, testing và deploying code
- Granular Control: Có thể build theo các cách tùy thích bằng cách sử dụng custom job với WorkWorkflows
- Complete Flexibility: Tất cả ngôn ngữ chạy trên Linux thì đều chạy được với CricleCI. Hỗ trợ First-class Docker giúp ta có thể tùy chỉnh môi trường tùy thích
2.3. AWS ECR
Là nơi quản lý image của các bạn. Nó cũng giống như DockerHub vậy, chỉ khác là được host trên AWS và là private
2.4. AWS ECS
Là dịch vụ của Amazon Web Service, cung cấp khả năng dựng, quản lý container dựa trên các image có sẵn.
2.4.1. Fargate
Là 1 trong 2 loại AWS ECS: bao gồm EC2 container instance và Fargate. Fargate sẽ chịu trách nhiệm quản lý cho bạn từ đầu đến cuối container của bạn. Bạn không cần phải ssh vào server hay instance để ngó xem container của bạn chạy ra sao hay việc scale như nào. Đó là nhiệm vụ của Fargate, AWS sẽ hỗ trợ bạn tận "răng"
2.4.2. Task Definition
Là 1 task để định nghĩa các thành phần như CPU, RAM, image ... sử dụng trong AWS ECS
2.4.3. Cluster
Là nơi để host dịch vụ của bạn trên AWS ECS
2.4.4. Service
Là service bạn sử dụng, được cài trên cluster và định nghĩa bới task definition
3. Build
Để Circle CI có thể chạy được, chúng ta cần chuẩn bị:
- Repo github. Điều này là tất nhiên rồi. Và nhớ add vào project trên Circle CI nhé
- AWS ECR để chứa images
- Tạo task template cho ECS service
- Configure docker image
- Create cluster
- Create Task definition
- Create service
- Configure CircleCI
3.1. Repo Github
Phần này có lẽ đơn giản với các bạn nên mình bỏ qua nhé
3.2. AWS ECR
Khi các bạn có 1 tài khoản AWS, các bạn có thể tạo ECR bằng cách: Service -> ECS -> Amazon ECR Repositories -> Create repository. Save Repository URL
3.3. Task template ECS
$ vim fargate-template-task.json
------------------------------
{
    "networkMode": "awsvpc",
    "containerDefinitions": [
        {
            "name": "app",
            "image": "%AWS_ACCOUNT%.dkr.ecr.%AWS_REGION%.amazonaws.com/%AWS_REPO%:%BRANCH%_%IMAGE_TAG%",
            "portMappings": [
                {
                    "containerPort": 80,
                    "hostPort": 80,
                    "protocol": "tcp"
                }
            ],
            "essential": true
        }
    ],
    "requiresCompatibilities": [
        "FARGATE"
    ],
    "executionRoleArn": "arn:aws:iam::%AWS_ACCOUNT%:role/ecsTaskExecutionRole",
    "cpu": "256",
    "memory": "512"
}
trong đó cần lưu ý Port sử dụng . Ở bài này mình sẽ demo cho các bạn 1 web cơ bản nên mình lấy port 80. Ngoài ra còn có executionRoleArn là role khi các bạn tạo ECS sẽ tự create.
3.4. Configure docker image
$ cat Dockerfile
FROM ubuntu:16.04

RUN apt-get update && apt-get install -y nginx
ADD index.html /usr/share/nginx/html/
ADD default /etc/nginx/sites-enabled
RUN echo "daemon off;" >> /etc/nginx/nginx.conf
CMD ["/usr/sbin/nginx"]
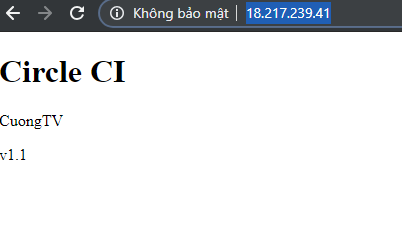
$ cat index.html
<!DOCTYPE html>
<html>
<body>

<h1>Circle CI</h1>

<p>CuongTV</p>
<p>v1.1</p>


</body>
</html>
$ cat default
server {
	listen 80 default_server;
	listen [::]:80 default_server;
	root /usr/share/nginx/html;
	index index.html index.htm index.nginx-debian.html;
	server_name _;
	location / {
		try_files $uri $uri/ =404;
	}
}
Đây là 3 file mình chuẩn bị cho Docker
3.5. Create cluster
Ta sẽ dùng aws cli để tạo (thực hiện phần 3.5, 3.6, 3.7 trên local và chỉ thực hiện 1 lần).
$ aws ecs create-cluster --cluster-name "cuongtv-clus"
3.6. Create Task definition
Khi tạo task definition, các bạn nên tạo trước VPC, subnet, Security Group theo ý mình trước, nếu không thì AWS ECS sẽ tự tạo theo template của aws đấy.
- Trước hết các bạn build docker image và push lên ECR:
$ aws ecr get-login --no-include-email --region <REGION>
$ docker build -t cuongtv .
$ docker tag cuongtv:latest <ACCOUNT>.dkr.ecr.<REGION>.amazonaws.com/cuongtv:lastest
$ docker push <ACCOUNT>.dkr.ecr.<REGION>.amazonaws.com/cuongtv:lastest
- Tạo task definition
$ cat fargate-task.json
{
    "networkMode": "awsvpc",
    "containerDefinitions": [
        {
            "name": "app",
            "image": "<ACCOUNT>.dkr.ecr.<REGION>.amazonaws.com/cuongtv:lastest",
            "portMappings": [
                {
                    "containerPort": 80,
                    "hostPort": 80,
                    "protocol": "tcp"
                }
            ],
            "essential": true
        }
    ],
    "requiresCompatibilities": [
        "FARGATE"
    ],
    "executionRoleArn": "arn:aws:iam::<ACCOUNT>:role/ecsTaskExecutionRole",
    "cpu": "256",
    "memory": "512"
}

$ aws ecs register-task-definition --cli-input-json file://fargate-task.json
nhớ thay <ACCOUNT> và <REGION> nhé
3.7. Create service
$ cat service.json
{
    "cluster": "cuongtv-clus",
    "serviceName": "cuongtv-service",
    "taskDefinition": "cuongtv-fargate:1",
    "desiredCount": 1,
    "launchType": "FARGATE",
    "networkConfiguration": {
        "awsvpcConfiguration": {
          "subnets": [
                "subnet-047fcf99999475f74",
                "subnet-0e2d5f728dc8defcf"
          ],
          "securityGroups": [
                "sg-04a9498293c951eed"
          ],
          "assignPublicIp": "ENABLED"
        }
    }
}
nhớ thay các thông tin cho đúng nhé.
$ aws ecs create-service --cli-input-json file://service.json
Sau khi tạo xong, các bạn có thể lên AWS Console -> ECS -> Cluster -> Service -> Task -> check IP public của task
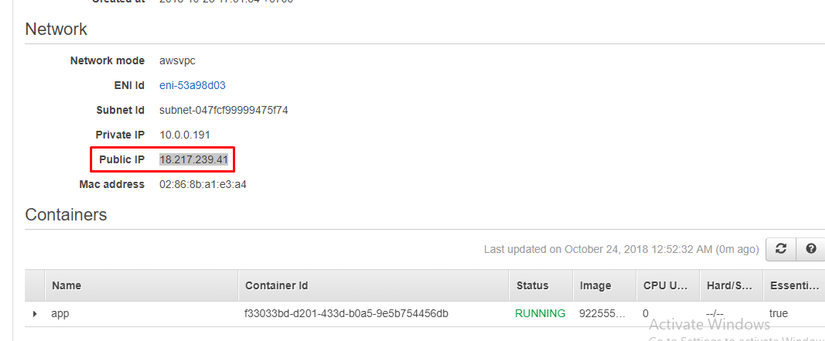 như ở đây: http://18.217.239.41/
3.8. Configure CircleCI
- Trong Repo github của các bạn, các phải phải cho thêm folder .circleci chứa file config.yml
$ cat .circleci/config.yml
version: 2
jobs:
  build:
    docker: # use the docker executor type; machine and macos executors are also supported
      - image: ubuntu:16.04 # the primary container, where your job's commands are run
    steps:
      - checkout # check out the code in the project directory
      - setup_remote_docker:
          docker_layer_caching: true
      - run:
          name: Install Docker client
          command: |
            apt-get update && apt-get install -y curl
            set -x
            VER="17.03.0-ce"
            curl -L -o /tmp/docker-$VER.tgz https://download.docker.com/linux/static/stable/x86_64/docker-$VER.tgz
            tar -xz -C /tmp -f /tmp/docker-$VER.tgz
            mv /tmp/docker/* /usr/bin
      - restore_cache:
          key: v1-requirements.txt
      - run:
          name: Install aws cli
          command: |
            apt-get update && apt-get install -y python3 python3-venv
            python3 -m venv venv
            . venv/bin/activate
            pip install -r requirements.txt
      - save_cache:
          key: v1-requirements.txt
          paths:
            - "venv"
      - run: |
          docker build -t app .
      - run:
          name: Push Docker image
          command: |
            # login aws
            . venv/bin/activate
            aws configure set region $AWS_REGION
            aws configure set aws_access_key_id $AWS_ACCESS_KEY_ID
            aws configure set aws_secret_access_key $AWS_SECRET_ACCESS_KEY
            $(aws ecr get-login)

            # push image to ecr
            docker tag app $AWS_ACCOUNT.dkr.ecr.$AWS_REGION.amazonaws.com/$AWS_REPO:${CIRCLE_BRANCH}_$CIRCLE_SHA1
            docker push $AWS_ACCOUNT.dkr.ecr.$AWS_REGION.amazonaws.com/$AWS_REPO:${CIRCLE_BRANCH}_$CIRCLE_SHA1
      - run:
          name: deploy
          command: |
            # deploy
            . venv/bin/activate
            sh deploy.sh
- Tạo thêm file requirements.txt
$ cat requirements.txt
awscli>=1.16.30
- Tạo thêm file deploy.sh
$ cat deploy.sh
#!/bin/bash
BUILD_NUMBER=${CIRCLE_BUILD_NUM}
IMAGE_TAG=${CIRCLE_SHA1}

# Create a new task definition for this build
sed -e "s/%IMAGE_TAG%/${IMAGE_TAG}/g; s/%AWS_ACCOUNT%/$AWS_ACCOUNT/g; s/%AWS_REGION%/$AWS_REGION/g; s/%AWS_REPO%/$AWS_REPO/g; s/%BRANCH%/${CIRCLE_BRANCH}/g" fargate-template-task.json > task-${BUILD_NUMBER}.json
aws ecs register-task-definition --family ${TASK_FAMILY} --cli-input-json file://task-${BUILD_NUMBER}.json

# Update the service with the new task definition and desired count
TASK_REVISION=`aws ecs describe-task-definition --task-definition ${TASK_FAMILY} | egrep "revision" | tr "/" " " | awk '{print $2}' | sed 's/"$//' | tr -d ,`
DESIRED_COUNT=`aws ecs describe-services --cluster ${CLUSTER_NAME} --services ${SERVICE_NAME} | egrep "desiredCount" | head -1 | tr "/" " " | awk '{print $2}' | sed 's/,$//'`
if [ ${DESIRED_COUNT} = "0" ]; then
    DESIRED_COUNT="1"
fi

echo "aws ecs update-service --cluster ${CLUSTER_NAME} --service ${SERVICE_NAME} --task-definition ${TASK_FAMILY}:${TASK_REVISION} --desired-count ${DESIRED_COUNT}"
aws ecs update-service --cluster ${CLUSTER_NAME} --service ${SERVICE_NAME} --task-definition ${TASK_FAMILY}:${TASK_REVISION} --desired-count ${DESIRED_COUNT}
- Các bạn lên https://circleci.com/dashboard -> project -> Environment Variables -> Add thêm các trường: CLUSTER_NAME, AWS_ACCESS_KEY_ID, AWS_ACCOUNT, AWS_REGION, AWS_REPO, AWS_SECRET_ACCESS_KEY, SERVICE_NAME, TASK_FAMILY
OK vậy là xong khâu chuẩn bị. Giờ tiến hành merge 1 pull xem sao nhé.

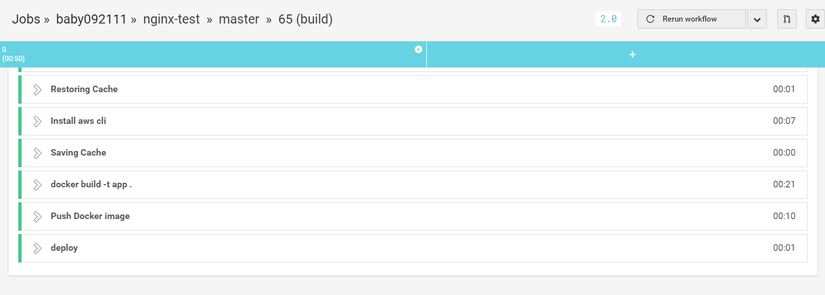 Khi các bạn build những lần sau trên circle ci, nó sẽ lưu cache cho các bạn, đảm bảo việc build diễn ra rất nhanh. của mình mất có ~50s để build xong. OK vậy check tiếp ECS thì sao nhỉ
 Vâng đã xuất hiện task mới và có IP mới
 Kiểm tra thử thì có thể thấy web đã up version mới rất nhanh phải không nào.
Đây là github của bài demo lần này, các bạn có thể tham khảo thêm: https://github.com/baby092111/nginx-test