Hướng dẫn cơ bản sử dụng NPM như một Build tool (part 2)
Tiếp tục bài viết trước, trong bài viết lần này, chúng ta sẽ cùng tìm hiểu về việc dùng npm làm build tool. 7.Biên dịch typescript với npm Trước hết, cài đặt typescript compiler npm install typescript --save-dev Trong app.ts, nhập mã sau: class Messenger { message(name: string) { ...
Tiếp tục bài viết trước, trong bài viết lần này, chúng ta sẽ cùng tìm hiểu về việc dùng npm làm build tool.
7.Biên dịch typescript với npm
Trước hết, cài đặt typescript compiler
npm install typescript --save-dev
Trong app.ts, nhập mã sau:
class Messenger {
 message(name: string) {
  return "Hello from the Messenger class, " + name;
 }
}
export = Messenger;
Thêm script "compile:ts" trong package.json
"test": "mocha test -u bdd -R spec",
"pretest": "npm run lint",
"posttest": "echo 'the test has been run!'",
"start": "node server.js",
"start:dev": "node server.js 4000",
"lint": "jshint *.js **/*.js",
"compile:ts": "tsc --outDir ./lib --module commonjs ./src/typescript/app.ts"
tsc command typescript -outDir ./lib : đường dẫn đến thư mục chứa output file -module commonjs : cho biết module target. Với node.js, chúng ta dùng module commonjs ./src/typescript/app.ts : input chứa file cần compile
Chạy command
npm run compile:ts
code typescript được compile và output lưu tại thư mục lib với tên file "app.js"
8. Làm sạch thư mục output trước khi compile code
Đầu tiên, ta cần cài rimraf (thư viện phục vụ cho việc xóa file và thư mục)
npm install rimraf --save-dev
Tiếp đó bổ sung những script cần thiết trong package.json như sau
"test": "mocha test -u bdd -R spec",
"pretest": "npm run lint",
"posttest": "echo 'the test has been run!'",
"start": "node server.js",
"start:dev": "node server.js 4000",
"lint": "jshint *.js **/*.js",
"precompile": "npm run clean",
"clean": "rimraf lib/*",
"compile": "npm run compile:ts",
"compile:ts": "tsc --outDir ./lib --module commonjs ./src/typescript/app.ts"
Bây giờ, ta chạy command
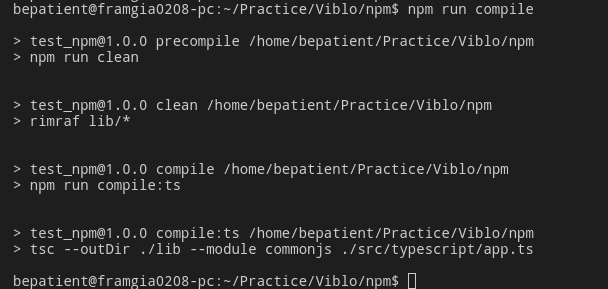
npm run compile
Kết quả sẽ như sau
 Theo đó, thư mục lib sẽ được clean trước khi source code được compile.
**Tip: để xem những executable script trong project bạn có thể dùng lệnh
ls node_mobudels/.bin

9. Compile LESS sang CSS dùng npm
Đầu tiên, install less
npm install less --save-dev
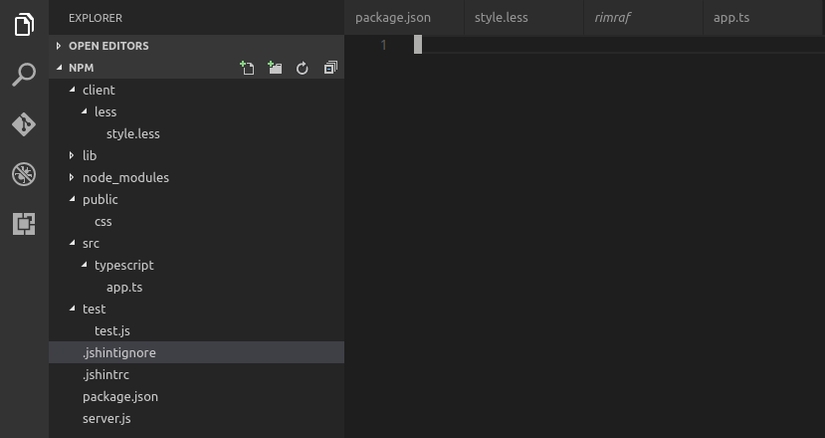
Tiếp theo, tạo thư mục client/less với file style.less. Tạo thư mục public/css.
Cấu trúc thư mục tại thời điểm này sẽ như sau
 Thêm script "build:less" vào package.json
"build:less": "lessc client/less/style.less public/css/style.css"
Chạy lệnh
npm run build:less
Bạn sẽ thấy file style.css trong thư mục pulbic/css.
10. Bundling với Browserify và npm
Install browerify
npm install -g browserify
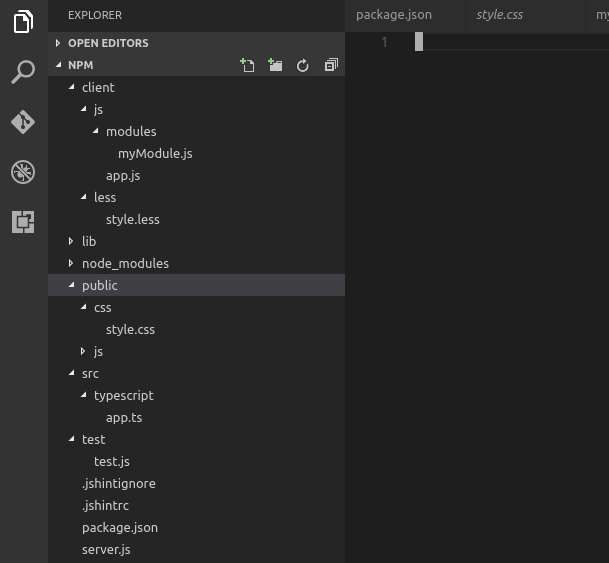
Tạo file và thư mục sau
client/js/app.js
client/js/modules/MyModule.js
public/js
Cấu trúc thư mục sẽ như sau

Trong file app.js, nhập đoạn mã sau
var module = require('./modules/myModule');
console.log(module.getGreeting('Nader'));
Trong myModule.js, nhập đoạn mã sau
module.exports = {
 getGreeting: function(name) {
  return "Hello, " + name
 }
}
Thêm script "build:browerify" để bundle app.js sử dụng browserify
"build:browserify": "browserify ./client/js/app.js -o ./public/js/bundle.js"
browserify : command browserify ./client/js/app.js : file cần bundle -o ./public/js/bundle.js : output của file đã được bundle
Chạy command sau:
npm run build:browserify
11. Minifying code
Cài đặt uglifyjs
npm install uglifyjs --save-dev
Tiếp theo sửa "build:browserify" thành "build:bundle" và chứa đoạn sau
browserify ./client/js/app.js | uglifyjs -mc > ./public/js/bundle.js
| : nhận lấy output của command bên trái và dùng làm argument cho command bên phải uglify -mc : dùng uglifyjs để minify và compress > ./public/js/bundle.js : chuyển output đến ./public/js/bundle.js
Chạy command
npm run build
Với command trên, prebuild chạy command để clean thư mục "public", tiếp đó "build" sẽ chạy command "build:less" và "build:bundle"
12. Update sự thay đổi file bằng watchify
Cài đặt watchify
npm install watchify --save-dev
Thêm script "watch:bundle" vào package.json
"build": "npm run build:less && npm run build:bundle",
"watch:bundle": "watchify ./client/js/app.js -o ./public/js/bundle.js -v"
watchify : track những thay đổi của file được gán cho nó và chạy lại compiler khi có thay đổi -v : hiển thị log trên terminal
Chạy command
npm run watch:bundle
Output:

13. Kết luận
Như vậy chỉ cần với npm chúng ta đã có thể tự cài đặt một build tool đầy đủ cho quá trình phát triển web.
Tham khảo Introduction to Using NPM as a Build Tool https://medium.com/@dabit3/introduction-to-using-npm-as-a-build-tool-b41076f488b0#.uh41wzdui
