Introduction to the Google street view on Android
Google Street View is attached in Google Maps & Google Earth which is a technology to provide the panoramic 360-degree view from a defined position throughout its coverage area along many streets in the world. It was launched in 2007 in few cities in the United States at first and ...

Google Street View is attached in Google Maps & Google Earth which is a technology to provide the panoramic 360-degree view from a defined position throughout its coverage area along many streets in the world. It was launched in 2007 in few cities in the United States at first and started to be continued worldwide. To build up the street view, most of the photography is done by car, but some is done by trekker, tricycle, walking, boat, snowmobile, and underwater apparatus. You can explore the panoramic views in different places within 360-degree angles such as lava cave, oceans, mountain as well as the whole world where the street views are featured. It's a thrill when you can explore by moving back & forward as you are walking in the NY Times Square or rotate on any historical place in Greece!
Nowadays, there are many tech-applications are building based on the street view & this article is going to introduce on how to code to get the Google street view on the Android devices. The coverage of the street view is available through the Google Maps Android API v2 is the same as that for the Google Maps app on Android.
The Google Maps Android API provides a Street View service for obtaining and manipulating the imagery used in Google Street View where the images are returned as panoramas. Each Street View panorama is an image, or set of images, that provides a full 360-degree view from a single location (point). The output of each panorama is a projection on a sphere with the image wrapped to the 2D surface which contains 360 degrees of horizontal view & 180 degrees of vertical view. You will see a class namely StreetViewPanorama provides a viewer that renders the panorama as a sphere with a camera at its center.
Now, let's begin the sample code to show the street view in Android project.
Step 1 = Add the gms play-services in the application's gradle.
Add the latest gms play-services dependency in the gradle file as following:
dependencies {
    compile 'com.google.android.gms:play-services:11.0.2'
}
P/S: You don't need to add any extra user-permission into Manifest for only previewing the street-view if you are using the latest gms play-services as above.
Step 2 = Add the Google map api key into Manifest.
Since, we are going to work with Google map to show the street view, so we need to setup the api into the Google console to get a Google Maps API key. You may get started from the official documentation. After getting the api key, you will need to add it as meta-data into the AndroidManifest as following:
<?xml version="1.0" encoding="utf-8"?>
<manifest ...>

    <application
        ...
        <activity ...> </activity>

        <meta-data
            android:name="com.google.android.geo.API_KEY"
            android:value="..Your value goes here.." />
    </application>

</manifest>
Step 3 = Add the StreetViewPanoramaFragment in the layout file.
You can show street view as Fragment in the Activity's layout file. According to the latest update, you can use the com.google.android.gms.maps.StreetViewPanoramaFragment class to show the street view. Here is an example given below:
<?xml version="1.0" encoding="utf-8"?>
<FrameLayout
    xmlns:android="http://schemas.android.com/apk/res/android"
    android:layout_awidth="match_parent"
    android:layout_height="match_parent">

    <fragment
        android:id="@+id/streetviewpanorama"
        class="com.google.android.gms.maps.SupportStreetViewPanoramaFragment"
        android:layout_awidth="match_parent"
        android:layout_height="match_parent"/>
</FrameLayout>
Step 4 = Use the SupportStreetViewPanoramaFragment in your Activity.
So far, we already have the necessary basic setup to preview a sample street view in the project. Now, it's time to code some Java in the Activity file. Basically, you have to implement the OnStreetViewPanoramaReadyCallback interface to use the onStreetViewPanoramaReady(StreetViewPanorama) callback method to get a handle to the StreetViewPanorama object. Then, you have to call getStreetViewPanoramaAsync() on the fragment to register the callback. There is a basic example given below on how it's actually works.
package com.licon.googlemapstreetview;

import android.os.Bundle;
import android.support.v7.app.AppCompatActivity;

import com.google.android.gms.maps.OnStreetViewPanoramaReadyCallback;
import com.google.android.gms.maps.StreetViewPanorama;
import com.google.android.gms.maps.SupportStreetViewPanoramaFragment;
import com.google.android.gms.maps.model.LatLng;

public class MainActivity extends AppCompatActivity implements
    OnStreetViewPanoramaReadyCallback {  // PanoramaReadyCallback to use StreetViewPanorama.
    private static final LatLng NY_TIME_SQUARE = new LatLng(40.758952, -73.985174); // sample input.
    private StreetViewPanorama mStreetViewPanorama; // the object that handle panorama preview.

    @Override
    protected void onCreate(Bundle savedInstanceState) {
        super.onCreate(savedInstanceState);
        setContentView(R.layout.activity_main);
        SupportStreetViewPanoramaFragment panoramaFragment =
            (SupportStreetViewPanoramaFragment) getSupportFragmentManager()
                .findFragmentById(R.id.streetviewpanorama);
        panoramaFragment.getStreetViewPanoramaAsync(this); // call this to use the fragment.
    }

    /**
     * after panorama get ready, you can declare the position.
     */
    @Override
    public void onStreetViewPanoramaReady(StreetViewPanorama streetViewPanorama) {
        mStreetViewPanorama = streetViewPanorama;
        mStreetViewPanorama.setPosition(NY_TIME_SQUARE); // where the street view will be shown.
        /** you can control the inputs into street view */
        mStreetViewPanorama.setUserNavigationEnabled(true);
        mStreetViewPanorama.setPanningGesturesEnabled(true);
        mStreetViewPanorama.setZoomGesturesEnabled(true);
    }
}
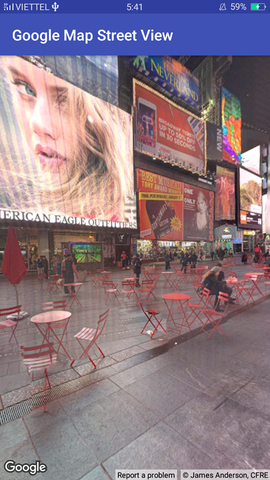
The output will be like the given screen-shot below:

You may look at the sample project where the above code are pushed. Happy coding!
