Phát triển game với Pygame – Part 2: Sprite
Phát triển game với Pygame - Part 1: Map Phát triển game với Pygame – Part 2: Sprite Phát triển game với Pygame – Part 3: Va chạm và chuyển động Phát triển game với Pygame – Part 4: Sử dụng nâng cao map Tiếp tục với phần 1 của series phát triển game với pygame, ở phần này, ta sẽ tiến hành ...
- Phát triển game với Pygame - Part 1: Map
- Phát triển game với Pygame – Part 2: Sprite
- Phát triển game với Pygame – Part 3: Va chạm và chuyển động
- Phát triển game với Pygame – Part 4: Sử dụng nâng cao map
Tiếp tục với phần 1 của series phát triển game với pygame, ở phần này, ta sẽ tiến hành code nhân vật mario. Việc trước tiên, ta sẽ tiến hành chỉnh sửa lại code của chương trình lần trước thành class MarioGame: gồm các function chính:
- init: đảm nhận việc load các sprite và map
- run: vòng lặp chính của game
- draw: function được gọi trong function run của game, đảm nhiệm việc vẽ lại các nhân vật và map trong game
- update: function được gọi trong function run của game, đảm nhiệm việc cập nhật trạng thái các nhân vật trong game qua từng khung hình
- handle: function xử lý các sự kiện của game
import sys
import pygame
import tmx

if not pygame.font: print 'Warning, fonts disabled'
if not pygame.mixer: print 'Warning, sound disabled'

class MarioGame():

    awidth = 640
    height = 480

    def __init__(self):
        self.pygame = pygame

    def init(self):
        self.pygame.init()
        self.size = (self.awidth, self.height)
        self.screen = pygame.display.set_mode(self.size)
        self.clock = self.pygame.time.Clock()
        self.time_step = 0
        # TODO: init sprite, tile,...
        self.tilemap = tmx.load("map.tmx", self.screen.get_size())

    def run(self):
        # main game loop
        while True:
            # hold frame rate at 60 fps
            dt = self.clock.tick(60)
            self.time_step += 1
            # enumerate event
            for event in pygame.event.get():
                if event.type == pygame.QUIT:
                    sys.exit(0)
                # sprite handle event
                self.handle(event)

            self.update(dt / 1000.)
            # re-draw screen
            self.draw(self.screen)

    def draw(self, screen):
        screen.fill((95, 183, 229)) # sky color
        if pygame.font:
            font = pygame.font.Font(None, 36)
            text = font.render("Hello World !", 1, (255, 0, 0))
            textpos = text.get_rect(centerx=self.awidth/2)
            self.screen.blit(text, textpos)
        # TODO: sprite tilemap
        self.tilemap.set_focus(0, 480)
        self.tilemap.draw(screen)
        self.pygame.display.flip()

    def update(self, dt):
        #self.mariosprite.update()
        pass

    def handle(self, event):
        #self.my_mario.handle(event)
        pass

if __name__ == '__main__':
    g = MarioGame()
    g.init()
    g.run()
Giờ là đến nhân vật Mario của chúng ta. Ta sử dụng frame hình của Mario là file small_mario.png dưới đây

Nếu ta đánh số các frame từ trái sang phải thì frame 0 ứng với Mario đang đứng, frame 0-1 là đang chạy, và frame 3 đang nhảy. Ta sẽ thay đổi thuộc tính image của Mario tương ứng với từng frame và trạng thái. Class Mario sẽ được extend từ class pygame.sprite.Sprite như dưới đây:
import os
import math
import pygame

import config

class Mario(pygame.sprite.Sprite):

    FRAME_WIDTH = 20
    FRAME_HEIGHT = 19
    PADDING = 1
    img_file = "small_mario.png"
    STAND = 0
    RUNNING = [0, 1]
    JUMP = 3
    index = STAND
    loaded_sprites = {}
    ANIMATION_INTERVAL = 5

    def __init__(self):
        super(Mario, self).__init__()
        img_path = os.path.join(config.image_path, self.img_file)
        self.sprite_imgs = pygame.image.load(img_path)
        self.image = self.set_sprite(self.index)
        self.rect = self.image.get_rect()
        self.pos = self.rect
        self.v_state = "resting"
        self.h_state = "standing"
        self.facing = "right"

    def set_position(self, x, y):
        self.rect.x = x
        self.rect.y = y

    def draw(self, screen):
        screen.blit(self.image, self.pos)

    def update(self, dt, game):
        new = self.rect
        game.tilemap.set_focus(new.x, new.y)

        # change sprite
        if game.time_step % self.ANIMATION_INTERVAL == 0:
            if self.v_state == "jumping":
                self.image = self.set_sprite(self.JUMP)
            else:
                if self.h_state == "running":
                    self.index = (self.index + 1) % len(self.RUNNING)
                    self.image = self.set_sprite(self.index)
                elif self.h_state == "standing":
                    self.image = self.set_sprite(self.STAND)

            if self.facing == "left":
                self.image = pygame.transform.flip(self.image, True, False)

    def set_sprite(self, index):
        if index not in self.loaded_sprites.keys():
            left = (self.FRAME_WIDTH + self.PADDING) * index
            rect = pygame.Rect(left, 0, self.FRAME_WIDTH, self.FRAME_HEIGHT)
            _surface = pygame.Surface((self.FRAME_WIDTH, self.FRAME_HEIGHT), pygame.SRCALPHA)
            _surface.blit(self.sprite_imgs, (0, 0), rect)
            self.loaded_sprites[index] = _surface

        return self.loaded_sprites[index]
Hãy cùng xem qua class Mario. Ta thiết lập một số biến lưu giữ thông tin của Mario.
- img_file : file ảnh chứa toàn bộ các sprite của mario
- Các biến STAND, RUNNING, JUMP là các index của các frame trong file ảnh
- ANIMATION_INTERVAL số lần cập nhật các ảnh (tốc độ nhanh chậm) và một số biến trạng thái của mario.
Có hai biến quan trọng được khởi tạo trong hàm __init__ :
- self.image : chứa hình ảnh hiện tại
- self.rect : vị trí và kích thước hiện tại, dựa vào biến này ta sẽ vẽ lại ảnh của mario ở vị trí mà ta muốn.
Function update sẽ cập nhật ảnh hiện tại của mario tùy vào trạng thái. Function draw sẽ vẽ mario tại vị trí ta muốn.
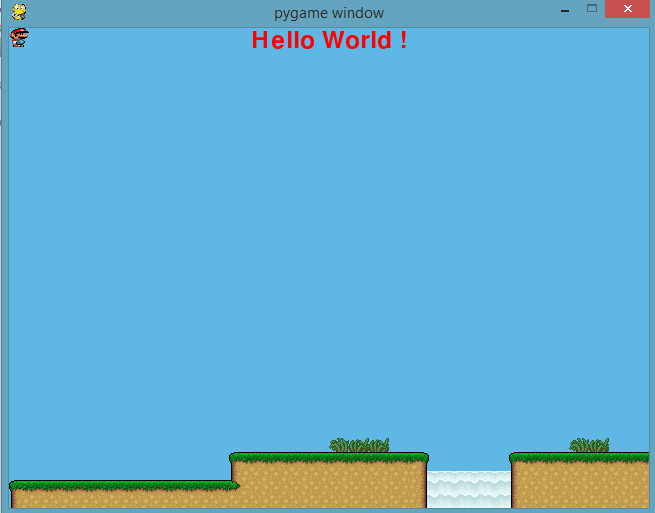
Chạy thử ta có kết quả:

Phần tiếp theo: Phát triển game với Pygame – Part 3: Va chạm và chuyển động
