RxSwift với MVVM (Phần 1)
MVVM (Model- View - View Model) được sáng tạo bởi hai kỹ sư của Microsoft là Ken Cooper và Ted Peters với mục đích làm đơn giản việc lập trình sự kiện của giao diện người dùng dựa trên các tính năng đặc biệt của WPF và Silverlight. View : Tương tự như trong mô hình MVC, View là phần giao diện ...
MVVM (Model- View - View Model) được sáng tạo bởi hai kỹ sư của Microsoft là Ken Cooper và Ted Peters với mục đích làm đơn giản việc lập trình sự kiện của giao diện người dùng dựa trên các tính năng đặc biệt của WPF và Silverlight.
View: Tương tự như trong mô hình MVC, View là phần giao diện của ứng dụng để hiển thị dữ liệu và nhận tương tác của người dùng. Một điểm khác biệt so với các ứng dụng truyền thống là View trong mô hình này tích cực hơn. Nó có khả năng thực hiện các hành vi và phản hồi lại người dùng thông qua tính năng binding, command.
Model: Cũng tương tự như trong mô hình MVC. Model là các đối tượng giúp truy xuất và thao tác trên dữ liệu thực sự.
View Model: Lớp trung gian giữa View và Model. ViewModel có thể được xem là thành phần thay thế cho Controller trong mô hình MVC. Nó chứa các mã lệnh cần thiết để thực hiện data binding, command.

Các ưu điểm của MVVM:
-
Tăng tính lỏng của code (Loosely Coupled):
- View biết về View Model nhưng View Model không biết về View
- Có thể dễ dàng thay thế View mà không ảnh hưởng tới View Model
-
Code có thể dễ dàng viết Unit Tests
-
Code dễ dàng bảo trì
Binding
Trong mô hình MVVM, View và Model không ràng buộc chặt với nhau mà được "bind" với nhau, nghĩa là thay đổi ở Model sẽ được cập nhật ở View và ngược lại.
Do iOS không hỗ trợ binding nên chúng ta phải chọn một trong các phương án sau:
- Dùng một trong các thư viện binding dựa trên KVO như RZDataBinding hay SwiftBond
- Sử dụng các FRF (functional reactive programming) framework như ReactiveCocoa, RxSwift hay PromiseKit
Trong khuôn khổ bài viết này, chúng ta sẽ sử dụng RxSwift.
RxSwift: ReactiveX for Swift
RxSwift là 1 phần của ReactiveX (thường gọi là “Rx”) được sử dụng ở rất nhiều ngôn ngữ và platform khác nhau. RxSwift là framework sử dụng cho ngôn ngữ Swift theo kỹ thuật reactive.
Các bạn có thể tham khảo thông tin về RxSwift qua 1 số bài viết trên Viblo:
Giới thiệu về thư viện RXSwift RxSwift các khái niệm cơ bản P.1
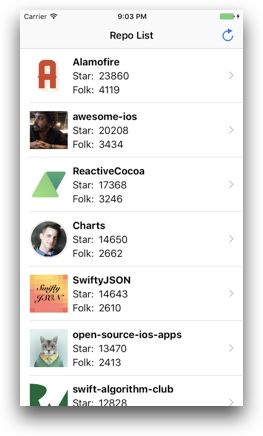
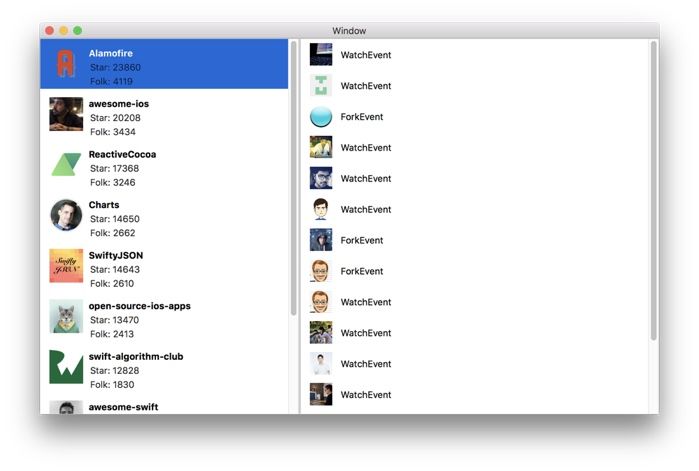
Chúng ta sẽ tạo demo 1 ứng dụng cho phép lấy danh sách các repository từ github và hiển thị danh sách event tương ứng với từng repository. Trong dự án sẽ có 3 target tương ứng với MVC, MVVM và macOS. Trong đó MVVM của iOS và macOS sẽ dùng chung Model và ViewModel, chỉ khác về View.


3.1. Tạo project:
Tạo project MGMVVMRxSwiftDemo, có kiểu là Single View Application, ngôn ngữ Swift.
3.2. Model:
Căn cứ vào yêu cầu của bài toán, chúng ta cần 2 model là Repo và Event, việc map với json trả về từ server sẽ được thực hiện thông qua ObjectMapper.
struct Repo: Mappable {
    var id = 0
    var name: String?
    var fullname: String?
    var urlString: String?
    var starCount = 0
    var folkCount = 0
    var avatarURLString: String?

    init() {

    }

    init(name: String) {
        self.name = name
    }

    init?(map: Map) {

    }

    mutating func mapping(map: Map) {
        id <- map["id"]
        name <- map["name"]
        fullname <- map["full_name"]
        urlString <- map["html_url"]
        starCount <- map["stargazers_count"]
        folkCount <- map["forks"]
        avatarURLString <- map["owner.avatar_url"]
    }
}
struct Event: Mappable {
    var id: String?
    var type: String?
    var avatarURLString: String?

    init?(map: Map) {

    }

    mutating func mapping(map: Map) {
        id <- map["id"]
        type <- map["type"]
        avatarURLString <- map["actor.avatar_url"]
    }
}
3.3. Service:
Việc lấy danh sách repo và event từ server sẽ được thực hiện thông qua RepoService, chúng ta sẽ gửi request lên qua 2 url:
struct URLs {
    static let repoList = "https://api.github.com/search/repositories?q=language:swift&per_page=10"
    static let eventList = "https://api.github.com/repos/%@/events?per_page=15"
}
protocol RepoServiceProtocol {
    func repoList(input: RepoListInput) -> Observable<RepoListOutput>
    func eventList(input: EventListInput) -> Observable<EventListOutput>
}

class RepoService: APIService, RepoServiceProtocol {
    func repoList(input: RepoListInput) -> Observable<RepoListOutput> {
        return self.request(input)
            .observeOn(MainScheduler.instance)
            .shareReplay(1)
    }

    func eventList(input: EventListInput) -> Observable<EventListOutput> {
        return self.requestArray(input)
            .observeOn(MainScheduler.instance)
            .map { events -> EventListOutput in
                return EventListOutput(events: events)
            }
            .shareReplay(1)
    }
}
Trong đó APIService là 1 base class cung cấp hàm generic request để xử lý chung các request tới server, gồm có request trả về 1 object và trả về 1 mảng object. Dữ liệu trả về sẽ được map tự động qua ObjectMapper.
class APIService {

    private func _request(_ input: APIInputBase) -> Observable<Any> {
        let manager = Alamofire.SessionManager.default

        return manager.rx
            .request(input.requestType,
                     input.urlString,
                     parameters: input.parameters,
                     encoding: input.encoding,
                     headers: input.headers)
            .flatMap { dataRequest -> Observable<DataResponse<Any>> in
                dataRequest
                    .rx.responseJSON()
            }
            .map { (dataResponse) -> Any in
                return try self.process(dataResponse)
            }
    }

    private func process(_ response: DataResponse<Any>) throws -> Any {
        ...
    }

    func request<T: Mappable>(_ input: APIInputBase) -> Observable<T> {
        return _request(input)
            .map { data -> T in
                if let json = data as? [String:Any],
                    let item = T(JSON: json) {
                    return item
                } else {
                    throw APIError.invalidResponseData(data: data)
                }
            }
    }

    func requestArray<T: Mappable>(_ input: APIInputBase) -> Observable<[T]> {
        return _request(input)
            .map { data -> [T] in
                if let jsonArray = data as? [[String:Any]] {
                    return Mapper<T>().mapArray(JSONArray: jsonArray)
                } else {
                    throw APIError.invalidResponseData(data: data)
                }
        }
    }
}
3.4. ViewModel:
RepoListViewModel - ViewModel tương ứng với việc hiển thị danh sách các repo. View model này có 2 output (2 state) là repoList và isLoadingData.
Có 1 action là loadDataAction, thực hiện nhiệm vụ lấy danh sách repo, dữ liệu trả về sẽ được cập nhật vào repoList, trạng thái
Thông qua constructor injection, chúng ta sẽ inject 1 instance của RepoService. Việc sử dụng protocol RepoServiceProtocol thay cho 1 class cụ thể RepoService sẽ giúp RepoListViewModel không bị phụ thuộc vào RepoService. Khi test chúng ta có thể dễ dàng thay thế bằng 1 class mock các tính năng của RepoService.
class RepoListViewModel {

    let repoService: RepoServiceProtocol
    let bag = DisposeBag()

    // MARK: - Input

    // MARK: - Output
    private(set) var repoList: Variable<[Repo]>
    private(set) var isLoadingData = Variable(false)

    private(set) var loadDataAction: Action<String, [Repo]>!

    init(repoService: RepoServiceProtocol) {
        self.repoService = repoService

        self.repoList = Variable<[Repo]>([])

        bindOutput()
    }

    private func bindOutput() {
        loadDataAction = Action { [weak self] sender in
            print(sender)
            self?.isLoadingData.value = true
            guard let this = self else { return Observable.never() }
            return this.repoService.repoList(input: RepoListInput())
                .map({ (output) -> [Repo] in
                    return output.repositories ?? []
                })
        }

        loadDataAction
            .elements
            .subscribe(onNext: { [weak self] (repoList) in
                self?.repoList.value = repoList
                self?.isLoadingData.value = false
            })
            .disposed(by: bag)

        loadDataAction
            .errors
            .subscribe(onError: { [weak self](error) in
                self?.isLoadingData.value = false
                print(error)
            })
            .disposed(by: bag)
    }
}
EventListViewModel - ViewModel tương ứng với việc hiển thị danh sách các event của repo. ViewModel này có input là repo và output là eventList. Chúng ta cũng inject RepoService thông qua constructor injection.
class EventListViewModel {
    let repoService: RepoServiceProtocol
    let bag = DisposeBag()

    // MARK: - Input
    private(set) var repo: Variable<Repo>

    // MARK: - Output
    private(set) var eventList: Variable<[Event]>

    init(repoService: RepoServiceProtocol, repo: Variable<Repo>) {
        self.repoService = repoService
        self.repo = repo

        self.eventList = Variable<[Event]>([])

        bindOutput()
    }

    private func bindOutput() {
        repo
            .asObservable()
            .filter { $0.fullname != nil && !$0.fullname!.isEmpty }
            .map { $0.fullname! }
            .flatMap({ repoFullName -> Observable<EventListOutput> in
                return self.repoService.eventList(input: EventListInput(repoFullName: repoFullName))
            })
            .subscribe(onNext: { [weak self] (output) in
                self?.eventList.value = output.events
            }, onError: { (error) in
                print(error)
            })
            .disposed(by: bag)
    }
}
(Hết phần 1) Link dự án demo Github
